Bee Waterer DIY Craft
This bee craft project makes a small bee waterer to decorate your bee garden and provide a drink for thirsty insects. You only need 3 types of materials. A great opportunity to teach kids about bees.
This post may contain affiliate links. As an Amazon Associate, I earn from qualifying purchases.
Read my Disclosure.Tools
- Parchment Paper (optional)
Supplies
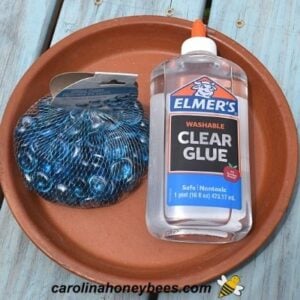
- 1 piece 8" - 12" clay saucer (plastic is okay)
- 1 bottle Clear Glue
- 1 bag Assorted Glass Pebbles
Instructions
- Choose a Clay Dish: Obviously, the larger the dish the better from a standpoint of it holding more water. However, if you are working with folks with small hands… a large dish may be overwhelming and will require more stones too!It should be clean of any dust or dirt. For extra longevity, you could spray it with acrylic sealer to make it more water proof – but that is optional.Parchment paper or similar can be used to protect your working space.

- Add Glue: A quick word about glue. Clear glue is generally the best because you don’t have to worry about any of it showing.However, if you use Elmers Washable Glue (again a good choice for working with children) – you must let it dry a day or more before adding water. Otherwise your stones will release. Dribble some glue in the bottom of the dish. Don’t put too much. You only need the glue to hold the stones in place.

- Add stones - glass or rock: Place your glass stones ( or real ones) in the dish. Arrange them in any design. You may only need one layer. They do not have to be touching, just close enough together to prevent bees from drowning.We want some of the stones to stick up out of the water when finished. This gives the bees a place to stand and drink. Honeybees drown very easily. Stack your stone 2 deep if needed.

- Let glue dry and cure: If you are using washable glue, it can take 2-3 days to dry and cure. The time frame depends on the humidity where you live too.Once the glue is completely dry – your bee waterer dish is ready to use. Add some water and place it in your garden. (If you want to be extra cautious, add a couple of small floating sticks etc, to offer the bees even more drinking locations.)

Notes
If you use small stones, make a double stack ring around the edge to give bees a safe landing spot.
I use washable glue when working with kids but it takes a long time to dry. For older kids and adults, consider a stronger clear glue.
Learn more about bees and using products from the hive!Join me on Pinterest - @carolinahoneyb