Citronella Beeswax Candles Tutorial
These cute clay pots are perfect for making your own citronella candles for your next outdoor event. Leave them plain or decorate to match your decor.
This post may contain affiliate links. As an Amazon Associate, I earn from qualifying purchases.
Read my Disclosure.Tools
- scissors
Supplies
- 3 units 2 1/2" diameter clay pots
- 19 ounces beeswax
- 1 ounce citronella oil
- 20 inches cotton candle wick 2/0
- 1 teaspoon air dry clay (optional)
- 3 pieces clothespins (optional)
Instructions
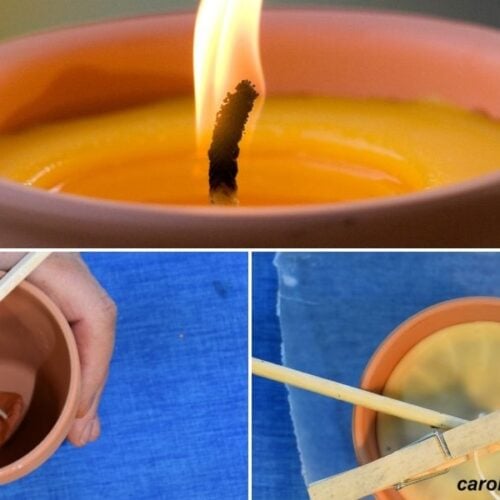
- Choose several small clay pots. Simple craft clay pots are inexpensive and great for many projects. These are 2 1/2″ in diameter. Sometimes you can find them a local dollar store.

- Seal the drainage hole in the pot with some type of clay or glue. For this project, I used air dry clay.

- Measure and cut a 6 1/2″ piece of 2/0 cotton candle wicking. Attach a small amount of air dry clay to the bottom of the wick.Use your fingers to reach down into the small pot and adhere the wick in place. (You can use tape or anything that will seal the hole).

- Secure top of candle wick. Use a clothespin and skewer to secure the top of the wick. Be gentle-do not pull too hard or your wick will release from the bottom.Your goal is to center the wick inside the pot. It does not have to be pulled tightly.

- Place your beeswax in a double boiler for safe melting. I like using a neat little double boiler insert and a regular pot for the water in the bottom.

- Adding the citronella oil. Once the beeswax is completely melted, remove the pot from the heat. Measure your citronella oil and pour into the beeswax. Stir well.

- Carefully pour a small amount of beeswax into each clay candle pot. An inch or two of depth is fine.Let this sit for a couple of minutes – then continue to fill the pot to the desired level.This helps set the wick - but you can use a hot glue gun to attach the wick to the bottom of the jar or pot if you wish.

- Cooling. Leave your beeswax citronella candle stationary for a couple of hours. Do not move it – allow the wax to cool and set.

- To ensure good burning, once the wax is completely cool – trim the candle wick to 1/4″.

Notes
** Always be careful when using candles with open flames to prevent fire or wax burns.
**These candles should only be used outdoors in a well-ventilated environment - porches, patios etc.
Learn more about bees and using products from the hive!Join me on Pinterest - @carolinahoneyb