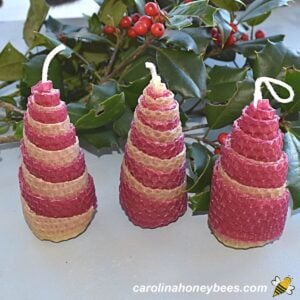
DIY Christmas Tree Candles /Ornament Tutorial
Use colorful rolled sheets of beeswax to create stunning Christmas tree candles. Use them as candle or small ornaments to hang on the tree.
This post may contain affiliate links. As an Amazon Associate, I earn from qualifying purchases.
Read my Disclosure.Tools
- scissors
- heat gun (or hairdryer)
- ruler
Supplies
- 1 piece beeswax craft sheet white or natural
- 1 piece beeswax craft sheet (colored) red or green
- 1 piece cotton candle wick 2/0 18"
Instructions
- Place the 2 sheets of beeswax on a table or sturdy surface. (You are going to cut the wax sheet so be sure to protect your table or surface counter).Lay the wax sheets – one atop the other – it does not matter which color is on top. I was using regular 1 sheet of regular foundation that was slightly larger – so I trimmed off the excess.

- With the sheets of beeswax laying in front of you (long side going left to right), measure 4 ¼” from end to end.Your goal is to cut the sheets in half lengthwise and end up with a long rectangle. Make the cut.You now have 4 pieces of beeswax – 2 of each color. Lay 2 of them aside for later – we only need 2 (1 or each color) to create our candle.

- Place the 2 sheets of wax on the table – again with the long side of the rectangle running left to right. Align the sheets so that they are stacked on top of each other. Using your ruler, measure up ½ inch from the bottom of the rectangle on your left side – and ½” down from the top right corner.This line will create a diagonal line that you will cut along and create 4 triangles (2 of each color).

- Cut the wick for your beeswax Christmas tree candle – about 6” – you can always trim it later if you plan to burn it. You need 1 piece of wick for each candle you plan to make – and 2 of the beeswax triangles.

- Place one of the triangles on the table. The 3 ½” side is closest to you with the taper pointing away.Lay the other color of wax on top of the first sheet. Adjust the 2nd color of wax so that the longest edge is about ¼” up from the edge of the bottom sheet. The right angle of the triangle will be on your left side.

- Put the wick along the short end of the triangle – left to right. On the right angle corner (this will be the bottom of the candle) the wick should be flush. The remainder of the wick can hang out the top.

- Gently warm the wax with your hair dryer on a low setting for a few seconds – to not overheat the wax.Take a ruler and use it to evenly fold up a small section of wax to enclose the wick. With your fingers – firmly enclose the wick in wax material.

- Using 2 hands, firmly roll up the candle. Try to keep the bottom edges aligned properly with the same amount of overlay.Once the sheet is completely rolled up – hold the candle in your hands and let your body heat seal the edges.

Notes
*Work with warm wax. The pliability of beeswax sheets is temperature dependent – warm wax is easier to work with. However, like all beeswax, the sheets will melt – do not overheat.
If you want to give your Christmas trees as ornaments, just create a loop in the wick at the top, before rolling up with wax.
** Do not light these on the tree!!! Yes we are calling them candles but do not burn light candles of any kind around combustible materials.
Learn more about bees and using products from the hive!Join me on Pinterest - @carolinahoneyb