How to Assemble a Beehive Box
Learning how to properly assemble your Langstroth boxes is a great way to ensure quality work. It is a very rewarding experience and can be a cost-effective part of beekeeping. A well-assembled box will hold frames securely and stack neatly with other hive components. In this tutorial, you’ll learn how to assemble your beehive boxes with precision using glue and nails.

In our era of mass production, it is not uncommon to find parts for beehives that are not cut properly – or are assembled in bulk in haste. If you do it yourself, there is no one else to blame if it fails – or is out of square.
DIY Langstroth Hive Box Assembly
Langstroth hives are the standard in modern beekeeping. They are designed to hold removable frames and stack securely – giving the colony more space as needed.
Whether you are using deep, medium or shallow boxes, assembling them yourself ensures good quality control. You only need a few basic tools to get the job done.

Materials and Tools Needed
Every beekeeper has their own way of putting equipment together. The exact tools you use will depend on what you already have on hand. This is my material list:
- Unassembled wood hive parts
- Nails (7D 2 1/4″)
- Wood glue
- Hammer (or nail gun)
- Carpenter’s square
Preparing the Box Parts
If you order an unassembled super (deep, medium or shallow) from a major supplier, it may come in a box- unassembled. Otherwise, boxes purchased from a local bee supplier may be four pieces taped together in a bundle.
Before you begin assembly, check each piece for defects or warping. Tight wood knots are okay – warping wood that does not lay flat is not good.
Step by Step Assembly
I like to do a dry fit before making a commitment with nails. Assemble the pieces as you think they should go – like a puzzle (no glue or nails at first). If everything fits okay (or reasonable so)– you are ready to assemble your box.

Step 1: Apply Wood Glue to the Joints
Some beekeepers may use screws when putting hive boxes together. But, the norm is to use both nails and wood glue.
I feel that glue is essential for long-term durability. It helps ensure a tight seal and is insurance again nails becoming loose. We all have our favorite brand of glue – but any good quality wood glue will work well.
Apply a small amount of glue to the inside joints of two pieces (of course we will glue the others together as we go.) I like to start with one corner – this is a short side and a long side.

Step 2: Align and Square the Corners
It is important to ensure that your beehive boxes (regardless of size) are square. This helps ensure that the frames, etc will all fit properly – the beauty of the Langstroth design.
Use a carpenter’s square or right-angle jig to ensure the first corner (and each one after) is square. Sometimes, the manufacturer does such a great job of cutting that the box fits together naturally. But, don’t depend on it – check.

Step 3: Nail or Staple the Box Together
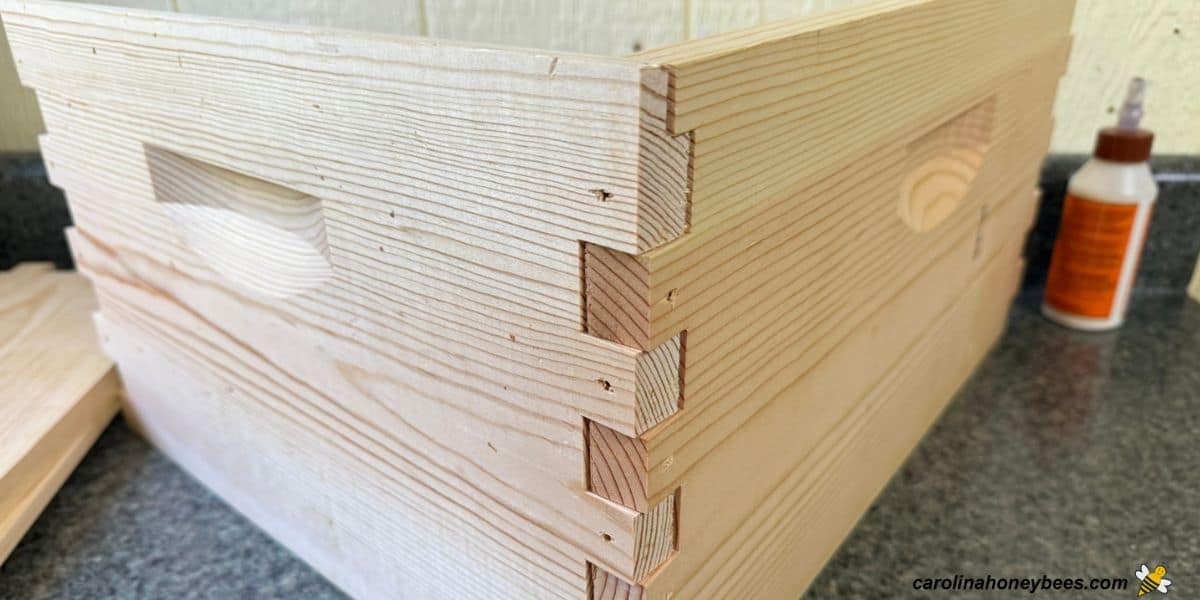
Most unassembled hive boxes come with predrilled nail holes. I love this because it helps prevent splitting of the soft wood.
You may use regular nails (normally 7D – 2 1/4″ nails) or a nail gun. With proper assembly and glue – it doesn’t really matter. I have often used 6D nails with glue and had no problems.
I like to work on one corner of the box at a time. I apply glue – fit two pieces together (1 long and 1 short!!) Make sure your handles on the side are pointing in the same direction!!!!
Check square and make any adjustments – then apply one nail. Then, do each of the other 3 sides with glue and 1 nail each. If everything looks square and tight – complete with the required number of nails.
Step 4: Clean up and Curing
Once all the nails are placed and the box is square, take a wet rag or paper towel and wipe away any glue that has squirted through the seams.
It is best to leave the box on a flat surface and allow it to dry and cure before proceeding.

Optional Tip: While not necessary, I always like to go back and smear some glue on the exposed ends of each corner. Some beekeepers use caulk to make these ends more water-tight. That’s fine – but I just smear on some glue and wipe the excess off.
Once you have completed assembly of your beehive box, consider your options for painting your beehive with latex paint or using a bee friendly stain or wax dip.

Tips for Success and Common Mistakes
We all make mistakes – as beekeepers they sometimes come back to haunt us at the most inappropriate time. Take your time and try to avoid these:
- Failure to use glue – resulting in weak joints
- Assembling the sides with one or more handle upside down
- Improper assembly (you need a rectangle – 2 short ends and 2 long sides)
Finally
Learn how to assemble beehive boxes for your Langstroth hives. It takes a bit of time and care, but the reward is strong, square equipment that performs well in the bee yard. With good materials, proper technique, and a little patience, you can build boxes that will serve your bees—and you—for many seasons to come.
Instead of using a square over and over again, do one box, make sure it is PERFECTLY square, then set it on your workbench and screw down 4 pieces of scrap wood around it and use that form to square up all the rest.
When screwing them together, clamp in both directions and work from the center to the top and bottom ( I use 1-1/4″ ‘outdoor rated’ screws, two cordless drills, one with a # 8 drill-countersink, one with a # 2 Phillips bit [plan on a new bit every 5-600 screws])
Bar clamps are not cheap, but its a one-time investment, two 24’s and two 18’s will get you started.
That’s very good advice for anyone doing regular assembly work!