DIY Beeswax-Dipped Leaves: Easy Fall Craft

Preserving leaves in beeswax is an enchanting way to keep Fall color around for just a bit longer. A traditional craft used to decorate the home. Wax dipped leaves provide a natural, long-lasting, eco-friendly decoration. In this guide, I will show you my set up for dipping leaves in beeswax. With some care and a few safety precautions – anyone can enjoy this fun craft project.

Beekeepers, like me, love to create projects using beeswax. Why not? There are hundreds of ways to use beeswax to make beautiful and practical creations.
Why Preserve Fall Leaves?
Fall leaves with their colorful shades of red, yellow, orange and brown are a signal of approaching Winter. They represent the last gasp of the late season bounty and brings a pop of color to the landscape.
Preserving leaves by dipping them in beeswax allows you to capture their fleeting beauty and enjoy it long after they’ve fallen from the trees.
You create a flexible yet sturdy preservation that helps maintain the leaf’s shape and texture for months or even years. It forms a protective skin across the surface of the leaf – allowing the veins and colors to show through.
They are also protected from becoming dry and crumbly. Also, anything created with beeswax seems to have a magical quality. It just smells so good!
This post may contain affiliate links. Carolina Honeybees earns a tiny commission when you shop from our links. See our privacy policy for terms.
Materials Needed to Wax Dip Leaves
You do not need a lot of supplies – the basic materials are:
- colorful leaves
- beeswax
- dipping pot
Choosing Leaves
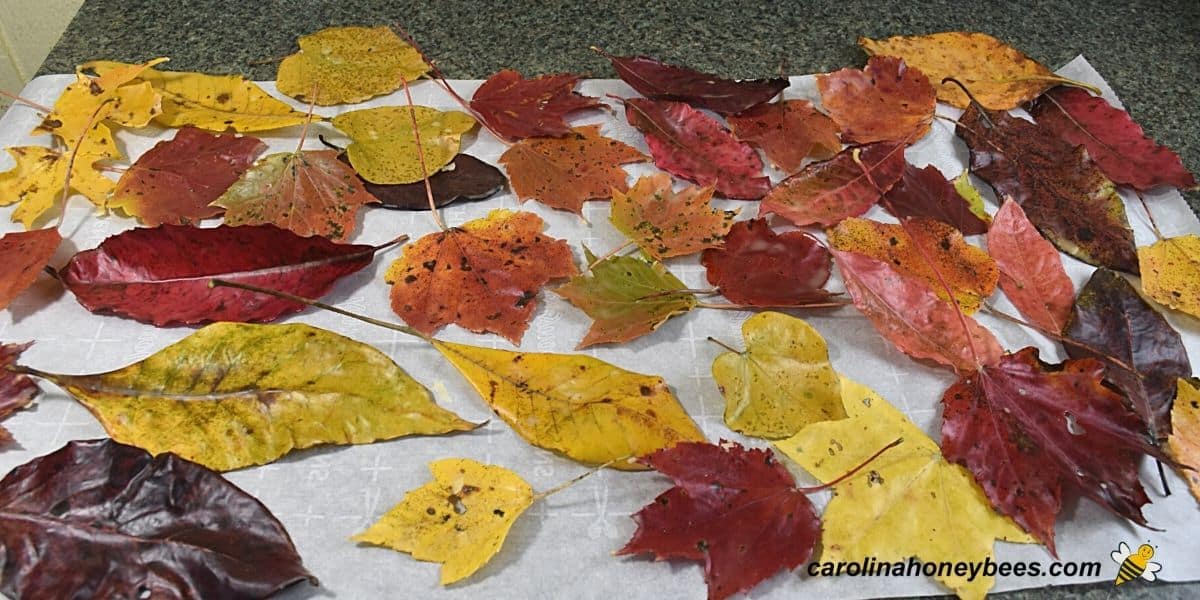
The first step is to choose some colorful Fall leaves. Red, yellow, orange and many vibrant colors will be on display in a diverse forest.
I enjoy the vibrant colors from Sugar Maples – and Red Maples too.(Red Maple trees help feed bees in the Spring – another reason I like them.)
Include a few yellow or greenish-colored leaves for contrast. Vary the type of leaves and shapes to add interest to your display. Large single leaves look nice but choose some with small compound parts.
When selecting leaves for preserving with beeswax, choose ones that are colorful and pliable. You want most of the green color to be gone but the leaves should not be too dry.
It is fun to vary sizes too. But, do keep in mind – that larger leaves will require a larger (or deeper) pot of beeswax!

Beeswax
If you are using raw wax be sure to clean the beeswax first. Wax from a beekeeper has often been run through a solar wax melter once but may need cleaned again using water or filtering through material.
While this step is critical when you are making beeswax candles, it is advised for any craft project.
The colors of beeswax do vary in nature. Bright yellow and shade of gold are common but you will find darker colors too. It is perfectly fine to use darker wax for leaf dipping. It will not make a difference for your finished product.
You will not need a lot of beeswax to dip your leaves. However, the size of the melting pot or vat has an affect on the amount of wax needed to create a pool large enough for the dipping process.

Dipping Pot
To create your dipping pot you will need a container to hold the liquid wax and a heat source. It is best to have a dedicated pot for melting wax. Removing beeswax from surfaces and pots can be done but it is a lot of trouble.
The safest way to melt beeswax is the double-boiler method. This is where you put a smaller pot to hold the wax inside a larger pot with water. This reduces the danger of overheating your wax as the heat is more uniform.
A crock pot can serve as a dipping pot and heat source – but it does take a long time to get hot. I do occasionally use a crockpot to render beeswax for cleaning.
Some crafters use a modified deep fryer pot (you will see in my pictures). The fryer works great but can be very dangerous without continuous supervision. Be safe and use the lowest temperature setting possible.
CAUTION:
If using a fryer, always triple check your temperature setting. We want it just warm enough to melt the wax. Around 160° F seems to do well. Do not rush the process and do not leave it unattended.

How to Dip Leaves in Beeswax
1. Select leaves of the proper size and moisture level. They should be slightly pliable, clean and dry.
2. Safely, melt beeswax just until it reaches the liquid stage. Use your hand to hold the leaf stem, carefully dip the leaf and most of the stem in the hot wax. Take care – hot beeswax burns.
3. Slowly remove leaf from wax and let drip for a few seconds. Then, lay it aside (on wax paper etc.) and let cool for a minute or two.
4. After a brief cooling, pick up the leaf and do one more quick dip in the beeswax. Lay on protected table and allow to cool completely.
After a few hours of drying time, you will have a selection of sturdy, colorful fall leaves to use for decorations.
Expert Tips
Here are some important project tips to keep in mind:
- dipped leaves will look white until the wax cools – they should cool to a clear coating
- don’t over-dip (2-3 time should be enough)
- leaves that crumble easily in your hand are too dry to use
- choose leaves that lay flat naturally for best results
- protect your workspace with newspaper or parchment paper
- consider using a candy thermometer for optimal safety to maintain wax at a safe temperature
Safety Notes When Working with Beeswax
One of the things that makes beeswax so craft friendly is the low melting point. However, caution should be used. Beeswax is flammable and can catch fire if over-heated.
That’s why it is good to use for homemade beeswax fire starters)! The flash point temp is around 400° F – there is no reason to let your wax get that hot. Never leave melting wax unattended.
Keep these tips in mind:
- melt beeswax slowly – low heat only
- use a dedicated pot for wax projects
- protect counters and surfaces where wax can drip
- supervise kids closely
Creative Ideas for Wax-Dipped Leaves
This is a great lesson of sustainability for children. A voice from the past when home decorations were made from natural materials that were readily available from nature.
Leaves preserved with beeswax can be used to make beautiful seasonal garlands or wreaths and other craft projects.
You can also brighten up any window by hanging your leaves with string or yarn to form a colorful garland.
Use them to create table centerpieces or decorate pillar candle displays. If you have artistic talents, beeswax dipped leaves can be used to create a wall art collage of various colors and shapes.
More Ideas
The ability of wax to hold in moisture is why beeswax products are so popular. Items such as beeswax lip balm recipes or beeswax lotion bars – protect our skin moisture.
In fact, while you have that melted beeswax handy – learn how to make these DIY Herbal Beeswax Sachets and you will have a beautiful sweet smelling display.
Final Thoughts
Dipping leaves in beeswax is a simple craft project that brings together nature and creativity. With proper supervision, you can even get the kids involved.
Make it a fun and educational let the children help collect leaves and identify the trees. Capture the brief natural beauty of Fall and fill your home with the rustic charm of autumn.

Preserves Leaves with Beeswax Dip Tutorial
This post may contain affiliate links. As an Amazon Associate, I earn from qualifying purchases.
Read my Disclosure.Tools
- Candy thermometer (optional)
Supplies
- 1 piece Parchment Paper or equivalent
- 1 pound beeswax
- 12 pieces Fall leaves
- 1 piece string or yarn 12" long
Instructions
- Melt beeswax in a double boiler of your choice. The size of this container depends on how much wax you have and how large your leaves are.You can use your fingers or (tie a small piece of string to the leaf stem for ease of dipping). This is especially true when coating leaves in beeswax with children as participants. Otherwise, carefully dipping the leaves and coating most of the stem will serve the purpose.Quickly dip a leaf into the melted beeswax. When you pull it out hold it firmly and give it a few shakes – allowing any excess wax to drip back into the pot.

- Hold the leaf above the wax pool for a few seconds. Then lay it flat on a piece of wax paper, aluminum foil, or parchment paper. It should cool for several minutes ( 5 min). Then, gently pick up the leaf and repeat the dip and shake process. Place your finished leaf out flat once again to cool. A cloudy coating of beeswax will be visible on the surface of the leaves. Don’t worry. If you performed the dip process correctly, the wax will become clear as it cools.


Notes
- Do not over heat your beeswax. Beeswax melts at a temperature of about 144° – 147 °. It is not necessary to heat your beeswax to a high temperature.
- When beeswax reaches a temperature of around 180° F it will darken and become less appealing.
- You want the wax to be completely melted but at its lowest temperature. If it begins so skim over on the top, it is not quite warm enough.
Hello Charlotte ❤️🔥
I happened upon this post to
on a journey to find ways to waterproof suede boots. You’re from South Carolina your name is Charlotte I am a Lindsay and I thought to myself, I have to say hello.
From down under.
Great to read and know your passion for bee keeping.
Celine-Susan
Thank you. HI. I do have a beeswax waterproofing post too! I love my bees but this has been a HOT summer.
Can you add FO to the melted beeswax before dipping the leaf?
Hmmm, I don’t see why not – it should not affect the wax.