DIY Solar Wax Melter

Learning how to build an inexpensive DIY solar melter comes in handy – especially, if you have a little raw beeswax on hand. There are many different things you can do with beeswax but it needs to be cleaned first. In this post, I will show you how to make a simple solar beeswax melter and enjoy harnessing the power of the sun!
Beeswax is some valuable stuff. We especially value the whiter cappings wax that is removed during honey extraction. Using this solar melter is a great first step to properly clean beeswax and a beautiful usable wax.
Why a Solar Wax Melter is a Good Idea
Of course, you can melt and clean beeswax in several different ways. However, if you only have a small amount of wax to clean (or render) making your own solar beeswax melter is a great option.
I designed this project for beginning beekeepers from my online beekeeping classes. They found themselves with small amounts of wax that they were dying to use. And, did not want to invest a lot of money.
How it Works
A solar wax melter can be made using any type of insulated box (wood or metal) that will hold heat. A sheet of thick glass fits the box as a top.
- Inside the box, honeycomb sits on a pan or shelf with a tub or pail underneath.
- As the sun shines through the glass it causes the internal temperature to rise.
- Wax on the shelf melts to a liquid and drips down into the tub or pail. If a little water is added to the pail at first, some of the debris in the wax will settle here.
- When the temperature cools (late in the day), the wax hardens. The dirty water in the pail will be on the bottom – making it easier to remove the block of beeswax from the container.
You don’t need fancy plans to make a solar wax melter – but its okay if you want to get fancy.

Materials Needed
- styrofoam chest – or insulated box
- glass sheet
- pan or sling to hold raw comb
- pail or tub to catch melted wax
Box
A regular Styrofoam cooler is perfect for this project. However, you can use any type of box that will hold in heat. Even a wooden box will work – it will work even better if you wrap it with some insulation. I am using an inexpensive chest – not very durable but cheap.
Glass
Admittedly, working with the glass is the most dangerous part of the process. Be very careful with your glass or you will get cut. Keep children and pets away – this is not a toy.
Window pane glass at the hardware store is cheap but it is also more fragile. I always tape the edges of glass for a bit of extra protection. What about an old window that would fit tightly on your box or chest? That would work as long as the sun shines through it.
Shelf or Sling
You need something to hold you mass of raw cappings or comb. For this project, I am using a sling made of cheese cloth. In my larger solar beeswax melter I have a large flat pan.
In the case of the cheese cloth, melted wax will drip through the cloth into a container below. In the unit with a pan to hold raw comb, the pan is angled and has a slot for the wax to run through.
Catch Bucket
Final item needed is a pail or tub to catch the liquid wax. It is a good idea to have something that will hold just a bit of water too. This will help filter out some of the excess honey in your wax cappings during the process.
In this project, I simply used a liner of aluminum foil to serve as my catch pail. It was a bit wrinkly at the end but it worked.

How to Use the Melter for Beeswax
Find a sunny location for your melter. The more hours of sun – the better. But, for safety purposes it should be away from human activity.
Place the melter in the chosen spot. Place the catch pan (with a bit of water) in the bottom of the box. Now use the cheesecloth to create a sling that will hold the raw wax inside the box but up off the water pan below.
I’m not kidding this can be a pain. I sometimes rely on the weight of my glass to hold the cheesecloth and sometimes it does not.
Perhaps consider some pins or another method to help hold the sling in place – especially if the wax you are trying to melt is heavy. Carefully, place the sheet of glass to cover the top of the box. You don’t have to have an airtight seal. If the weather is hot, the box will heat up enough.
It gets really hot inside the box. After the sun goes down, let the box cool in the shade for an hour or two. Carefully remove the glass top-using 2 hands.
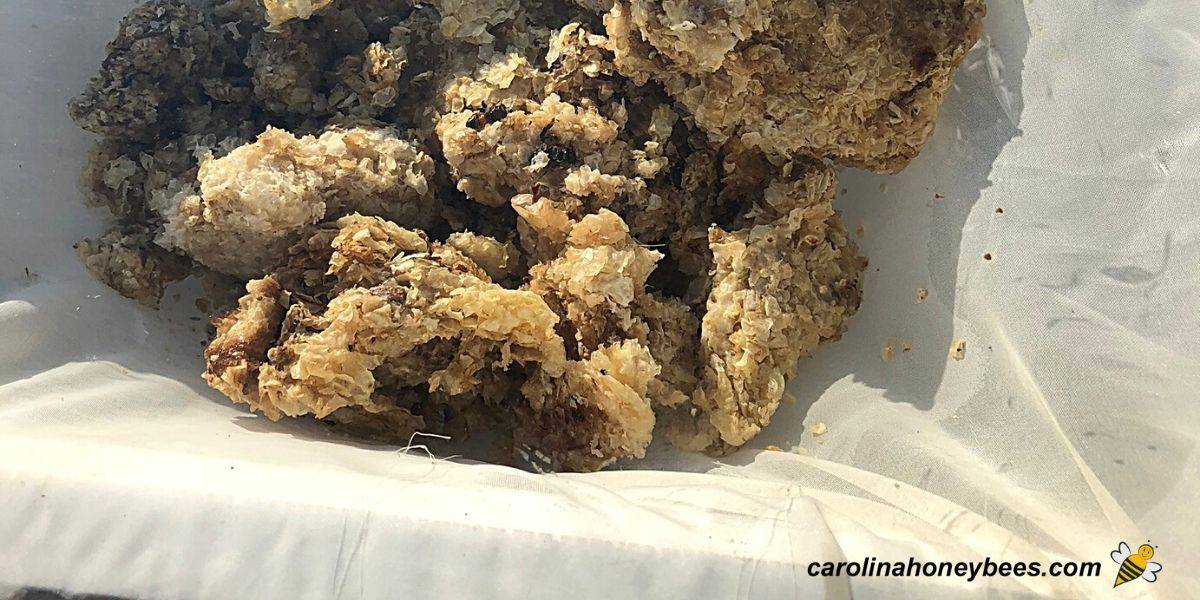
The strainer material (cheesecloth or pan/shelf) will have some dark, gunky beeswax “stuff” on top. We call this “slum gum”. I throw it away but you can use it to make homemade fire starters.
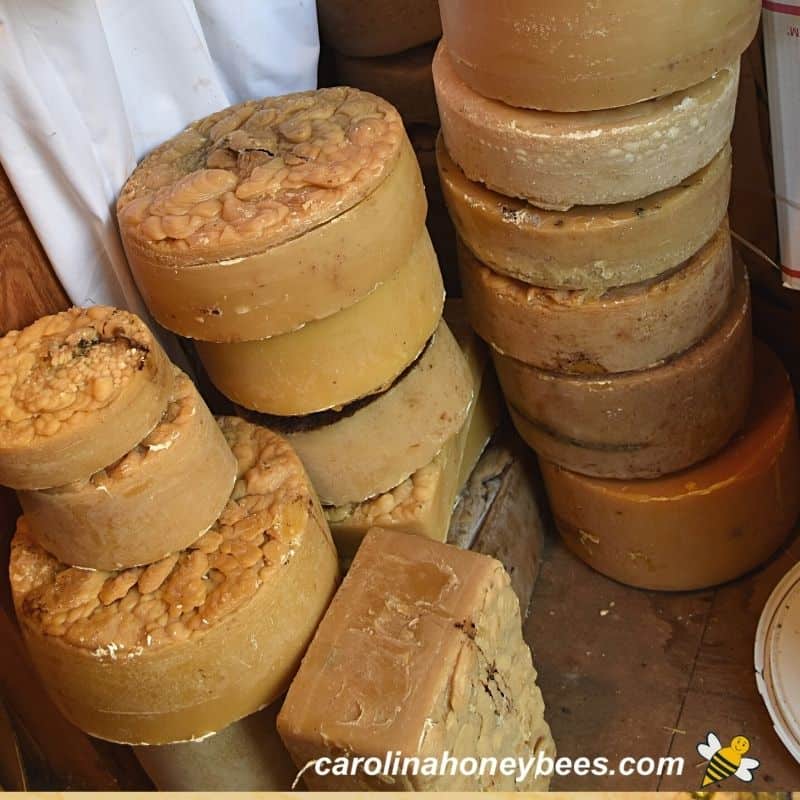
In the bottom, you will find beautiful wax. Underneath the wax is the water that we added earlier. It will have honey residue. Do not feed this to the bees-it can make them sick.
Expert Tips & Safety
Working with glass -a suitable piece of “safety glass” is the best option. But, an old window works well as long as it will fit your melter box.
Young children and pets should not be involved with this process. And, I always tape the edges of any piece of glass to reduce the chance of cuts.
It is best to set your melter in the sunniest location possible and leave it all day. Don’t try to move it or open the box until the temperature has had time to come down.

FAQs
You can make a simple solar wax melter for around $15. It will not be very durable but it will work well for small amounts of wax.
To melt beeswax in the sun, you need some type of container or box that lets sunlight in and also traps some of the heat of the sun. Raw wax is generally place on a sling or slanted tray and allowed to drip into a collection container.
The melting temperature of beeswax is around 144 to 147 °F. A sunny location on a warm day should do the job.
More Ideas
You did it and now have clean wax…. what to do? Allow yourself to enjoy the benefits of beeswax candles. Or, maybe you could make some homemade beeswax furniture polish.
Do you enjoy homemade body care products? Try these recipes for beeswax for hair care and I even have some soothing beeswax skin care ideas.
The many ways of using beeswax are too numerous to list. But, it is popular for many crafting projects – you can even make your own beeswax Christmas ornaments, or create a family treasure with tea cup candles.
Final Thoughts
A lot of effort is required for our honey bees to make wax. Never throw away valuable wax that you can use or sell as part of your beekeeping income.
Now you know how to make your own solar beeswax melter and use it. You can even up-size it and make a larger one if needed. Enjoy the many useful projects that you can make with your clean beeswax.
How to Make a Solar Wax Melter
This post may contain affiliate links. As an Amazon Associate, I earn from qualifying purchases.
Read my Disclosure.Tools
- scissors
Supplies
- 1 piece Styrofoam cooler (or other insulted box)
- 1 piece cheese cloth (or nylon, t-shirt material) sized greater than top of box
- 1 piece small sheet of glass with taped edges to fit top of box
- 1 piece aluminum foil or smal pan
- 1 cup water
Instructions
- Purchase a small Styrofoam cooler. You can use an old plastic cooler as well or an insulated wooden box. The point is that we want something that will hold in the heat.A little white disposable cooler is about $9 at the grocery store. It will last several years, if you don’t break it!Place a sheet of aluminum foil in the bottom of the cooler. The sheet should be big enough to cover the bottom and extend up the sides just a bit.You may choose to use a small pan instead. That’s fine as long as it fits well into the bottom of the cooler.

- Pour a cup of water (or 2) into the bottom of the cooler. (on top of the foil or inside your pan). We want a thin layer of water to cover the bottom.This water will catch the melting beeswax! It helps separate even more honey residue from the wax and makes it easier to remove from the box when cooled. Removing impurities from your beeswax is important, if you want to produce clean burning candles!
- Place your mound of beeswax cappings inside a piece of straining material. You can use a strainer bag, cheese cloth or t-shirt material. I search for old, clean nylon curtains at the thrift store!
- Carefully place your glass (with edges protected) on top of the cooler with the edges of the strainer material within reach.You need to suspend the cappings over the water reservoir in the bottom. We do not want it to touch the water.This can be accomplished using tape, pins or the light weight on the glass top. Anything that pulls the mound of cappings up off the bottom.Gently pull all edges of the strainer material until the wax is suspended above the water.
- A piece of glass that completely covers the top of the cooler is necessary. Clean glass lets the energy of the sun through and prevents its release.In partnership with our insulated box material, the air inside the box will heat up and melt the beeswax. You may see some condensation on the inside of the glass. Don’t worry, this is ok.With a little water in the bottom, beeswax cappings suspended above (on strainer material) and a tight-fitting glass top. You only need 2 more items. A sunny day and patience.Here in South Carolina it is hot as @#$@ in the summer. My small melter does a great job of melting beeswax by the end of the day. Place your wax melter in a sunny location out of the way. And, don’t open it to take a peek, LOL.


