How to Make Beeswax Wax Melts

Maybe you love the cozy glow of candles but want something a bit safer – if so, homemade beeswax wax melts may be the perfect solution. You can make your own without the mystery ingredients found in store-bought versions. This easy beeswax melts recipe is simple and only requires a few ingredients.
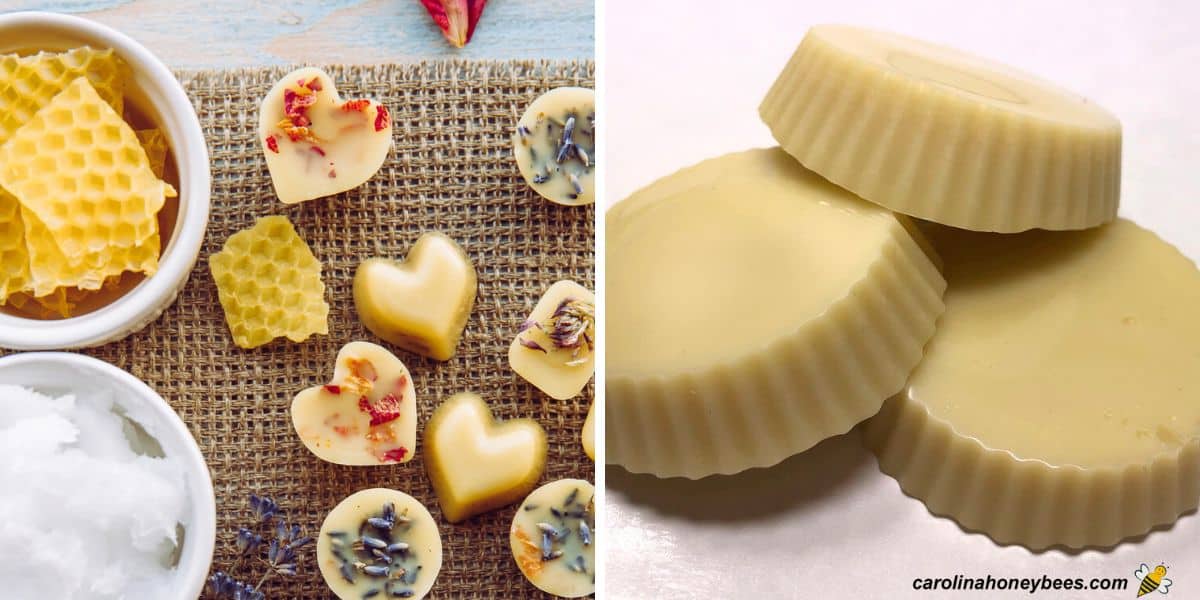
I’m a beekeeper and always have a bit of beeswax on hand. This is only one example of the many wonderful uses for beeswax. Scented beeswax melts will freshen your home and they make sweet handmade gifts for special friends.
Why Use Beeswax Melts?
With so many crafty options to consider, why use beeswax for wax melts? First, we need to understand that not all waxes are created equal.
Most store-bought wax melts are made with paraffin (less expensive) a petroleum by-product. Beeswax is a natural gift from honey bees that is renewable and eco-friendly.
Here are a few reasons beeswax makes the perfect base for your wax melts:
- Naturally Clean and Save – safe non-toxic aroma, free from harmful additives
- Gentle Air Freshening – beeswax has a subtle honey scent that compliments added oils
- Longer-Lasting – beeswax has a higher melting point, helping melts hold their shape longer
This post may contain affiliate links. Carolina Honeybees earns a tiny commission when you shop from our links. See our privacy policy for terms.
What You’ll Need

Here are the primary materials you need to make your own beeswax melts. Note that this recipe includes coconut oil too. I feel this combination makes the best product.
- beeswax
- coconut oil
- essential oil – your choice of scent
- kitchen scale
- some type of mold
Beeswax
If you are buying raw wax, be sure to clean your beeswax before using it to make melts. Commercial wax is usually clean and ready to use. But, you pay more for the convenience and light colors of wax are often bleached.
If you are a beekeeper with your own wax (or buy some raw wax from a beekeeper) – be sure to clean it again before using. You can even make your own solar wax melter for a few bucks.
Coconut Oil
Beeswax alone is quite firm and needs to be blended with a softer oil for this project. My favorite addition is – coconut oil.
Coconut oil is semi-solid if the room is cool and becomes a liquid when temperatures are warm. But, even when solid it is easy to measure and use.
This wonderful oil can be used in so many ways. It’s a great idea to keep a small tub on hand – you can even buy it at the grocery store.
In addition to this project, I use it in my beeswax lotion recipe and when making some of my natural beeswax lip balm recipes too!
Essential Oils or Fragrance Oils
Beeswax smells sweet but to make strong scented wax melts you need some fragrance. The easiest way to add fragrance is to use readily available essential oils. They come in many fragrances and work well in most beeswax melt recipes.
You can also purchase fragrance oils from crafting companies that are designed to work with melts. Read the labels carefully when buying to ensure you are getting the correct item.
Kitchen Scale
For my beeswax crafting projects, I measure ingredients by net weight (ounces or grams). A simple kitchen scale is perfect for the job.
For this project, your measurements do not have to be exact. We are not making “rocket fuel” or anything that requires precise computations (like soap).
If you do not have a scale – no worries. You can measure your ingredients and use a ratio. For example, in this recipe you want twice as much beeswax as coconut oil. Easy peasy to use a small scoop or cup to do this.
Molds for Wax Melts
You need some type of mold to hold the beeswax/oil combo while it cools and hardens. You will find many fancy molds to use for making wax melts. I often use silicone cupcake liners to make large melts. But, there are many cute ideas to consider.
Step by Step DIY Wax Melt Instructions

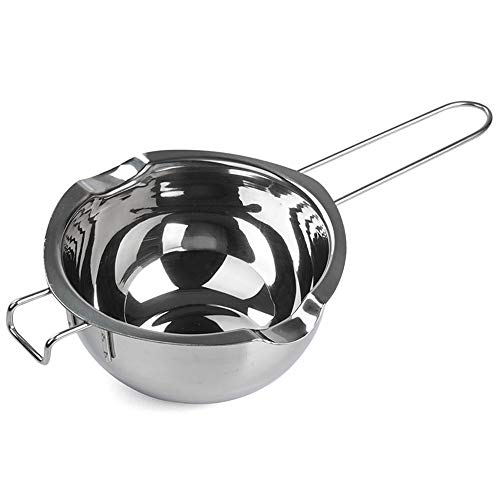
1. Begin by melting your beeswax. The double boiler method is the safest way – a pot with water containing a smaller pot with the wax. Take your time, it will melt slowly. ( I always melt beeswax first because it takes so much longer than the oils.)
This is my favorite wax melting pot – I have 3 or 4 of different sizes. Then I use a regular sauce pan to hold the hot water.
Stainless Steel Double Boiler Pot
2. Once the wax is liquid, it is time to add your coconut oil. Coconut oil is funny stuff. It is liquid when warm and can be rather solid when cold.
This makes it a perfect companion for making beeswax wax melts. Stir the wax and oil together. Until blended.
3. Now, it is time to remove the pot from heat and add your essential oils. Let your mixture start to cool just a bit before adding the oils – otherwise you may lose some fragrance strength.
In most cases, I use 4 oz of beeswax, 2 oz of coconut oil and about 40-50 drops of essential oil. (Full instruction at bottom of post).
4. Last step – pour the mixture into the molds of your choice. Keep in mind that wax melts are often small so they will fit in the burners. Let cool completely.
Clean Up
Spreading newspaper or freezer paper on the counter to create an easy to clean work space is advised.
And if you make a mess – you can remove beeswax from surfaces with some elbow grease (hard work).
I use a paper towel to wipe any reside out of my little boiler pot while it is still wax. Be careful, do not wash warm beeswax down your sink – you will be sorry 😉
How to Store
Once your beeswax wax melts are completely cool. Store them in an air-tight container or bag (in a cool location). They will keep well for months and be ready to enjoy when needed.
Expert Tips
- a wide range of fragrances are used for wax melts. Color is sometimes added for a visual effect but the focus is always fragrance.
- take care when making and using melts – when liquified you can get burned
How Much Fragrance Oil to Use in Your Beeswax Melts?
The type of fragrance oil or essential oil used will play a role in the amount needed. Also, personal preference matters too – you may not want a strong scent.
It is wise to begin with a small amount of fragrance – you can always add more. In general, fragrance oil should not exceed 6% or 1 ounce per pound of wax.
Fun Ways to Customize
Beeswax melts can be customized for any season or occasion. For scent, what about Wintergreen, Balsam Fir or Pine Needle essential oil for the holidays. Then, a light lavender essential oil or a floral scent for spring?
You will find hundreds of fun silicone mold shapes to use: hearts, flowers, bees etc.
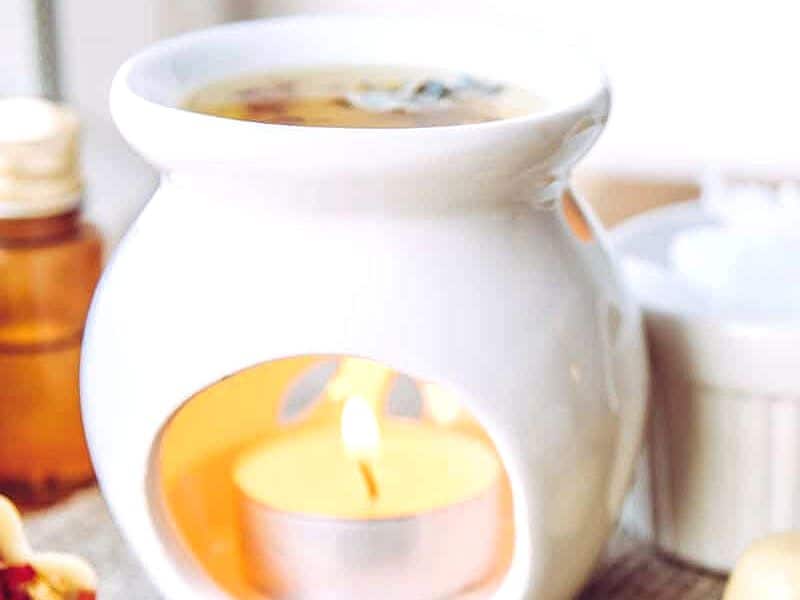
Using Your Homemade Melts
The easiest and most common way to use your wax melts is with a burner/warmer dish. They are specifically designed for this purpose and are not subject to over heating.
There are numerous styles of electric wax burners to chose from and they may be the safest option. However, some users enjoy the elegant clay burners with tealights.
Can you use a wax melt without a burner? Sure you can. Place your melts in a wide mouth glass jar (mason jar) and sit in a pot with water.
Gently heat the water until steaming and then set off the heat source. The wax should melt and release the fragrance into the room.
More Fun Ideas
If you want to make another type of beeswax melt, try these scented beeswax and soy tarts. This project uses soy instead of coconut oil – they have a different melt behavior. It is fun to experiment.
Try creating a unique Christmas ornament with blackened beeswax. A great way to start a new tradition.
What about some beeswax crafting projects to pamper your body – they make great gifts too: luxurious body butter, or even foot balm made with beeswax.
FAQs
The whole purpose of wax melts is to fill the room with a pleasant scent without the use of a flame – as you would have with a candle.
The fragrance of beeswax melts will last various lengths of time. This depends on the type of fragrance and strength used in the melt.
Melts are safer than live flame candles. They are also cheaper to buy and make due to the fact that the fragrance lasts longer when not exposed to flame.
Yes, you can. Once the scent has faded – you can remelt the wax and add more fragrance oil.
Final Thoughts
Once you try this recipe, you’ll see how easy it is to customized scents for the season, experiment with fun shapes or mix in other waxes for a different texture. Explore the many craft projects that you can enjoy with bees wax – only one of several cool products from honey bees.
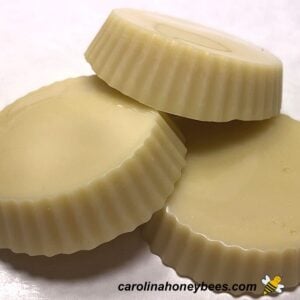
DIY Beeswax Melts Recipe
This post may contain affiliate links. As an Amazon Associate, I earn from qualifying purchases.
Read my Disclosure.Supplies
- 4 oz beeswax (net wt)
- 2 oz coconut oil (net wt)
- 50 drops Balsam Fir Essential Oil (optional)
Instructions
- Melting beeswax: While you can use the microwave, the best and safest way to melt beeswax is by using a double-boiler.I am loving this small double-boiler. It is easy to clean and is large enough for most of my projects. When paired with a pot to hold water, it makes a great tool for melting beeswax.

- Add coconut oil: Measure 4 oz. (net wt.) of beeswax and 2 oz. (net wt.) of coconut oil. Place these in your double boiler and turn the heat to medium.As the water in the bottom pot heats up, your wax will begin to melt. It will take longer for the beeswax to melt than the coconut oil. Gently stir occasionally until everything is melted and combined.
- Add fragrance oil or essential oil: Remove the melting pot from the hot water bath. Now, it is time to add our fragrance. Adding fragrance to hot oils can affect its aroma. Your beeswax melt recipe mixture should not be above 185° F when oils are added.I added 50 drops of Balsam Fir Essential Oil to this recipe because I wanted a strong scent. You may need to experiment a bit to choose the best one for you.
- Molding: This is the fun part. As soon as the fragrance oil is added – give the recipe a quick stir. Then pour the hot ingredients into any type of mold or form that you wish.There are many types of molds to choose from but silicone cupcake wrappers work well too. If not using silicone, you may need a mold release spray.
- Cool and remove from mold: Allow the mixture to cool for a couple of hours. As it cools, the mixture will harden and take the form of the mold.Once the mixture is set, you can easily remove your wax melts from the mold.They are ready to use! Add a cute bee bag and ribbon for a quick homemade gift.


Notes
- beeswax is flammable (as are most other oils)- avoid overheating
- pots and pans exposed to wax are hard to clean – used dedicated craft pots
- take every precaution to prevent burns – use pot holders, safety glasses and gloves where needed
I love and live by all your beekeeping tips, so am now ready to try some crafting with my extra wax I’ve been collecting the last couple of years! One question (and it might be silly…) I’m committing some equipment just for the purpose of making things like these melts—what is best way to clean the pot you’re mixing the fragrances into—mainly for when you want to do a different scent? So excited to try but also don’t want to have sooooo much extra kitchen equipment like a pot for every scent…already have a ton of bee equipment, got to keep hubby happy and supportive of my fav hobby!☺️ Thx!!
Oh my, technically you can…. get wax off any pan with alot of hot water and rubbing with a paper towel.It is not always easy !! But, I’ve have the best luck keeping a few of those little candy pots on hand. And I’ve never had problems when changing fragrances between them and they can be dedicated to wax projects.
Thankyou Very clear guidance
Thanks – have fun.
Hi! Why add coconut oil? Can these be made without it? Thanks!
In my experience, you need to add something that has a lower melting point – plain beeswax ones did not get hot enough in my melters to work.