Beeswax Balm for Your Feet

This beeswax foot balm recipe is perfect for soothing dry cracked heels – and even elbows! Using the natural moisturizing power of raw beeswax, your skin is cure to feel smoother in no time at all. Best of all, you don’t need any fancy ingredients – you may already have what you need in your pantry. Loved by many, homemade beeswax foot balm is always on my bed side table.

Let’s face it – your feet need some love too. Using beeswax for skin care is nothing new – you will find it in many recipes for health and beauty products.
Making Homemade Beeswax Balm
There is something extra special about making your own salves and creams. You know what is on the ingredient list and can choose the best natural products to include.
This is where the remarkable properties of beeswax come into play. It acts as a natural emollient and seals in existing moisture.
Beeswax also forms a light protective barrier to reduce drying of the skin. It naturally helps you hold on to the skin moisture you have.
Why Beeswax is Great for Cracked Heels
Cracked heels is a common problem for many of us during the harsh cold season of the year. If you suffer from rough, cracked heels ( I do – especially in Winter), you probably already know that lotion doesn’t seem to help very much. It doesn’t last long and I forget to apply it every day.
But, this recipe for homemade beeswax balm works so well because it is heavier and thicker. You are able to rub the balm down into the cracks of the heel and it stays put. It doesn’t rub off as easily as a thinner product.
This post may contain affiliate links. Carolina Honeybees earns a tiny commission when you shop from our links. See our privacy policy for terms.
Simple Ingredients
In order to create your foot care masterpiece, you just need a few ingredients and supplies.
- Beeswax
- Shea Butter
- Coconut Oil
- Vitamin E Oil (optional)
- Lavender Essential Oil (optional)
- Tea Tree Essential Oil (optional)
Beeswax
You can purchase beeswax in a variety of forms: bars, chunks, pellets, etc. All work well and it really does not matter which color of beeswax you use. Most crafters favor light shades but this is just a visual appeal manner.
Perhaps you are a beekeeper with some extra beeswax on hand or know someone with a few hives. If so, be sure to clean your beeswax before beginning your foot balm recipe.
Butters & Oils
If you have ever held a bar of fresh beeswax, you will know that it is a solid that can not be rubbed into your skin. This wax needs some help from other ingredients to become useful for skin care.
Soft butters and oils combined with beeswax create a luxurious, moisturizing product with a semi-solid consistency. I perfer Shea Butter and Coconut oil but you could use cocoa butter and olive oil too.
Essential Oils
Adding essential oils for the properties they provide or the aromatherapy benefits is optional. Any skin safe essential oils can be added to your DIY beeswax balm. Or you can opt out and just have the natural scent of the wax and butters.
Tools & Supplies Needed
Very little equipment is needed for this recipe. You will need to melt some ingredients. It is best to used a double boiler (stove top) or glass container (microwave safe) for melting.
I prefer to not use the microwave so my instructions will involve melting ingredients on the stove top. If you want to use a microwave, that is okay.
Go slow, using very short times to safely melt your ingredients – and constant supervision.
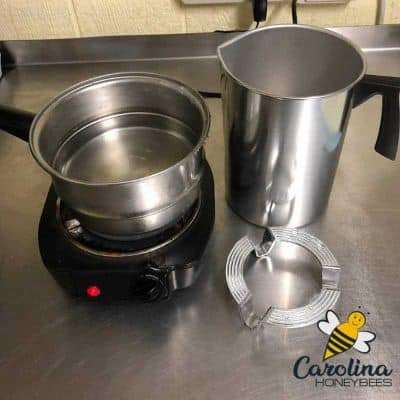
I use a pot with water and a smaller double pouring pot – to contain my ingredients. They are so useful for many projects.
Some craft sticks of wood are useful to mix our ingredients. And, don’t forget you need container to pour the finished foot balm recipe into.
**This information is shared as one way to use beeswax for natural products. Use all safety precautions to avoid burns or other possible effects of using the product. I am not a doctor – use this product at your own risk. **
Beeswax Balm Instructions

1. Using a double boiler or similar setup, melt the beeswax, shea butter and coconut oil. Watch it closely, do not over heat. This should be a slow and gentle process.
Don’t have a double boiler? Consider purchasing one of these little double boiler inserts and use it as the top pot – placed in a pot with water. I love them and have several.
2. Prepare a pouring work surface-protect your table with a layer of foil, wax paper or similar. If you want to use essential oils- have them ready.
3. When all ingredients are melted and combined, remove from heat – add essential oils and vitamin E oil if desired. Then, pour into smaller containers.
If you are using glass, pre-warm them with hot water and dry – before pouring hot wax into them. Metal tins and plastic cups are other good choices for containers.
4. Once the beeswax balm is cool and set. Add a lid to each container and a label.
How to Store
Once your foot balm recipe has cooled and set – it should be shelf stable and not require any special storage. Keep it on your nightstand – like me – or a pantry shelf is fine.
Beeswax foot balm will remain fresh for several months – even longer if you added some vitamin E oil to the mix. It should have a fresh clean smell when opened. Once it starts to smell gnarly – it’s time for a new batch.
Expert Tips
This recipe is a general formula. It is very forgiving, you can remelt and tweak the ingredients a bit. If you want a less solid product – remelt and add a bit more coconut oil.
If you find it to be too liquid in warm weather, adding a bit more beeswax should help. That is one of the wonderful properties of working with beeswax.Our goal is to mix solid ingredients with softer oils such as coconut oil, shea butter etc. The resulting combination is a product that is harder than regular beeswax lotion – yet pliable enough to spread.
Using Beeswax Balm
Apply your beeswax balm to dry heels before bed. Do a thorough job and really rub it into the cracks around the bottom edges and sides of the heel. Cover with socks to prevent stains on clothing or falls – it will feel slick-don’t walk without socks.
By the next morning most of the balm should be absorbed into your skin. Repeat as needed and you should see a big difference in a few days.
Of course, this foot balm recipe is not just for cracked heels – it works great on any rough skin – like elbows.
More Ideas
Using homemade recipes to making your own products is a good way to know exactly what you are putting on your body. You do not have to worry about possibly dangerous chemicals being in your balms.
Pamper your lips – you can make beeswax lip balm with a minimum of fuss.
Need a sturdy skin soother to go? These hard beeswax lotion bars with essential oils travel well.
Many folks enjoy creating healing salves with beeswax and plant materials: dandelion salve, calendula salve and even herbal plantain salve to name a few.
Planning to spend some time outside? Try this DIY bug bite relief stick that uses beeswax and essential oils to soothe irritated skin.
And if Rover is experiencing some paw dryness – you can make your own dog paw balm too!
And finally, if you are really into herbal remedies – try this natural recipe for Black Walnut Salve made with bees wax and coconut oil!
Final Thoughts
Give those hard working heels the care they deserve. Homemade beeswax foot balms may be your feet’s best friend thoughout the cold months of the year. Make a batch to keep on hand and you will be ready to battle dry skin in an instant.
Don’t let this guide for beeswax foot balm be your last experience with beeswax – there are so many things you can make.

Beeswax Balm for Feet Recipe
This post may contain affiliate links. As an Amazon Associate, I earn from qualifying purchases.
Read my Disclosure.Tools
- 1 double boiler (pot to melt wax) (or similar)
Supplies
- 4 oz beeswax
- 4 oz shea butter
- 5 oz coconut oil
- 3 drops vitamin E oil (optional)
- 10 drops Essential Oil (I used Lavender) (optional)
- 10 drops tea tree essential oil (optional)
Instructions
- Melt the beeswax and other Ingredients. For a standard double boiler (dedicated to wax crafting) put water in the bottom half and your ingredients in the top pot.Or you can improvise one using little double boiler inserts and stacking pots. Place the beeswax and shea butter in the top melting container. Once the wax and shea butter are half melted, you can add the coconut oil.Coconut oil melts very quickly. Beeswax takes longer to melt. Cutting it into smaller chunks will speed melting.

- While the wax is melting -prepare working surface and containers. Working with hot beeswax can be messy. Cover your work surface with a large piece of aluminum foil, wax paper or parchment. This makes clean up a breeze. You also need some type of containers to hold your finished product. If you are making this recipe for yourself, a wide-mouth pint jar is fine. Smaller containers are good for gift-giving. If you are using glass, pre-warm them with hot water and dry – before pouring hot wax into them. Metal tins and plastic cups are other good choices for containers.
- Add Vitamin E and essential oils then pour up. When all the ingredients have completely melted, remove from the heat source. It is a good idea to avoid over-heating your ingredients. This can harm some of their beneficial properties.Add Vitamin E and essential oils – if desired. Neither is necessary. However, the vitamin e helps your beeswax balm last longer. The essential oils offer a pleasing fragrance and has some soothing qualities too.Carefully, pour your ingredients into their final containers. While the pouring pot is hot, a quick wipe with a paper towel to remove any residue left inside.
- Allow Beeswax Balm to cool and seal. Leave the lids off until the beeswax foot balm has cooled. It should become semi-solid in an hour or so.Then, put lids on your jars (or other containers) and your product is ready to use. Be sure to add a label so you will remember what it is for.


Notes
- always take care when melting wax to avoid fire or burns
Hi, can this be used on hair also? Thanks
Possibly so, check out my tips for haircare and beeswax. https://carolinahoneybees.com/use-beeswax-for-hair/