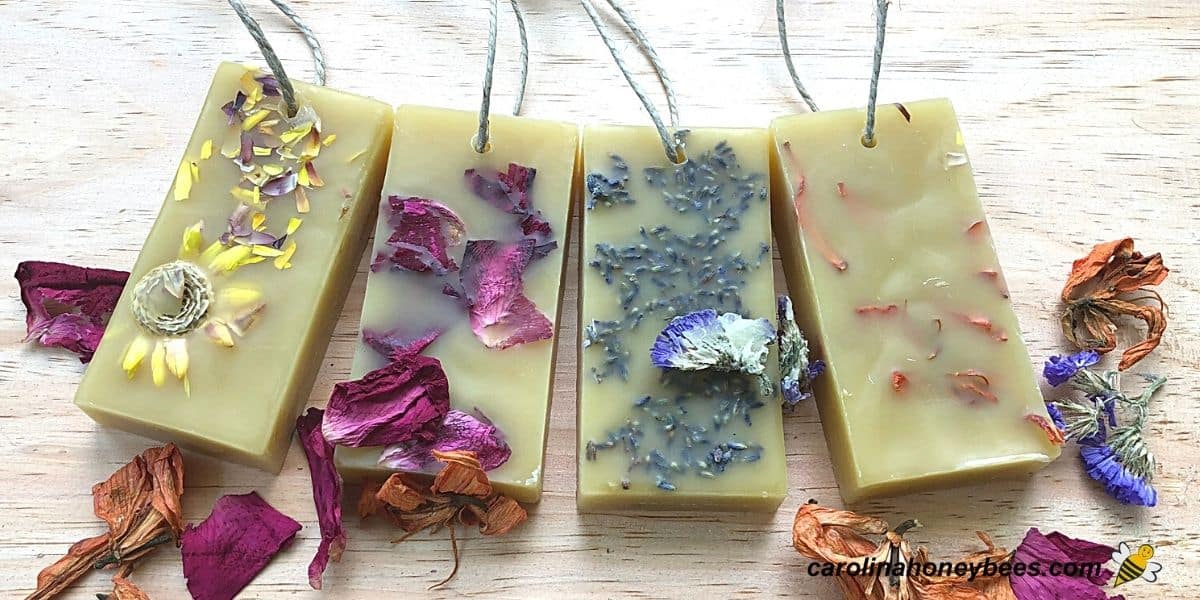
Scented Wax Sachets

Scented wax sachets are a delightful way to freshen up small spaces. They add a pleasant fragrance without over-powering the room. In this tutorial, you’ll learn how to make scented wax sachets using raw beeswax, essential oils and dried flowers. Beauty and function all in one little project. Enhance your home with these natural creations – they make thoughtful handmade gifts too.
As a beekeeper, I always have excess beeswax on hand. I don’t want to waste any – my bees worked hard to make it. You may be surprised to learn that there are so many practical uses for beeswax that you will likely never try them all. But, no harm in trying!
Create Your Own Natural Scented Wax Sachets at Home
Naturally scented wax sachets are a wonderful way to bring a little freshness to small spaces – like: closets, drawers on even the foyer of your home.
Unlike commercial air fresheners, DIY wax sachets use natural ingredients and are an eco-friendly option.
Let’s dive in and explore how you can craft these lovely aromatic sachets in a scent and design that you prefer.

Materials Needed
Gather your materials, in addition to some craft basics, you will need:
This post may contain affiliate links. Carolina Honeybees earns a tiny commission when you shop from our links. See our privacy policy for terms.
- beeswax
- dried flowers or herbs
- essential oils (your choice of scent)
- a mold (optional release spray)
- string or ribbon for hanging
Beeswax
Beeswax is one of the best waxes for making sachets. It’s a natural wax produced by honey bees. You can purchase beeswax in many different forms: blocks, pellets etc.
Raw wax from a local beekeeper works well – just make sure your wax has been cleaned. Don’t stress it is easy to do – and rather fun too!
The color of beeswax that you use is not critical. Wax varies in tones of yellow to dark – white wax is bleached. Do keep in mind that unless you add colorings to the wax, the beeswax color you choose will be obvious in your final project.
Dried Flowers/Herbs
Adding dried flowers or herbs to your scented wax sachets is a great way to add eye appeal. These do not contribute very much to the scent. But, they add beauty to the project overall.
Choose the color combinations you like or that fit with the room where you want to use them. Petals that are flat tend to work better – make sure they are dry.
Essential Oils
Essential oils are natural floral compounds. Even though they are natural – they are powerful. You will not need much.
Handle with caution and read the manufacturers directions. Any good oil from a reputable company worked well for making scented wax sachets.
Molds
Any small mold can be used to shape wax sachets. As long as the mold can stand up to the heat of how wax and is easy to manipulate, it should work.
I prefer flexible silicone molds when working with beeswax. They are nice because it is easy to pop the finished wax sachet out.
The one I chose to use is a rectangular, silicone mold that can be used for resin castings. These types work fine – especially if you have a little oil or mold release spray on hand.
Variations
This recipe has a lot of room for customization. You can use a wide variety of dried herbs and flowers – as well as- different essential oil combinations.
Perhaps you grow herbs for bees in your garden – dried ones from there would be great. Or perhaps a friend or relative has a favorite rose bush? Collect and dry some petals to make a special give for this person.
Equipment & Tools
This project requires no major tools or equipment – beyond a heat source to melt the wax.
And, a pot or container to melt wax and mix your ingredients. An exacto knife, scissors and normal crafting supplies make the job easier.
Step by Step Process

1. Begin by safely melting your beeswax. Ideally, this should always be done in a double boiler set up (water in bottom pot with wax in smaller pot on top).
Always supervise wax as it melts due to a danger of fire. I have small dedicated pots that I use for my wax crafting.
2. Once the beeswax is melted, remove the pot from the heat source. Now is the time to stir in your essential oils. To make a whole recipe using 1 pound – 16 ounces of beeswax – I used about 50 drops of Lavender Essential oil.
I suggest you experiment with a half or quarter sized batch at first to find the level of scent you prefer.
3. Spray your mold with mold release spray. OR, apply a light layer of olive oil to the inside of the mold.
4. Fill once section at a time with the beeswax/oil mixture and sprinkle dried flowers on top. Some of them will sink to the bottom and some will stand out – that’s okay.

5. Continue until all sections of your mold are full. Then, leave them in place to cool for several hours. Once they are completely cool and set – you can pop them out of the molds.
Though not an answer to “major bad smells” these small sachets can help freshen up the air in a stale room. Another example of one of many awesome to use beeswax in the home.
Ready for Hanging
In most cases, the wax sachets will be hung up. Use a large needle, exacto knife or drill bit to make a hole near the center middle position of your wax sachet. Then, use string or ribbon of your choice to make a hanger.

How to Use
Once they are cool and set, simply hang your sachets in any space that need a bit of color and scent.
Be reasonable, these are not strong enough to scent the room like a can of spray. But, they are not filled with nasty chemicals either.
The scent on your sachets will last for a while. If you decide you want to refresh the scent – dab a few drops of your favorite essential oil on the surface.
Or, you can melt the wax, strain out the flowers and remake them again. The possibilities are endless and beeswax projects are easy DIY gifts.
Anytime you make a batch of scented wax sachets, keep a few extras back. You never know when you may need a small gift for a special occasion.
Over a long period of time, your sachets can develop a frosty appearance. It’s quite lovely honestly.
Don’t worry this is natural (it is called beeswax bloom) and easily removed if you don’t like it. Simply gently warm the wax surface with a hair dryer and they are good as new!
FAQs
With commercial air fresheners, we don’t always know what is in them. Homemade natural wax sachets should not be toxic. However, some people are more sensitive to certain fragrances so keep that in mind.
It is a matter of personal preference but some popular essential oils to use in scented wax sachets are: lavender, lemon, pine, citrus and tea tree.
Various types of wax can be used in making scented wax sachets. However, raw beeswax is often recommended because it is easy to work with and is natural.
The amount of essential oil you add depends on the size of your batch and your desired scent strength. A general rule of thumb is to use about 10-15 drops of essential oil per ounce of wax.
I would not use fresh flowers for your wax sachets. Fresh flowers contain moisture that can lead to mold growth.
More Ideas
If you still have a bit of beeswax, consider making these Scented Beeswax and Soy Tarts. They are easy to make and can be used in various warmers.
If you like to sew or know someone who does, tiny sewing cakes of beeswax are a great simple gift idea. They make awesome presents for: mother’s day, teacher gifts etc.
You can do so much with a little beeswax. You can even make your own beeswax crayons to spur your children’s creativity in a natural way.
Crafting is always a lot of fun and so easy to do. Whether you are making Beeswax Furniture Polish or your own dipped beeswax candles.
And what about some blackened beeswax ornaments to bring an old world tradition to your home? Enjoy this wonderful gift from the bees.
By creating your own natural wax sachets, you can control the ingredients in the recipe. Your family and friends are not exposed to any nasty hidden chemicals that are present in so many commercial air fresheners.
DIY Scented Wax Sachets
This post may contain affiliate links. As an Amazon Associate, I earn from qualifying purchases.
Read my Disclosure.Supplies
- 16 ounces beeswax
- 1 piece Silicon Mold-Bar Shapes
- 1 ounce Dried Herbs – Flowers Your Choice
- 24 inches Ribbon or String for Hanger
- 1 can Mold Release Spray
- 50 drops Essential Oils Your Choice
Instructions
- Melt beeswax in a double boiler. Beeswax is easy to work with but it is flammable if it gets too hot. Yes you "could" use the microwave but a double boiler is much safer.

- While the wax is melting, prepare your molds by spraying with mold release or Pam Cooking Spray. I prefer to use a silicone mold that I bought for this purpose. But you can use any small mold such as : cookie cutters lined with plastic wrap, small plastic bowls, silicone molds in different shapes etc.
- Once the wax is completely melted remove pan from heat. Add 30-50 drops of the essential oil of your choice. You may divide the wax into 2 or 3 different cups if you want to have different scents in one batch. If you do so, adjust the drops of essential oil per cup.
- Pour wax into prepared molds of your choice. Sprinkle dried herbs on the surface of the cooling wax. Now you must be patient while the wax hardens.If patience is not your virtue you can put the mold in the freezer for a bit to hurry things along.
- Once the wax has cooled completely and hardened, remove your beeswax sachet from the mold. If you use the type of mold that I do, you will have a "hanger" holed in your sachet. If not, use a small knife to create one. Add a colorful ribbon or piece of natural twine to each sachet to serve as a hanger. Enjoy!


