How to Make Beeswax Crayons

Learn how to make beeswax crayons for your favorite kids. Crayons are sticks of colored wax that have been a part of childhood as far back as many of us can remember. A new box of crayons was always a reason for celebration in my world. Now, you can make your own crayons for the little hands in your life.
A renewable resource, beeswax is used for many things in and around the home. One thing that makes it a great ingredient for crayon making, is the pliable strength. While not brittle, it contributes to making a durable stick suitable for small hands.
DIY Natural Beeswax Crayons
As wonderful as crayons are, they can contain some gnarly substances. With a growing concern over exposure to chemicals, many folks have opted to create their own homemade crayons.
While the end product of these more natural crayons is a bit different than commercial crayons, you do know the materials that are used in each one.
Materials
Though beeswax candles recipes do vary a bit. These are the primary materials you need to make your own.
- beeswax
- carnauba wax
- cocoa butter
- pigment
Beeswax & Carnauba Wax – A Homemade Crayon Duo
A natural substance, beeswax is made by honey bees. It is a wonderful crafting material because it is solid at room temperature but has a rather low melting point.
When choosing wax for your projects that involve added colors, choose beeswax of a light color. It does not have to be bleached white – but avoid dark wax as it may affect the finished color of your crayons.
In spite of the many wonderful properties of beeswax, for the best crayons it needs a helper.
Carnauba wax is made from the leaves of Brazilian Palm Trees. It is one of the hardest natural waxes you can get.
Using only carnauba wax in your homemade crayons would not work as it is too hard to use for coloring.
By adding some beeswax and cocoa butter to the recipe, we get a natural crayon that is strong – yet soft enough to create masterpieces of color.

Pigments for Making Crayons
There are many ways to add pigment to your crayons. Some are natural pigments from plant materials or minerals that are ground into fine powders.
You will also find a wide range of mica mineral pigments that are easy to use for your crayon making projects. Use what you have on hand or let your creative muse go wild and try some new ideas.
Natural Materials for Coloring Crayons
- Red – alkanet root powder, Australian Red Clay
- Pink – beet root powder
- Yellow – turmeric powder
- Black – activated charcoal
- Brown – black walnut hulls, cocoa powder
DIY Crayon Molds
There are many different types of molds that can be used to make homemade beeswax crayons. Special molds can be purchased to create shaped crayons.
However, may items that you already have a home work well. My project uses an old plastic star mold used for Christmas ornaments and a silicone mold for ice cubes. Other options include using muffin tins or silicone cup cake wrappers.
The Process

1. We begin by melting and combining the major materials. I usually start with the beeswax first (ideally melting in a double boiler setup), the add the carnauba and cocoa butter.
2. Stir well to combine the materials. If you want to add fragrance to the mix. I would remove from heat and add scents at this point. (Assuming you want all crayons to be the same scent.) If you want to get fancy – and use different scents – add those after you separate the mixture for color.
3. Prepare your molds by using a mold release spray if you have it. This is not necessary for all molds but it is very useful. Now, decide how many different colors you want for this batch.
I chose 4 different colors. Divide your ingredient mixture between 4 different cups. (I used small disposable plastic cups.) Now is the time to add your color pigments to the shade desired.
4. Pour each color into your prepared mold and let to cool.
Expert Tips
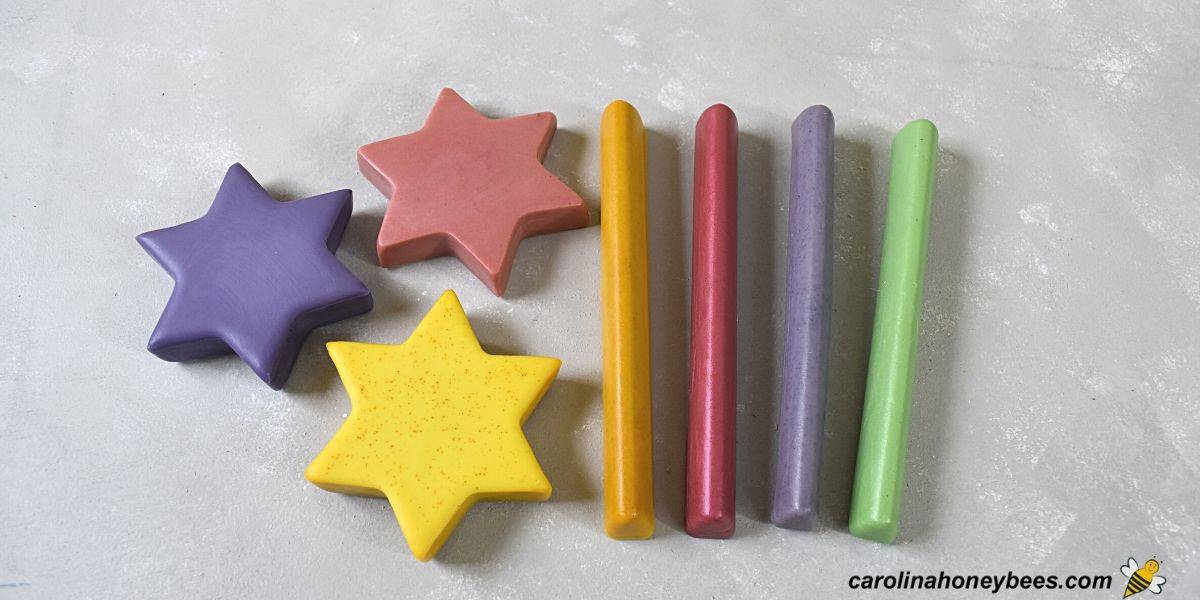
- large easy to hold shapes are a good choice for younger children.
- long slimmer crayons are great for slightly older kids – I chose to cut mine in half.
- protect your counter surface with wax paper or similar
- my recipe made enough mixture to make 3 star crayons and 4 sticks – about 230 grams.
- to add a bit of a special scent, a few drops of essential oils can be added to the recipe.
- some crafters use liquid food coloring for the crayon pigments – but I find it to be extra messy.

Why are Beeswax Crayons Better?
Unlike most commercial crayons that are made with petroleum-based paraffin wax, beeswax is made by honey bees.
This natural wax is used by the bees to construct the honeycombs inside their hive. In fact, bees do such a good job of making wax that they make more than they need.
Taking excess wax or honey is not bad for bees – as long as the beekeeper acts responsibly. the welfare of the colony should always be the major concern during honey harvesting.
More Ideas
After you experience the fun of making diy beeswax crayons, perhaps you have a bit of beeswax left over? Let’s not waste it – there are so many things to do!
If you wish to freshen up a stuffy room – consider these homemade beeswax wax melts – they are great in small rooms. For other small spaces where a heat source is not allowed – scented beeswax sachets work perfectly.
You can use this natural wax as a major ingredient in these easy beeswax soap recipes. Or maybe you would like to try a natural approach to unwanted insects with these beeswax bug bite sticks.
FAQs
Making crayons is a rather easy process. You need wax and colored pigments. Some of the popular choices for a wax base are: beeswax, carnauba and tallow.
One major difference between homemade crayons and commercial brands is the materials used. DIY crayons are usually make with a wax base while commercial crayons are more likely to use paraffin (petroleum products).
In most cases, natural crayons such as those made with beeswax do not provide the deep vibrant color found in paraffin crayons. Their color is more pastel and similar to water colors.
A Final Word
This is really a fun project and another example of how beeswax can be used for so many things. You can experiment with the ratios to find the perfect crayon recipe for your kids – or yourself. I have a confession to make – I always loved the smell of a box of Crayola. I know, it was probably toxic chemicals but they smelled so good.
Now, I can happily report that these homemade beeswax crayons smell good too! Another generation of children can experience the creative joy of creating a colorful rainbow.
Beeswax Crayons Recipe Tutorial
This post may contain affiliate links. As an Amazon Associate, I earn from qualifying purchases.
Read my Disclosure.Tools
- Measuring cups
Supplies
- 6 oz beeswax (3/4 cup)
- 45 grams carnauba wax (6 tablespoons)
- 19 grams cocoa butter (2 tablespoons)
- 1 tsp crayon pigment (of each color)
- 1 can Mold Release Spray
- 6 pieces small plastic cups (optional)
- 6 pieces stir sticks – spoons etc
Instructions
- Melting the beeswax first as it takes the longest. Melt beeswax in a double boiler or boiler insert. This is the safest way to liquify it.Yes you can use a microwave but be very careful. Beeswax does have a flashpoint. Double boiler is the best way.

- Add the carnauba wax and cocoa butter to the melted wax and allow all to melt together.
- Once melted, stir the ingredients with a wooden skewer, craft stick or spoon to blend the waxes and butter.
- Calculate amount for each mold and prepare:Estimate the amount of recipe needed to fill your molds. This will vary widely depending on the type of mold you use.Because the weight of the ingredients is close to the same as water, weight can be used as an estimation.Fill one section of the mold with water and then weighed it on your kitchen scale. This gives an estimate of how much recipe is needed for each section of the mold.My long stick mold required approximately 26 gram of beeswax mix; the star mold required 42 grams per section.Spray the sections of the mold with mold release. This may not be completely necessary but it ensures that removable of the finished crayon will be effortless.
- For each color: Pour the desired amount of mix into a small plastic solo cup. Stir in about ½ tsp of your pigment choice and stir very well with a toothpick or similar.Pour into the proper mold and leave to cool. Repeat the process with each color you wish to make.
- Leave to cool for at least an hour. The crayon will become stronger as it cools.


hello , thank you for your job its very good to see help
want ask for pigments , can used mica pigments for crayon ?
Look in the post at the bottom of the content and you will find the pigments I used on Amazon. You could use other pigments but keep in mind that you don’t want anything that will stain – and kids sometimes do put things in their mouths. Of course, crayons are best suited for toddlers and older not small babies but safety is always an important consideration. Good luck.
Thank you! I just made a wonderful thick blue crayon with only beeswax and pigment. I made it with parchment paper/ baking paper and tape. I formed it around a wooden spoon and I can peel it off as I use the crayon up. I am so happy with it. Such a rich color 😊
That’s wonderful. Great job.
Thank you for this! I made a crayon with the same recipe but used tallow instead of coca butter and it was ok but as my 4-year-old said “you have to press a little too hard to get the color bright”. I found that beet root powder didn’t make a bright enough red but I’ll try it again with this recipe.
spirulina makes a nice grassy/green color
Congratulations that sounds wonderful