Hand-Dipping Beeswax Candles
I encourage you to try hand-dipping beeswax candles at least once. It is a beautiful project that promotes the idea of being more self-sufficient. This time honored tradition dates back through the ages. While making dipped beeswax candles is not really hard – it is not as easy as it looks either. Are you up for a challenge?

There are many different ways to make beeswax candles. From traditional methods to using those new-fangled molds – you may want to try them all!
Dipped Candles with Beeswax
Beeswax is a natural wax produced by honey bees. Produced by special gland on the bee’s body, the wax is used to create the honeycombs that make up the structure of the hive.
While we often associate hand dipped candles with “the good old days”, most pioneers would not be using them for every day. These bright, clean burning candles would be used for special occasions due to the expense.
Dipping candles is a fun and educational activity. Once you have finished the project, you will have a better understanding of the time required to keep a homestead going.
Materials & Equipment
You only need a few things to make Hand Dipped Beeswax Candles.
- beeswax
- dipping container – heat source
- proper wick
Beeswax
There are many options for getting wax for your project. Raw beeswax can be purchased from local beekeepers and of course you can always order wax online.
Commercial wax is clean and ready to use, raw beeswax may not be clean. This is about more than just appearance. If the wax is not clean, your candles will not burn well. If in doubt, clean your beeswax one more time.
How much beeswax do you need? Well, that depends on the size of your candle dipping vat. You will need to melt more beeswax that will eventually end up as being a candle.
Go ahead and buy a pound of two of wax – there are many ways to use beeswax – you don’t have to waste any.
Candle Dipping Vat
When making beeswax candles with molds, you only need the amount wax needed to fill the mold and the proper sized wick.
However, dipped beeswax candles require a larger supply of wax than other types. For your dipping vat, you can use any metal container to hold the hot wax.
Candle pouring pots or vats (these can be used for years) are available for purchase and are well worth the cost. If buying a vat is not possible, a tall clean can will work (ex: a slim tall green bean can).
The larger dipping vat you choose – the more beeswax you will need. Try to select something that is tall and not very large in diameter.
But, while choosing the desired diameter of the container – keep in mind that you need to be able to dip and lift without bumping the sides.

Choose a Wick
There are many types of candle wicking available. The reliable standard for beeswax candles is square braided cotton wick. It is not very expensive, purchase a bit more than you think you will need.
Beeswax burns hotter than some other candle types. This means that a larger size wick is usually needed. For standard tapers – a size 2/0 cotton wick works well.
Other types and sizes of wicks may work but you have a higher chance of improper burning when using the wrong size.
Adding Scent
Many people enjoy the natural scent of beeswax. However, you certainly can add fragrance with essential oils or purchased candle fragrance. Just keep in mind that you will be adding scent to that whole vat of melted wax – this may make it less suitable for other projects.
How to Make Dipped Beeswax Candles

1. While your beeswax is melting in a double boiler setup, it is time to prepare your candle wick. For the simplest set up – make two holes in a craft stick.
Cut a length of wick longer enough to thread through the two holes and hang down on two sides. Remember the length of the candle you can make (and the wick) is set by the depth of the vat you use to hold the melted beeswax.
After measuring the wick and threading it through the craft stick (that now serves as you dipping handle. Tie something slightly heavy (I used a small metal nut) to the end of the wick.
This is the end that will be dipped into the liquid wax – it’s purpose is to hold the wick straight.
2. Let’s look at the dipping vat set up. The safest way to melt beeswax is in a double boiler set up. One metal container holds the melting wax – it sits inside another container that holds water.
I used a candle pouring pitcher as my wax vat (you could use a tall can). My modified fry daddy served as the heat source holding the water. Use of a thermometer is suggested – to prevent the wax from getting too hot.
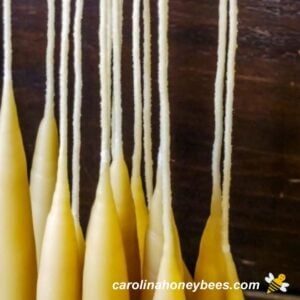
Once your wax is melted (this takes a while – don’t rush it), hold the prepared wicks over the vat. With a smooth motion, dip the wicks into the melted beeswax – hold for 1 second and lift out. Hold over the vat, letting excess drip back into the container.
Repeat the dipping process twice more – then hang the growing candles somewhere for a few minutes to let the wax set and cool a bit. Then, it is back to dipping. Continue the process until your candle reaches the diameter you wish.
3. While your dipped beeswax candles are still warm, lay them on a flat surface and gently roll them with your hands. This is to straighten them and prevent any curving.
4. After your candles have cooled, use a knife or scissors to cut off the bottoms. Remember that metal nut is still inside the beeswax. Now, your candle should have a smooth cut base.

Extra Wax
As you coat the wicks, the level of melted wax will start to drop in your dipping vat. It is a good idea to have an extra pot set up with melted wax so you can keep the dipping level constant.
Expert Tips
Making hand dipped beeswax candles is an art. Do not fret if your candles do not look perfect. I am sure pioneer candle makers did not have perfect machine smooth tapers.
The beauty of handmade products is the individuality of each one. But, it is natural for tapers made by dipping to be a bit bumpy – especially if this if your first time. If you are expecting machine smooth dipped tapers – you may be disappointed.
No harm in making beeswax sheet candles at first until you build up your confidence.
More Ideas
Be sure to experience other types of candle making fun. You can even make a quick blend with this beeswax candle recipe using coconut oil.
Another great use of wax, preserve some leaves with a beeswax dip. It’s a great way to make the Fall color last for months.
Another interesting way to enjoy the warm light of beeswax is by making DIY wax lanterns or luminaires – they look difficult but are so easy to make.
Now that you have all this wax left over – try creating some other crafts such as beeswax wax melts or maybe some beeswax lip balm.
In fact, there are a lot of inexpensive handmade gifts you can make with beeswax. What a nice idea for someone special.
FAQs
Beeswax is a pure wax to use for hand dipped candle making. It is a natural wax that burns bright and clean.
Most crafters prefer square braided cotton wicking for making candles with beeswax.
There are several factors that can cause hand dipped candles to be bumpy or lumpy. One of the most important issues is to ensure that the pour (dip) temperature of your wax is right. For beeswax, a steady temp of 160°F usually works well.
A Final Thought
Enjoy the benefits of beeswax candles by making dipped candles with raw beeswax with your own hands.
Not only is this a fun crafty thing to do, they are great to use at home or give as gift. A handmade item shares the gift of the object but also your time and thoughtfulness – that’s a precious thing.
Dipping Beeswax Candles Tutorial
This post may contain affiliate links. As an Amazon Associate, I earn from qualifying purchases.
Read my Disclosure.Tools
- scissors
Supplies
- 2 lb beeswax more if your dipping vat is large
- 1 roll cotton candle wick 2/0
Instructions
- Melt beeswax safely: When melting beeswax for handmade dipped beeswax candles, it is always safest to use the double boiler method.This is a pot of water that has a smaller container holding wax inside. It is safer because it allows an even distribution of heat.Beeswax is flammable. Use proper safety techniques to avoid over heating the beeswax. Use pot holders when handling hot wax containers. Be safe.Keep in mind that the depth of the melting vat determines the length of candle you can make.In this project I am using a candle making pitcher sitting inside a pot of water.

- Prepare the wick: I like to use a regular 2/0 cotton braided wick for beeswax tapers. It is easiest to make two candles at a time. The wicks can be draped across a few fingers during dipping to keep the wicks apart. Or, you can use a popsicle/craft stick with 2 holes to hold the wicks apart.
- Attach weights to keep wick straight:A metal nut tied to the end of each wick will aid in keeping the wick straight as you make your candles. Don’t worry, you will cut these off later!
- A candy thermometer is your friend when making dipping candles. Over heating beeswax can cause it to darken.If the wax is not hot enough, your candles will be lumpy and bumpy. A thermometer helps you keep the wax in the proper temperature zone.Heat the beeswax in your dipping vat to 160° F. As wax accumulates on your wick, the level of wax in the vat will drop.It is good to have extra hot wax in another container. This will allows you to add warm wax to the dipping vat as needed.This small pot shown here is my very favorite wax pot for small projects. You need one or maybe even 2 – I have several. LOL
- Dipping: Once your wick is prepared and the wax is at the correct temperature, you are ready to proceed.Dip the wicks into the hot wax 3 times. A quick dip – remove, dip – remove, dip- remove. Then, set it aside to cool for a couple of minutes.Repeat the process until your candles are as thick as you want them to be. This takes time and patience.Unless you have special powers, your candles will not look completely smooth (as if they came out of a machine). They are handmade.
- Finishing the base:Once the candle dipping process is done, use scissors to cut off the base of each candle. The excess beeswax encasing the nut can be reused.For a smoother base, you may dip the candles once more after cutting off the excess wick/wax/nut.


Notes
- Take all precautions to avoid fire or burns – candle making is easy but you must respect the hot wax
Hello there,
Thank you for sharing this information. The popsicle stick hack was on point. Nice to know until I can afford the metal apparatus I have been seeing online to do more than two at a time.
You are most welcome. It works 😉