Parts of a Beehive
Beekeeping is one of those activities that comes with a lot of terminology. Can you name all the parts of a beehive and tell their function? Well, don’t feel bad if you can not – at least in the beginning. Different types of equipment, tools, bees, management styles, etc. How can you keep all these beekeeping related supplies straight? Don’t fret – everyone has to learn. However, understanding the name and function of the components of a hive is essential.

Whether you are a new beekeeper struggling to understand the basics of beekeeping equipment, or a seasoned beekeeper looking for a refresher – this guide will help.
Basic Parts of a Standard Beehive
Deciding which kind of beehive to use is one of the biggest decisions that a beginner beekeeper must make. A beehive is not only a box or structure – it is the home for a family of bees.
If you want to learn how to be a good beekeeper, you need to know your tools. Learn the basic parts of your hive and grow from there.
As you read beekeeping books and learn from other forms of education, you need to know the name and function of hive components.
Beehive Styles
Beekeepers worldwide use many different hive designs in their bee yards. In the United States, you most often find beekeepers using one of 3 different types of beehives.
Each one with its own advantages and disadvantages. You can be successful with any of them.
- Top Bar Hives
- Warre Hives
- Langstroth Hives
Top Bar Hives are often used by beekeepers interested in bee pollination benefits. These hives do not use whole wooden frames or foundation. Bees build comb down from simple wooden top bars.
Langstroth hives are the most popular for those hoping to reap a large honey harvest. The Warre Hive is similar to a Langstroth but has different management techniques.
In recent years, the long horizontal or long Lang hive has gained some popularity. And, some beekeepers build their own hives in a variety of types.
This post may contain affiliate links. As an Amazon Associate, I earn from qualifying purchases. Please read my disclosure.
Components of the Starter Langstroth Hive
The Langstroth Hive was developed by Reverend Lorenzo Langstroth in the mid 1800’s.This hive design was an occasion where the structures inside the hive are the parts that made history.
The “Lang” hive featured removable frames that allowed beehive inspections without destroying the sheets of honeycomb inside. It is still the most popular hive design in use today.

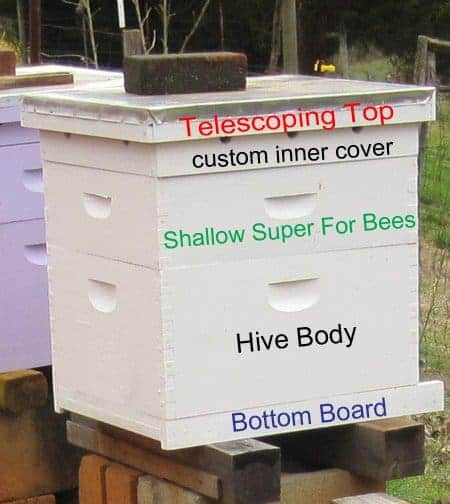
Parts of the Standard Beehive
- a bottom board (solid wood or partial screen)
- bee boxes – hold frames – different heights – deep, medium, shallow
- frames of various sizes and usually wax foundation
- an inner cover
- and a top cover
Bottom Board – Base of a Hive
Everything needs a good foundation. The beehive is no exception. Hives can get very heavy. The bottom board is the base part of the hive. Usually made of wood or wood and screen – plastic bottom boards are available too.
Place your bottom board on a firm surface raised off the ground. A hive stand can help prolong the life of your wood by keeping it off the ground. Paint exposed wooden surfaces!

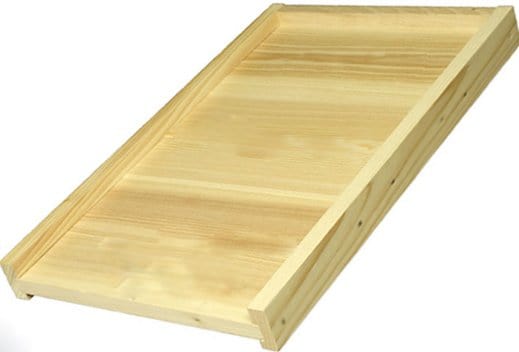
A Solid Bottom Board features a wooden bottom with no screen. The design of the sides creates a front entrance for the bees when a hive body is added.
Solid bottom boards have been in use for years. They are especially useful in climates that experience very cold winters.
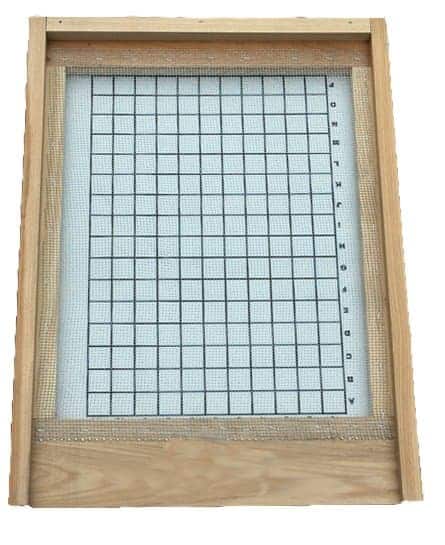
A relatively newcomer on the scene, is the screened bottom board. It is similar in construction to a regular bottom board.
Instead of a full plank bottom, a large area of screen is installed. The wire (size #8) prevents robbing bees and predators from entering the hive bottom.

Originally, the Screened Bottom Board was developed as a soldier in the war against mites. It was hoped that the screen bottom would allow mites to fall through to the ground and perish. It also made testing for varroa mites much easier.
In reality, research has shown that this bottom board has a very small affect on mite numbers. Beekeepers in areas with hot Summer temperatures use the screened bottom board without the grid board in place.
Many Southern beekeepers place hives in full sun attempting to dissuade Small Hive Beetles. But this hot location causes the bees to have to work harder in summer to keep the hive cool.
A bottom board with screen, helps with ventilation of the hive. It is also useful when conducting varroa mite test counts.

Beehive Boxes “Supers”
Several beekeeping terms are used to name the stackable boxes that make up the hive. You will hear them called: Deeps, a hive body, a Brood Box or supers. This causes a lot of confusion for novice beekeepers.
The word “super” is short for “superstructure” – originally if referred to the “extra” boxes that were added to the hive for the beekeeper to collect. Today, the word super may be referred to any box on the hive.
In general, larger “taller” beehive boxes are used for a brood nest and food storage for the colony.
Smaller “shorter” boxes are used for honey harvesting for the beekeeper. The Langstroth hive grows in height as more boxes are added to the hive.
Deep or Hive Body
The first box for the hive is usually a deep or hive body and sits directly on the bottom board. The deep box measures 19 7/8” in length and 16 ¼”wide. A deep beehive box is 9 5/8” tall and will hold brood frames (9 1/8″ tall).
You will start out with 1 and add other boxes as needed. Depending on local climate conditions, you may choose to use 1 or 2 deeps on the hive for the use of the bees.
Inside, the bees raise baby bees and store food. Honey in this area is for the use of the bees – not the beekeeper.
Beekeepers in regions with long cold winters may need 2 deeps to provide enough honey storage space for the honey bees to survive Winter.
These frames can get very heavy so most beekeepers do not prefer to use deep frames for collecting a honey harvest.
Supers – Shallow and Medium
Most beekeepers use shallow supers for the bees to use for the honey harvest. Shallow supers share the same length and width of the other boxes. Their height measures 5 ¾” ( using 5 3/8″ tall frames).
A common hive set up (warmer regions) is 1 deep box and 1 shallow super – to be left for the bees. (Perhaps more or larger boxes in colder regions.)
As more space is needed by the working colony, more shallow super boxes are added to the hive for the beekeeper to harvest.
Mediums
Medium supers are the same length and width of the other boxes of a standard hive. They are just a bit taller than a shallow.
The height of the medium super is 6 5/8”. They require frames that measure (6 1/4″ tall). Mediums do provide a bit more room but that makes them heavier too-when full of honey!
The use of mediums is becoming more popular and some beekeepers choose to use mediums exclusively for the hive.
It is common for all hive boxes to have the pre-cut inset handles. But wooden beehive cleats make lifting and gripping much easier.
Frames & Foundation
Frames are used inside each box. These hold the sheets of honeycomb and make removing frames for inspections possible. Plastic frames are available but wooden frames are still the most common option.
There are various styles of frames – depending on the type of foundation you use. All of them work as long as they fit into your hive properly.

Frames will be longer or shorter depending on which super they go into. You need the corresponding size frame for the box you are using.
It can be difficult to see the difference between shallow frames and medium frames at a glance because they are so close in size – look carefully. If you need to fill a shallow box – you need shallow sized frames.
Also, Langstroth hive boxes come in the standard 10-frame size and a smaller 8-frame size. How many frames are needed depends on the size of hive boxes you choose.

You can find frames that are ready to use but I like to put my own frame together. Frames are easy to assemble. Be sure to use nails and glue.
These frames will experience a lot of stress while being pried from the hive. Proper use of wood glue keeps the frame usable for a longer time.
If you like putting your equipment together – be sure to learn how to assemble your beehive boxes properly. They should be sturdy and square so all future parts will fit.
Foundation In the Hive
Inside the frames, most beekeepers install foundation. The most common types of foundation are beeswax, beeswax with wire and plastic.

The purpose of foundation is to encourage bees to build straight combs within the frame. This keeps the frames removable – which is the purpose of them in the first place.
Beeswax foundation is made of beeswax and other waxes. We assume it is pure beeswax but that is not always the case. Beware of cheap beeswax foundation on the market. If it sounds too good to be true, heed the warning.
What about Plastic?
Plastic foundation is preferred by many beekeepers, especially larger commercial operations. A plastic sheet is made with a honeycomb embossed design.
A layer of beeswax is brushed on the plastic foundation. This encourages the bees to use it. Plastic foundation is durable and easy to install but some bees are reluctant to use it.
You can have beekeeping success with either type of foundation. I suggest you not put new plastic and beeswax foundation in the same box.
The bees will prefer the wax and be slow to work on the plastic. After the wax is build out, the foundation type doesn’t matter as much.
Some beekeepers are proponents of foundation-less beekeeping. This technique has some good points but I don’t recommend it for beginners.
Inner Cover: Insulates and Eases Inspections
One of the most versatile parts of a beehive is the inner cover. The inner cover goes on top of the top box of the hive – just under the outer cover.
It helps maintain correct bee space in the hive. The top box in the hive stack will have enough space for bees to move over the tops of the frames. But, it prevents bees from building burr comb and attaching frames to the outer telescoping top.

This makes opening a hive easier. If the inner cover is stuck, you can insert a hive tool underneath and release the frames.
The inner cover is reversable. The notch should be up and toward the front during the warm season. If you desire to use the inner cover for a second entrance, flip the cover over (notch faces down) and slide the telescoping top forward to allow bee access. An oval hole in the center promotes good air ventilation.
Telescoping Top – Roof for the Hive

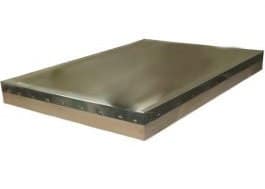
The most common top used for our beehives is the Telescoping Top. Made of wood and covered with metal, the top has sides that extend for a few inches down the side of the hive. This is where the “telescoping” term comes from.
Sealing the colony well and less likely to blow off, telescoping tops are very useful. If you really want a special look for your hive, consider the garden hive top!
Beehive Accessories
Luckily, or maybe not so much, there are tons of things you can buy to go with your beehive. Some of them do perform necessary functions and yet – may not come with a beekeeping kit.
Purchase and prepare your equipment weeks prior to bee arrival. This is a good time to add extras such as entrance reducers, feeders and queen excluders.
- an entrance reducer – wooden piece to block part of front
- queen excluder – a piece of narrow wires that prevent queen access to the honey supers
- feeders – you need to feed your colony but feeders found in a beekeeper starter kit are not necessary
- hive stand – raising the hive up off the ground is good but you can use other types of stands
- slatted racks – placed between the bottom board and the first bee box to provide ventilation and clustering space (optional-but handy in hot climates)
- frame spacers to evenly space frames in your honey supers for extraction
- slatted racks are often used on Langstroth hives in hot regions – you can add one later.
Choosing a Hive Configuration for Your Apiary
How many hive components you need to set up a standard hive depends on 2 factors. The climate in which you live and your personal preference.
Most beekeepers who live in the Southern US can over-winter bees in a standard configuration of 2 boxes.
One deep sized box (also called Hive Body) and one shallow super (or medium) for the bees for store food for winter. When you winterize your beehives, you make sure these boxes are full
Some beekeepers have a tall stack of boxes on a hive and others have less. If there was truly 1 best way to successfully set up a beehive, everyone would be doing it that way.
It stands to reason that a beekeeper in North Dakota may need more boxes of honey for his Winter hive than one in Georgia. Connect with other beekeepers in your area and learn how many boxes their hives need for Winter.
FAQs
A standard Langstroth hive holds 10 frames. (8 frame Langs have risen in popularity.) Beekeepers use many variations of the Langstroth Hive – including a long Lang! But, all work on the idea of removable frames.
The most common types of hive boxes on a beehive are: the deep or hive body, medium supers and shallow supers. Each serves a specific purpose, from brood rearing to honey storage and not every hive will have each box.
Both beeswax and plastic foundation has merits. Beeswax is natural and widely accepted by the bees, while plastic is durable and lasts longer.
When you first begin a new hive, start with 1 deep box. As they bees complete comb in this box, prepare to add another.
The size of that second box will depend on the size needed for your climate and beekeeping style. It is always a good idea to have a couple of extra super boxes on hand.
Final Thoughts
When you understand the function of each part of the beehive, you are better equipped to manage your bees. Strive to understand this in the beginning. And then, you have other things to decide including – How do I buy bees? and where to put my hive? During the busy bee season, some beekeeping supplies may be temporarily hard to obtain. Good planning will make your bee season much easier and more enjoyable.

