DIY Bug Bite Relief Sticks
Nothing ruins a great day outdoors faster than a bunch of itchy insect bites. This DIY bug bite relief stick provides a natural way to get some relief. We can’t stop mosquitoes, gnats and other biting bugs but we can soothe the itch. Made with beeswax, nourishing oils and a few carefully chosen essential oils, this anti-itch stick is easy to carry in your pocket or backpack. Best of all, the recipe is simple to make and easy to customize with your favorite oils.

There are many reasons to include beeswax in skin care recipes. A natural humectant with antibacterial properties – it is a great partner in promoting healthy skin.
How This Bug Bite Relief Stick Works
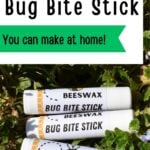
One of the best features of this homemade bug bite stick is its portability. Beeswax, nourishing oils, shea butter and essential oils combine into a smooth semi-solid balm.
The balm melts slightly when it touches warm skin. The tube container also makes it simple to apply directly to itchy insect bites.
Beeswax is the anchor of the recipe. It thickens the oils naturally but still allows the product to glide smoothly over the skin. A few drops of essential oils add a pleasant scent and can make the balm feel extra soothing on itchy spots.
A quick swipe over the affected area leaves a thin layer of herbal balm behind, making it a convenient option during gardening, hiking and other outdoor activities.

Ingredients Needed
You only need a few ingredients to make this homemade bug bite relief stick with beeswax.
This post may contain affiliate links. Carolina Honeybees earns a tiny commission when you shop from our links. See our privacy policy for terms.
- beeswax
- carrier oil (I like coconut oil)
- shea butter (or cocoa butter)
- essential oils
- vitamin e oil (optional)
Beeswax
Beeswax is available in several forms – pellets, bars or chunks. If you using pure raw wax from a beekeeper – be sure to clean your beeswax before using it.
Beeswax acts as a humectant (it attracts water) and it forms a protective layer on your sensitive skin.
These properties make it a great soother for skin irritation. You can even use products with beeswax for hair care.
It is also a lot of fun to create a special beeswax lip balm recipe with your favorite fragrances and oils.
Carrier Oil (Coconut Oil)
You have several options for the carrier oil (the liquid part of the recipe that helps the other ingredients work). Olive oil or sweet almond oil is popular.
However, I love coconut oil because it contains lauric acid which gives it antimicrobial properties. It kills bacteria on your skin and helps reduce inflammation. Liquid at warm temperatures, it becomes a soft solid in cooler conditions.
Shea Butter
Shea butter is full of vitamins and antioxidants. It softens and hydrates the skin and makes the balm feel richer.
Some people have a sensitivity to shea butter. If this is you – try cocoa butter instead or simply use more coconut oil.
Essential Oils for Bug Bite Balms
Essential oils are compounds extracted from plants. They are natural but that does not mean they are not powerful.
Their anti-inflammatory, antiseptic, and analgesic properties can help reduce itching, swelling, and pain associated with bug bites.
Tea tree, peppermint, eucalyptus and lavender essential oils are good for insect bites. Some recipes use spearmint and patchouli oil.
Vitamin E Oil (optional)
I always include a few drops of vitamin e oil in my homemade body care products. Not only is it nourishing for the skin – it helps prevent the natural oils and butters from going rancid.
How to Make a DIY Itch Relief Stick

1. First, melt your beeswax in a suitable container. Luckily, beeswax has a low melting point of about 147°F.
However, it is flammable if heated to the flashpoint of 204.4 °C (400 °F). Some folks melt it in the microwave but that is not my recommendation.
The safest way to melt your beeswax is using a double boiler method. These little small double boiler inserts are inexpensive and make great pans to dedicate to your wax crafts. That’s what I use.
I melt the beeswax first because it takes a bit longer. Then, add the oils and butters (but not the vitamin e or essential oils yet.) Stir well to combine.
2. Remove the pan from the heat source – now add the desired essential oils and a few drops of vitamin e oil (optional).
3. Pour your recipe ingredients into regular sized lip balm tubes. Let them cool completely before adding the lid.
4. Use some type of label or marker to display what is inside. Don’t count on remembering what is in that tube!
How to Use
Anytime you are bitten by an insect, it is vital to rule out any dangerous allergic reactions. Then, gently apply the bug bite relief stick to the affected area.
If the weather is chilly and the recipe too firm- use your finger to gather some material off the end of your tube and apply to the skin.
Swelling, redness and frustrating itching are the most common discomforts of bug bites – consider other methods or remedies for bee sting care that may help.
Because anyone can be allergic to anything – it is always a good idea to start with a light application first. And of course, if any serious symptoms arrive – reach out to medical professionals immediately.
Storing
Your bug bite relief sticks should last several months, even longer if you keep the extras in the refrigerator until you are ready to use them.
I suggest keeping one with you and the rest in the frig until needed. They do not require refrigeration but don’t leave them in a hot car.

FAQs
Yes, you can use the bug bite relief stick on children, but be cautious with the types and quantities of essential oils used. Some essential oils may be too strong for young children, so consider using gentler oils like lavender and testing a small amount first.
I would not use the bug bite relief stick on pets without consulting my veterinarian first.
Yes, you could add colorants or fragrances to your sticks but there is really no need to add unnecessary ingredients.
If your bug bite relief stick is too soft, increase the amount of beeswax in the recipe for a firmer consistency. If it’s too hard, add a bit more carrier oil (like coconut oil) to soften the stick.
Finally
DIY Bug bite relief sticks are not a cure. But, they can provide some itch relief if you get a bit to close to a foraging bee, fire ants, rub elbows with some chiggers or even discover a wasp nest! Sometimes, stings or bites happen. Be ready.

Diy Bug Bite Relief Stick Tutorial
This post may contain affiliate links. As an Amazon Associate, I earn from qualifying purchases.
Read my Disclosure.Supplies
- 28.4 grams beeswax (2 Tablespoons)
- 26.8 grams shea butter (2 Tablespoons)
- 13.06 grams coconut oil (1 Tablespoons)
- 24 drops tea tree essential oil
- 12 drops lavender essential oil
- 8 drops Peppermint Essential Oil
- 1 capsule vitamin E oil (or 3 drops)
- 9 pieces lip balm tubes (.15 ounce)
Instructions
- Melting the Wax:Beeswax is very easy to work with due to its low melting point. However, it can be messy. Protect floors and counters or avoid drips!First, place the required amount of beeswax in your double boiler set up (or small saucepan). Water in the bottom pot and ingredients in the top. Use the stove top element to slowly heat.I have several of the little double boiler inserts linked above. They are great for crafting.Your wax can be in blocks, pellets or shaved. It takes a while to melt – be patient and gentle.

- Adding Butter and Oil:Once your beeswax has liquified, add the coconut oil and shea butter. Don't be alarmed if the wax temporarily hardens again – it will quickly melt again.Continue to gently warm until these ingredients are liquid and mixed together. I use chop sticks or wooden skewers to stir but you can use whatever you wish to be dedicated to wax projects.
- Mix in Essential Oils:Remove the container from heat and add your essential oils. Count the drops – don’t use too much. We don’t want the essential oils to be overheated – that is why you remove the mix from the heat before adding them. (Add a few drops of vitamin E oil if desired – this is optional but it does help keep the oils from spoiling).
- Pouring into Containers:Stir well and let the mixture cool for a couple of minutes. Then slowly pour into empty lip balm tubes or small wide mouth jars or tins – depending on which container you prefer to use.
- Add Caps When Cool:If using plastic lip balm or chapstick tubes, let the mixture cool before adding the caps.
- Labels Please:You don’t want anyone applying the bug bite stick to their lips so label the container – even if you are only making them for yourself. Create some types of label. If you plan to give them away – I would list the ingredients -just in case someone may have allergies.


How many does one recipe make?
Depends on the size of your tubes or containers. I usually get about 8-9 tubes.
Easy and portable.