Creamed Honey

If you love all things honey, it is time to learn how to make creamed honey at home. You hear it described with different names: creamed honey, whipped honey, spun honey its all the same. Join me on a journey into the world of creamed honey and learn everything you need to know to make your own.
Whether you are a beekeeper or simply an enthusiast for all things honey, my guide will help you transform raw honey in a delicious, creamy spread that is still honey but… different.
Homemade Creamed Honey Recipe
Creamed honey is simply honey that has undergone controlled crystallization. Yet, it is a unique and unusual product – and I find that people are always amazed at the taste. Contrary to the name, creamed honey does not contain any dairy products.
There is nothing special about crystallization. Almost all types of honey will crystallize or “become granulated over time.”
For making creamed honey at home, there are 2 primary methods:
- the raw method
- Dyce method – uses pasteurized honey for added safety.
I prefer the raw method of making creamed honey because I want to protect all the natural goodness and do not have any special food safety concerns in my family.
Ingredients You’ll Need
You will need:
- honey
- starter (or seed) crystals
Honey
You can use any variety or type of honey but some varieties do crystallize faster (this means smoother crystals). Clover honey is a great choice. I would avoid those known to crystallize slowly – like Tupelo Honey.
Honestly, regular wildflower honey is usually the best choice. Use quality honey with an acceptable moisture percentage. If you store your honey correctly, you won’t really need to worry about this.
All honey has a water content – ideally around 19% or less. During crystallization, the water percentage will rise slightly – do not use honey with a borderline higher water content.
Starter or Seed Crystals
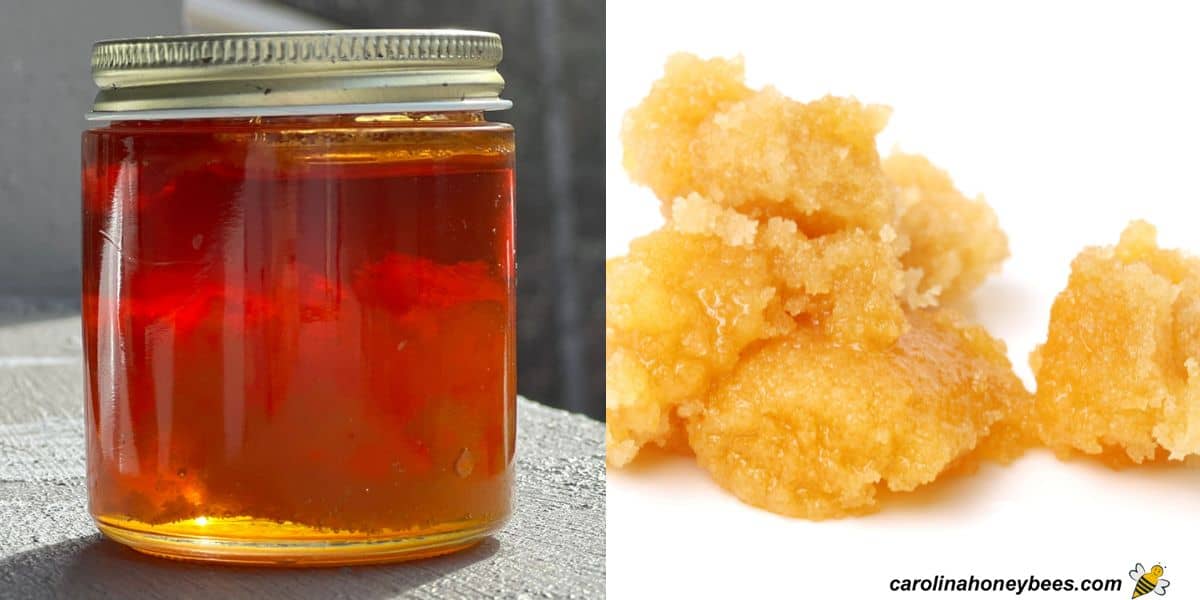
You also need some good starter or “seed crystals”. The best way to get them is to simply buy some spun honey at the grocery store. That is exactly what I do and it is worth the money. You only need a small amount.
Most commercial brands use clover honey and have a nice smooth creamy texture. These tiny crystals will be the starter that the rest of your liquid honey builds on.
If you have some honey that has already began to form crystals naturally, you could use it. Using a mortar and pestle to crush the large, gritty crystals to a smooth consistency, you have your seed crystals.
I tried this once – trust me – buy the seed starter. Making your own is a messy process.
Equipment
You really don’t need any special equipment to make a batch of creamed honey. Many times I have used a 5 gallon bucket and a long-handled spoon.
But, having a mixer to help stir is certainly a plus. One thing to consider – after mixing everything up – you will go ahead and pour the mixture into smaller containers. Have those clean and ready to use.
Step by Step Process

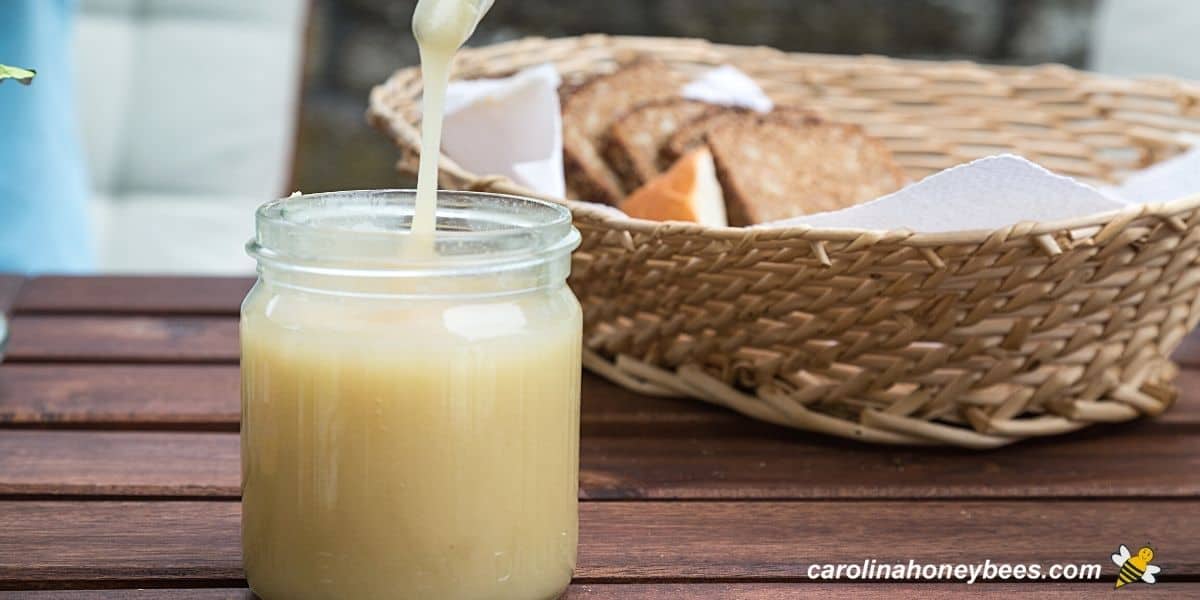
1. Your liquid honey should be at room temperature and show no sign of crystallizing. Look for cloudiness or small granules in the jar. We want the honey to build on our smooth seed crystals.
If it is cold, you can slightly warm the liquid honey for easier stirring. But, do not overheat it. If it is “too warm” it will melt your seed crystals. Pour the liquid honey into a large pot, bowl or bucket with plenty of room to stir.
2. Now it is time to add the seed crystals (or the creamed honey we purchased for starter). Ratio or percentages are important. The mix should be 10% seed crystals to 90% honey.
(Personally, I prefer a 1:7 ratio and use a bit more seed starter. 1# of creamed honey added to 7# of liquid honey)
You can not really use too much starter-but you can use too little. If you use too little seed or starter, the honey will be very slow to set up and many not be as nice and smooth as we wish.
3. Mix the desired amount of seed crystals into your liquid honey. Stir, stir, stir, until mixed well. The seed crystals should be spread throughout the entire mixture.
You can use a stand mixer or blender if desired-but a big spoon will do the job for small batches. In spite of the term, “whipped honey” – it is not necessary to use a whip attachment or special equipment.
If you do use a mixer, medium speed is sufficient. It is common for some foam to appear on the surface, skim this off with a rubber spatula.
4. Now, pour or spoon the mixture into smaller containers and add a lid. Short flat tubs work best but jars are fine too – just remember you will be spooning your homemade creamed honey out of that container.
Now for the hard part. Place your filled containers in a cool place for a few weeks. Generally, you can not use a refrigerator it gets too cold. The ideal temperature for setting up creamed honey is 50-57° F (14 C).
A wine cooler with adjustable temperature or a cool basement are two good choices. I put my containers in a igloo cooler and sat them under the house when I first started 😉
Within a couple of weeks, the process should be complete and you will have a delicious set spread.
Expert Tips
- Use starter or seed crystals that are fine and smooth. They should not feel grainy on your tongue.
- Do not heat your liquid honey too much or it will dissolve your crystals.
- The less crystals you use – the longer it will take to finish your homemade creamed honey.
- If the creamed honey you make does not solidify – you likely have it at the wrong temperature. It must not be too cold or too warm – stay in the range.

Variations
You only need 2 ingredient to make whipped honey. But, if you want to get really creative, add a bit of powdered cinnamon or cocoa powder to the mixture before pouring it into containers. (Hint- you can also use cinnamon to make some awesome Cinnamon Honey Butter too.)
Also, vanilla flavoring or various herbs can be included. Avoid any additive that is not dry as this may increase the moisture content of your end product.
Some people enjoy adding dried fruit etc to their creamed honey recipe. That’s really yummy! Even people who are not big honey fans seem to enjoy it.
Storage
Storing creamed honey is very easy – just keep it cool. After the crystallization process is complete, you can store your containers in the refrigerator without any harm.
But, a slightly warmer location will help maintain the spreadable consistency. The kitchen counter is fine as long as the room temperature is below 75 °F.
It will revert back to liquid when exposed to heat. It will still be safe to eat. And no, it will not crystallize back to the best consistency on its own.
Benefits of Creamed Honey
There are several reasons people enjoy creamed honey. The benefits include:
- it is less messy and does not drip
- the flavor is a bit different than raw liquid honey – milder
- may be easier to measure by spooning out the correct amount
Creative Uses
Creamed honey can be substituted for liquid honey in recipes. It is also delicious as a spread on toast or bagels.
Honey can be added to tea or coffee as a natural sweetener in liquid or solid form. It is especially delicious when spread on honey scones or biscuits.
You can also mix it with other spreads for a unique flavor. When combined with my homemade honey apple butter – it gives you a sweet spread with an unusual texture.
If the idea of using different forms of honey appeals to you, consider trying your hand at making honey powder – or dehydrated honey.
FAQs
Creamed honey will not go bad if stored in an air-tight container – protected from moisture. If may return to liquid form if you let it sit in a hot or very warm environment.
Refrigeration is not required as long as the room temperatures are not too warm (above 80°F). But, you can store creamed honey in the refrigerator to keep it in a firm state.
No, both creamed honey and regular are the same things in a different form.
As the crystallization process continues, the honey will reach a level of stability. At that point, it is as thick as it will get. It is common for the color to change to a lighter shade but that is relevant to the variety of honey used for the recipe.
Technically, yes. But, honey that crystallized naturally without starter is often gritty and unappealing. It is rather easy to decrystallize honey back to liquid.
Final Thoughts
Over the years, I have made thousands of containers of creamed honey at home. Now you can too. All you need is honey, seed crystals, a cool storage space and a bit of patience – while you wait for the magic to happen. Now, while you have that jar of honey handy, put to to good use – whip up a Honey Bee Latte to go with your scones.
Did you like this recipe? Please leave a 5 star (⭐⭐⭐⭐⭐) rating in the recipe card below. And, don’t forget to follow me on Facebook and Pinterest.
Creamed Honey Recipe
This post may contain affiliate links. As an Amazon Associate, I earn from qualifying purchases.
Read my disclosure.Equipment
- large bowl
Ingredients
- 7 pounds raw honey
- 1 pounds clover creamed honey
Instructions
- Measure your liquid honey and pour into a large bowl. Leave room to stir well later. You do not need a mixer but it is okay to use one on low speed if you wish. Your liquid honey should be slightly warm (just enough to work). But, not hot – it would melt your seed crystals!

- Using weight as a measurement: add the starter seeded honey – already creamed (1 pound) to regular liquid honey (7 pounds). I use the 1 – 7 ratios but you can use the 1-10 as the Dyce method if you wish. If you do not use enough starter, the end product will be grittier and not smooth.I like to use clover starter as it has a smooth texture.
- Your creamed honey starter may not be white. It may be darker. That's okay – the nectar source of the honey determines the color.Now, stir well to combine the seed and liquid well. Let it settle for a few minutes allowing air bubbles to escape.
- Now, pour the mixture into your desired containers and seal. Flat plastic containers (like deli cups) are good or a wide mouth mason. Remember, you have to be able to spoon it out!Your jar should not be too deep either. Fill it to the rim with a little headspace left.
- Now, you must be patient. Find a cool – not cold place to let the honey rest. A refrigerator is often too cold unless you have an extra one that you can have just barely running. A cool corner of the basement is a fine choice for most. In a couple of weeks (at this consistent cool temperature), your whipped honey should be ready to enjoy.


Notes
- did not use enough seed crystals
- your liquid honey was too hot and melted them
- the setting location temperature is too cold or too warm
- your honey is a type that resists crystallization
On recent trip to Spain, I think I saw more Creamed Honey in stores than Regular Honey. Chestnut Honey was incredible! Noticed that some local bee hives in the mountains had super walls about 3 or 4 inches thick unlike our thin walled supers. Queen excluders were NOT the size of the entire box, only a solid board with about a 6 inch by 6 inch area to let bees go back and forth. Inner cover was a piece of canvas. And hives were low to ground–not elevated at all.
this worked so smoothly! pardon the pun, but it really tastes wonderful and was easy except for waiting for it to be ready!
Thank you. It works well in most cases and be sure to use new fine texture starter from time to time to keep the crystals small!
Thanks for the recipe! I keep finding so many helpful tips on your site. The creamed honey was the best. I made a batch 1:7 and after two weeks it is fantastic. I took some of them and added things like coco powder, cinnamon, and a few other flavors. In our area we can’t sell flavored honeys at all. Thats ok, the family and friends will enjoy these treats!! Thanks for all your help!
That’s wonderful! I’m so glad you are enjoying it!
Our recent fall harvest in New England produced a dark, thick honey. After bottling, some of it has already solidified due to its heavy concentration/low moisture content. I’m thinking this may be the perfect starter?
If the crystals are smooth – not gritty to the tongue – it could be good starter.
When you add spices or dried fruit is there the possibility of spoiling? Also if you make flavored creamed honey, can you sell it or does it cross over into any regulations? I make many wax products along with my honey. I love making honey gift baskets, but I wouldn’t want to add flavored honey if there was a danger of spoilage.
With spices… not so much because they are dry. With dried fruit you should be okay as long as the honey used is not borderline high in moisture.
Quite by mistake I came across some canola pollinated honey that crystallized very quickly, and very smoothly. This honey would harden from liquid to butter like solid overnight. Would this work for seed?
I think it would!
We have been using your recipe for creamed honey with great success—thank-you! We are ready to move on to the next big step for us–flavored creamed honey. Can you share your recipes of what you add and the amount to creamed honey, please?
Thats wonderful news. When I add flavor I normally use dried fruit powder or something similar. Such as cinnamon or even chocolate cocoa powder YUM. How much is a bit subject to taste preference. I think is about the equivalent of 2 – 3 level teaspoons per 12 oz finished container.
Good Afternoon,
I’m giving your recipe a try! Thanks for putting it out there. Was this sentence supposed to say “Slightly warm”? Or should it b e warmer than slightly warm? I made it with it being slightly warm. 🙂
“Your liquid honey should not be slightly warm. But, not hot – it would melt your seed crystals! ”
Thanks,
Dee
Thank you so much – you did just right!
How many pounds of creamed honey will 60 pounds liquid honey make?
Roughly 60 pounds plus the amount of starter that you add. In my experience, it doesn’t really expand very much – just the texture changes.