How to Make Petroleum Jelly

If you enjoy the benefits of using petroleum jelly but cringe at the idea of crude oil byproducts, this post is for you. Those little jars (commonly known by the brand name “Vaseline”) are found in most homes. A highly moisturizing substance used for everything from chapped lips to squeaky hinges. It is very easy to learn how to make petroleum jelly at home – without the petroleum please.
Crafting with beeswax is a rewarding experience. The uses of beeswax are many-but it is highly regarded as an ingredient in many body care recipes.
DIY Natural Petroleum Jelly
Unrefined petroleum jelly is a gel-like substance, originally used by workers on the oil rigs to treat wounds and burns. In time, the product was refined and become the substance we know as
“Vaseline”.
Before being refined, petroleum jelly contains carcinogens. Refined products should be safe. But, exactly how “refined” must something be before it is safe?
This is one of the best reasons for learning how to make your own petroleum jelly product with natural ingredients .
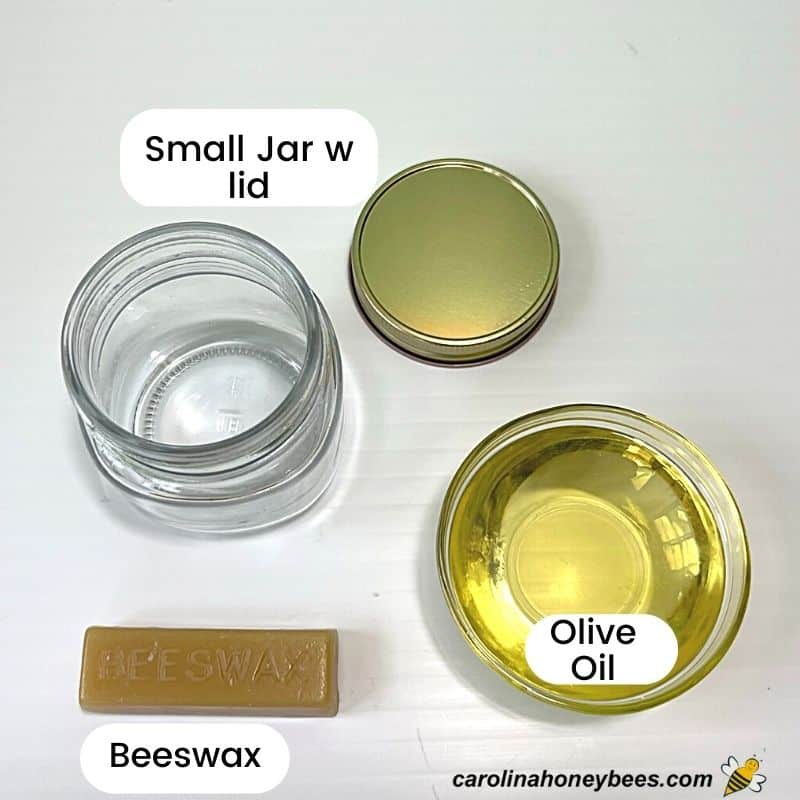
Ingredients
Do not worry about a complicated ingredient list for a homemade petroleum jelly product. You only need two items.
- Beeswax
- Olive oil
This post may contain affiliate links. Carolina Honeybees earns a tiny commission when you shop from our links. See our privacy policy for terms.
Beeswax
Beeswax is a natural wax that is made by honey bees. Produced from glands on their abdomen, this wax is shaped into the hexagonal wax cells of their comb.
A recognized moisturizer, beeswax is often used in skin care products commercially and homemade.
To make petroleum-free jelly, you only need a small amount of beeswax. It is available for purchase in blocks or pellets.
You can also purchase raw beeswax from a beekeeper – but be sure to clean raw beeswax properly before using it in this recipe.
Olive Oil
Olive oil is a staple in most kitchens so you likely have a bottle on hand. In addition to using it in food recipes, it is also useful in many recipes for homemade products. For instance, it can be used in substitution for coconut oil when making beeswax hand lotion.
Additions
This most basic recipe of homemade petroleum jelly – Vaseline only requires those two ingredients. You will be able to use it externally in the same way you use the purchased product.
However, some people choose to a small amount of an essential oil for the increased healing properties they can provide.
Take care to use only those approved for skin contact and only the amount recommended on the label. Natural essential oils are powerful and should be used with care and respect. Two popular oils used are:
- Tea Tree Oil – believed to be anti-bacterial
- Lavender Oil – soothing
Another possible addition to consider is vitamin E oil. An anti-oxidant, it is a popular additive in body care products. I use a few drops in many of my salves and soaps to extend the life of the oils.
The Process

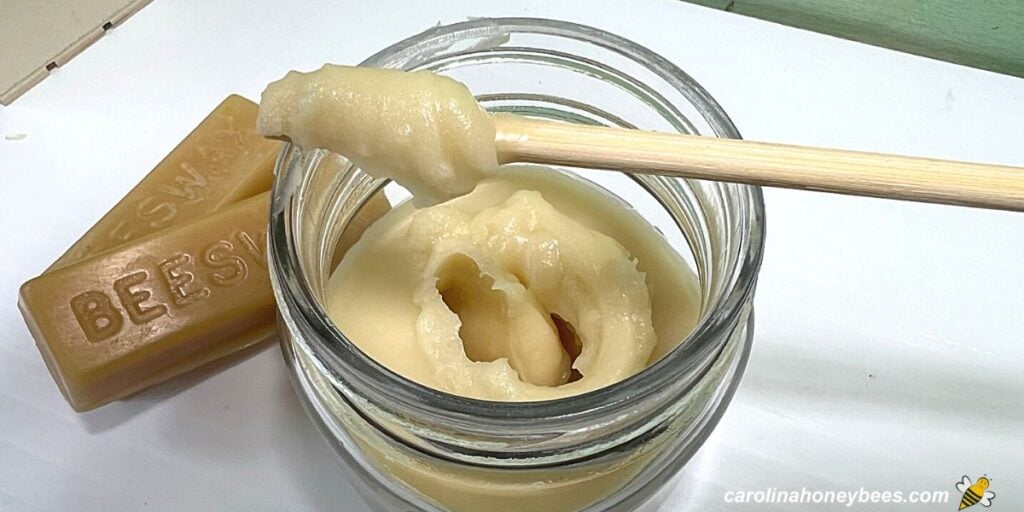
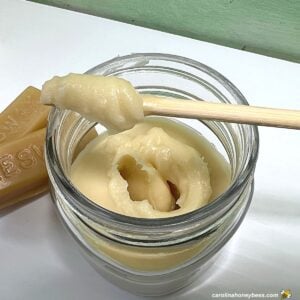
1. Melt beeswax in a double boiler set up. Once it is completely melted – add the olive oil.
2. The olive oil will temporarily cause some of the beeswax to solidify. This is okay, just let it warm and go back to liquid. Do not overheat.
3. Pour the ingredients into a heat safe container. If you are using a glass jar, warm it first to avoid breakage due to shock. Choose a container with a large enough opening to be able to access your product.
4. Let cool until the material sets up as a soft solid.
How to Use It
Being a combination of oil and beeswax, your homemade petroleum jelly excels as a moisturizer. Use it to lock in existing moisture and form a protective seal.
Apply a light coat to dry skin to ease discomfort. It is also soothing for rashes, scrapes and minor burns. Other uses include:
- polishes dry leather goods (own make a dedicated beeswax leather recipe)
- softens cuticles before using nail polish – helps prevent messy manicures
- serves as a water barrier for wound care
- soothe earlobes after long earring wearing
- ease crack corners of mouth
- helps prevent rust on tools
- apply to minor cuts
More Ideas
Creating homemade skin care products such as salves and ointments is actually a lot of fun.
Many of them use similar ingredients with a few tweaks here and there. My DIY Vapor Rub is great for the season of colds and sniffles.
For those of you into herbal applications, consider this recipe for Plantain Salve – I love the green tint. You can also use flower petals to make natural calendula salve or even dandelion salve.
If you enjoy the outdoors, consider these DIY bug bite relief sticks you can make at home. They are great to toss in the backpack and take along.
FAQs
Vaseline is a brand name for a spreadable substance that has been in use for over 100 years. The main ingredient of Vaseline is petroleum jelly.
Yes, most dermatologists are fans of Vaseline for skin care. It does not clog pores and helps repair dry skin.
Petroleum jelly contains hydrocarbons. This mixture of oils and waxes has not changed much in the last 100 years.
Final Thoughts
Okay, technically – perhaps I should not call this petroleum jelly since it does not have any crude oil by products. But, that is the commonly used term we all recognize and you can use your recipe in the similar manner.
I enjoy using resources from my beehives to make natural products for the family. You can do the same. With a few simple tools and a little patience it is not hard to do.
DIY Homemade Natural Vaseline Tutorial
This post may contain affiliate links. As an Amazon Associate, I earn from qualifying purchases.
Read my Disclosure.Tools
- 1 double boiler (pot to melt wax) (optional)
Supplies
- 1/2 cup olive oil
- 1 ounce beeswax (net weight)
Instructions
- This project is as easy as it gets – you simply need to melt the beeswax and combine with your oil. Begin with your beeswax – you can melt it in block form – but shaving the wax into small pieces or cutting it into smaller chunks makes melting faster. Of course, you can use purchased beeswax pellets too.

- Begin by setting up a double boiler. I have one I love for projects – it is dedicated to working with wax. Water in the bottom pot (saucepan) allows for safe melting of beeswax. Place prepared wax in the top pot.
- Heat gently on medium-low heat until all of the wax is melted into liquid form.
- Slowly pour olive oil into the melted beeswax. Stir to combine (I use a wooden skewer). If the cold oil thickens the beeswax, set the pan back on the hot water bath for a minute.
- Remove from heat. If you want to add any essential oils – now is the time. But, you don't need to. Pour the mixture into a warmed glass jar that has a lid. Leave to cool for at least an hour. Add lid and label to mark the jar.


Notes
- It is not the safest way but some folks use the microwave to melt beeswax. If you do so – use short times and do not leave unattended.
- A bit of skin safe essential oil can be added but you don’t have to do that. Plain is just fine.
- Prior to pouring the hot mixture into the glass jar – warm the jar with hot water.
- Once set, stir your homemade Vaseline to mix it up well and avoid a top crust.
Great article. Very informative. Thank you🙂
Thank you.