Make a Bee Watering Station
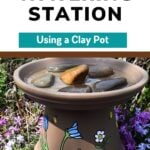
Bees and other pollinators need water – especially on hot summer day. Crafting a simple yet effective watering station can not only help quench their thirst but also add a touch of charm to your outdoor space. In this step-by-step tutorial, I’ll guide you through the process of creating a bee watering station using a humble clay pot and saucer.

If you happen to be a beekeeper, you will need a larger source of water for honey bees. But, if instead you are simply a bee lover who wants to help – ideas such as this clay pot craft will work well.
DIY Bee Water Station
A well-designed bee garden can be a beautiful and relaxing place for you too. Of course, if you have a large space, perhaps you can create a meadow of wildflowers for bees.
But, you don’t have to have a huge patch of flowers for honey bees. Bees, butterflies, hummingbirds and others will come in search of food.
However, pollinators need more than food and shelter, they need water too. They do a good job of seeking out water sources. However, there is no reason you should not offer a drink for thirsty bees.
There are many pollinator water station ideas – you only need something that holds water and a setup that makes it safe for bees to drink.
This idea for a bee watering station is special because it involves using clay pots. Clay pots are a traditional favorite for many gardeners – including my Granny.
This project can be as simple as you wish or you can really get your creative juices flow in the decoration phase.
This post may contain affiliate links. Carolina Honeybees earns a tiny commission when you shop from our links. See our privacy policy for terms.

Materials Needed
- terra cotta clay pot 8″ (at least) with big saucer
- paint
- sealer
- rocks or small pebbles
Clay or Terra Cotta Pot
A medium sized clay pot and saucer ( 8″ pot size minimum) will create a colorful bee water station that will look nice for years. The bigger the saucer – the more it will hold. You can use an old pot but you may have trouble getting paint to stick if the surface has stains from being use.
When choosing the best pot, keep in mind that the smaller it is – the more often you will need to fill it. Your water station for pollinators needs to stay as consistently active as possible.
Paint and Sealer
Decorate your pot however you wish, paint it or leave it natural. It looks lovely in any corner of the garden. A bold bright color will make it stand out while the neutral tans and greens allow the water station to blend.
I would suggest a solid color paint to form the base (primer) of your design, I painted mine with Rustoleum Ultra Cover. Bright colored outdoor acrylic paints work well. I used a black paint pen to outline designs for emphasis.
Once finished with the color work – a coat of clear sealer helps protect your bee water station from some weather damage.
Rocks, Pebbles, etc.
Use small rocks or pebbles to place in the saucer – providing safe places for bees to drink. Honey bees are notorious for their ability to drown.
Step by Step Assembly

1. You may choose to paint a base coat on your pot before beginning design or not. I have one of each. In this image, I am using a pencil to draw some simple flower shapes on the pot. You will notice that I have the pot upside down – because this is how it will appear once finished.
2. Once you have a general design going. Use bright color paint to finish your designs. Using a black paint marker to outline the floral designs help them “pop” – but that is optional. Let your designs dry – then spray with clear sealer for protection.
Be sure to spray the saucer with your clear sealer – both top and bottom. This helps it hold water better.
3. This design places the large pot rim down and the saucer sits on top. You may choose to glue the saucer and pot together. I normally do not because it is easier to store as two pieces. However, if you are concerned about wind, pets or kids – knocking it off and breaking it. Use the glue.
4. The final phase is deciding what type of safe drinking surfaces to include in your dish. Many small pebbles or several small stones seem to work well. The more material you add – the less water the saucer will hold – keep that in mind.
If you spray the finished pieces with clear sealer, the paint will stay bright and beautiful for a longer time. But, if you live in a region with bitter Winter weather – there is no reason not to bring it inside.

Where to Put Your Bee Watering Station
Choose a sunny location for your watering station. The saucer should sit mostly level to hold water well. If possible sit it near some flowers that attract bees. They will find the water.
Your bee watering station should be emptied and refilled occasionally to keep the water clean and fresh. If you live in an area with a lot of rain, it is okay to let it fill with rainwater. Do be sure to provide a safe, shallow drinking place for visiting bees and butterflies.

This bee garden craft is as fun as it is practical. For a thirsty bee or butterfly – every drop counts. If you are really enjoying creating with terra cotta…. consider this easy bee themed terra cotta candy dish. That one is for your treats!
More Ideas
For the smaller kids – a popular craft is creating a simple DIY bee waterer using a wide saucer and colorful pebbles or jewels. These are great gifts for teachers, Mother’s day and similar occasions.
A more advanced project – consider making a bee garden art pole. Of course you can use any theme. These are very expensive to buy but you can make your own for a fraction of the cost.
If you are a beekeeper with several beehives, you need a larger consistent water source. A thirsty hive with thousands of worker bees can consume a great deal of water on a hot day.
If you are struggling for and idea, consider using my DIY bucket feeders with water instead of sugar water. Otherwise, you may find your neighbors complaining because they can’t keep your bees out of their swimming pool. That’s no fun.
A small water source is beneficial for area bees, wasps, butterflies, etc. And, it makes a cute addition to your garden or gift for bee loving friends.

DIY Bee Watering Station Tutorial
This post may contain affiliate links. As an Amazon Associate, I earn from qualifying purchases.
Read my Disclosure.Tools
- heat gun (or hairdryer)
Supplies
- 1 piece terra cotta clay pot 8" with saucer
- 1 can spray paint primer – Bullseye 1-2-3 (or similar )
- 1 can Clear Coat Sealer
- 2 pieces small craft paint brush
- 1 pkg Small Rocks of Pebbles
- 3 pieces Craft Paint Outdoors assorted
- 1 piece Paint Pen Black
Instructions
- Painting the Pot. (This is optional but highly recommended.) If you want to leave the natural clay surface – only paint the inside of the pot that will not be visible. This seals out moisture.Turn the pot upside down and spray paint the outside with primer/paint. This will seal the pot and make the surface more suitable for decorating with colorful paint. Use any color you want for your garden. Let dry completely.

- Draw Simple Designs on the Outside Surface. Use a pencil to lightly trace simple flowers or designs on your pot. Remember, it will be upside down (when finished) so draw your flowers in the correct orientation.
- Add Color to Your Design: When you are pleased with your pencil sketches – use outdoor craft paint to add color. A black paint marker makes a nice bold outline around your colors. Then, fill in the flowers or other decorations with colorful paint.Optional: Use a heat gun or hair dryer to hasten paint drying.
- Seal Your Design. Once the paint is dry, you may wish to spray the pot and saucer with clear acrylic sealer and let dry again. This is to keep your colors looking fresh for a longer time .With the pot upside down, set the saucer on top. You could glue this in place if you wish or leave the bee watering station in two parts.
- Add water and rocks or pebbles. Let the bee watering station dry and cure for a couple of days. Then, choose a nice level place in your garden,. Place a few large rocks (or many small pebbles) in the saucer to give the bees safe drinking places. Add water and enjoy.


I use a chicken watering device and fill the water trough with pea gravel. It holds 2 gallons and I need to refill it every 2 weeks for 3 hives. This area is high desert and water is needed to save my bees the work gathering water from scarce dew or intermittent irrigation.
Thats a wonderful plan.
My bees water on a big stone I have in the dog’s drinking water. I put the stone in when I found a few drowned bees, it has worked wonders ? except in Winter when the water freezes. But because my dogs still need water in winter, we change ice for clean water every morning. It is mid Winter in Australia right now? so guess what my first outside job will be.?
That’s a wonderful solution. As long as you don’t have so many bees visiting that the dogs are disturbed. Good work – bees will fly on warmish Winter days and they need water too.
I would like to know what you use to clean the saucer when you get water stains. Thank you.
I just use Dawn dishwashing liquid and rinse, rinse, rinse. The stains may bother us but the bees don’t care. The biggest problem I have is keeping the barn cat from drinking it dry 😉
Great article! I live in California near the mountains and this year I have hundreds of bumble bees in my flower gardens. One evening I saw several dead bees and I considered the extreme hot days we were having, thinking “water”. I made two “Wee Bee Baths”. One for the front yards and one for the back. I put marbles in my clay saucers thinking the bright colors would attract them. I like your idea of putting the saucers on upturned pots. Thank you.
Thats so sweet. Thank you for helping those thirsty bees.