DIY Candy Dish (Bee Themed)
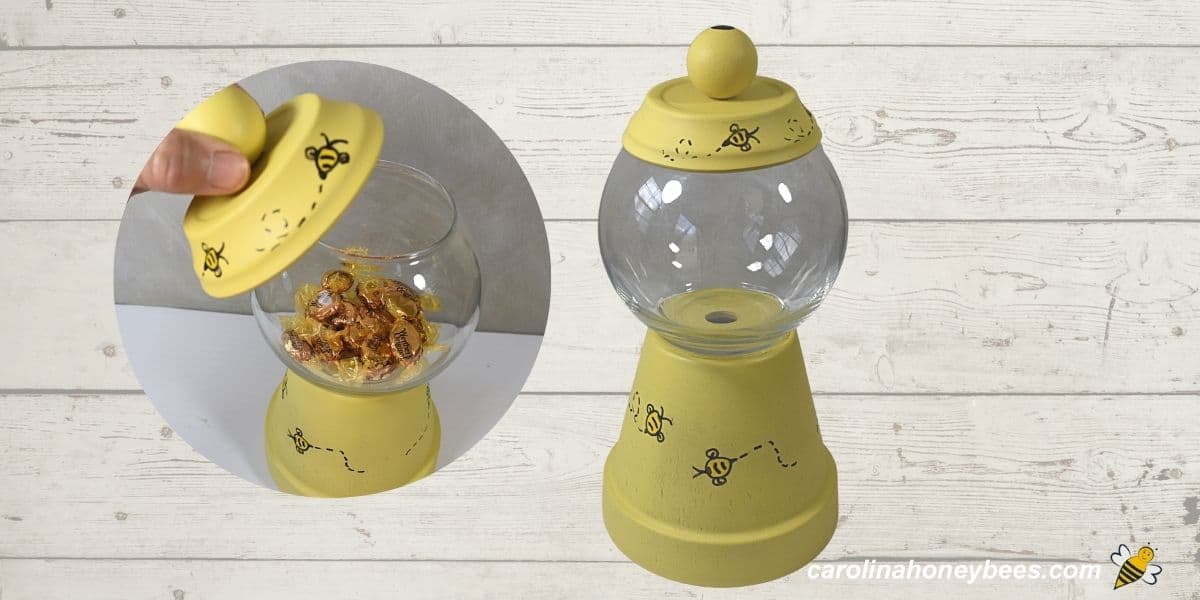
Welcome to this delightful tutorial that is sure to create a buzz with all bee-enthusiasts. You will learn how to transform a simple clay pot and glass bowl into a DIY bee candy dish. Even beginner crafters will enjoy creating a useable item that proclaims the glory of bees. This guide will show you how to glue and paint your creation to create a special design.

One of the benefits of doing bee crafts is that it brings awareness of the importance of these important pollinators. This can be a cute piece of home decor makes a thoughtful gift for any bee lovers. It can be used as a candy dish or a container for small trinkets.
Creating a Bee-Themed Candy Jar
First, you can certainly decorate your project with any theme that you wish. Vary the paint colors and embellishments to represent any thing you wish.
My honey bee clay pot candy dish uses colors in the yellow and black family. Even though honey bees are not necessarily yellow and black, that is the color combination that says “BEE” to most people.
However, the same assembly steps apply regardless of theme. You may have other candy dish ideas in mind – go for it.

Materials
Only a few materials are required and most are easy to find at local craft shops or garden centers. But, they can be ordered online too. You may already have some of them in your stash.
- glass bowl – 5.6″
- clay pot – terracotta & small saucer
- wooden knob
- paint
Glass Bowl
I chose the typical round glass bowl. You can choose to use a different shape or size glass bowl for the “bowl part”. But, be sure that the base of the glass can sit firmly on the bottom of the clay pot.
Also, keep in mind that a glass that is too large on the top with a too small or narrow base will make your project top heavy and unstable. This could lead to breakage of the whole endeavor.
When choosing the glass bowl to use, another thing to consider is the size of the opening at the top of the bowl. It does not need to be overly large but you need to be able to get a hand in there to access the goodies.
Plastic bowl? Yes, you can use a plastic container if you wish. The end results doesn’t look quite as nice but it is less breakable – so that is an option.
Terracotta Clay Pot
Terracotta pots are used in many craft projects. The 6 inch size is a good range for this project with a saucer that is a little over 3″.
Keep in mind that the size of the glass bowl, pot and saucer all have to fit together. The bowl sits on the bottom of the pot and the saucer you choose will become the lid on top of the glass bow. If you change one – check the fit with the other components.
I do not advise using a “used” flower pot for this project. It is much easier to paint and decorate a clean pot.
Wooden Knob
Choose a wooden knob that is large enough to grasp firmly. While you don’t want it too look too over-sized, you do want to be able to firmly grasp it when lifting it off your bee candy dish.
Paint
You can use a combination of acrylic paints and paint markers. I wanted a softer variation and chose the paint color “lemongrass” for the base.
Black and a different shade of yellow was used for the bee bodies. My goal was to have a soft washed look for my project.
Feel free to go bold with your color combination. This will make your project stand out more but if you go very bright – it will also make the striations in the clay pot more obvious.
This method works for any themed terracotta candy dish or fish bowl dish -if you want to call it that. Red and white for Valentines day, orange and black for Thanksgiving, white and pastels for Easter… get the picture?
Step by Step Instructions

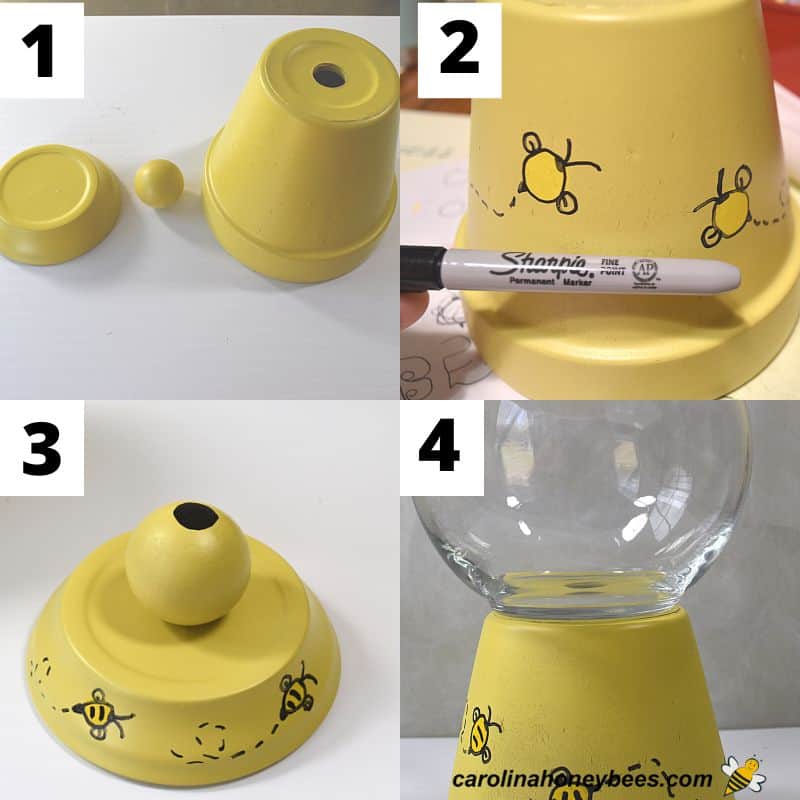
1. Begin by painting your clay pot and saucer. Do both inside and out for a clean nice project. Two coats may be necessary – let dry in between coats.
2. After hand drawing your bee decorations, paint the bodies in another shade of yellow. It is a good idea to trace the outlines with a fine sharpie marker (optional).
3. I fill the hole in the wooden ball with clay or wood putty. Then, glue the ball to the bottom of the saucer to form a lid. A nice black dot where the hole was helps disguise the any impressions from the putty. Spray everything with clear sealer.
4. For the final step, firmly glue the glass bowl to the bottom of the clay pot. Use a lot of glue and let dry completely.
Decorations
Drawing a bee – Perhaps you are not an artist – neither am I though I do admire folks with that gift. For this project a simple bee is fine.
Draw an oval, add 2 small round circles for wings (one on each side-with a little comma to show movement), add 2 antenna (bees need antenna), a small black oval for head area, a pointy stinger and a few stripes.

- use a pencil to rough in design
- yellow posci paint marker to color in bee body – let dry
- regular tip black sharpie to outline bee body, trace antenna, color in head and stinger – add dotted lines if desired
- use a black posci paint marker to add a couple of bold stripes
Note: If you don’t let it dry thoroughly, that darn sharpie marker will run.
Expert Tips
Check the size of your saucer and bowl. I used a 6″ pot but a 6″ saucer would have been way too big for my lid. That’s why I had to go down in size so my saucer would fit securely on my bowl rim.
Spraying the clay components with a sealer (after painting and before assembling) is a good idea. But, use very light coats of sealer. If applied to heavily it will run. Also heavy sealer may cause the fine outlines of your bees to run.
The shorter the clay pot – the more stable the piece. For a larger safety margin, you can use a plastic bowl as long as it is durable enough to hold the clay saucer.
While this project has a “lid”, it does not seal. Therefore it is most suitable for wrapped candy.
Other Idea
Bumble bees and honey bees and other pollinators are great inspirations for our crafting experience. A simple tin can bee is a good project for young insect lovers.
Whether you are making beeswax candles with eggshells, creating seashell tealights or crafting some painted bee rocks for the garden – there are many buzzing ideas to try.
And, while you are working with clay pots – remember there are many small bee friendly plants for pots or containers that help feed the bees. Pot up a few flowers while you are at it.
Final Thoughts
I hope you enjoy getting your creative juices flowing and making this bee themed terra cotta candy dish for yourself or as a gift. Any bee lover will be delighted. They make great conversation pieces for teacher gifts, beekeeping friends and even grandma will love one.

DIY Bee Candy Dish Tutorial
This post may contain affiliate links. As an Amazon Associate, I earn from qualifying purchases.
Read my Disclosure.Tools
- Paint Brushes
Supplies
- 1 piece 6" Terra Cotta Clay Pot
- 1 piece 3.3" terra cotta saucer (try to find locally unless you want a lot)
- 1 piece 1 3/4" wooden ball
- 1 piece 5.6" Glass Vase with Large Top
- 1 bottle Clear Glue
- 1 pack Paints – various (acrylic – posci paint pens)
- 1 piece Fine tip Sharpie black
- 1 can Acrylic Spray Matte
Instructions
- Paint the Base CoatUsing a color of your choice ( I used Lemongrass Spray Paint), coat the inside and outside of the clay pot well. Let dry and apply a second coat. Spray paint is easier – you don’t have to paint the inside of the pot but it makes for a nicer finished project. Pay special attention to painting the bottom of the pot as this will be visible when you are done.

- Paint the Small SaucerUsing the same paint (or different color if desired) paint the entire surface of the saucer – inside and out. I like to spray on 2 coats with a bit of drying time in between.

- Prepare the wooden ballIf the wooden ball you are using has a hole through it (a bead), you may use some wood filler to fill up the hole – but you don’t have to.If you do, let the filler dry and sand off the excess. You may have to repeat this twice if you want a completely invisible patch – mine shows a bit. Paint the wooden ball well in the color of your choice.

- Glue Ball on Jar LidThe small saucer will become the lid of our terra cotta candy dish. Turn it upside down and using your clear glue – attach the ball to what would normally be the bottom of the saucer. Let dry for several hours.

- Decorate the Clay Pot BaseThe base coat is dry. Now is the time to decorate the clay pot as you wish. Remember, the finished product will be upside down (compared to normal flower pot use).Don’t overthink this process – just do what looks nice to you. If you are a great artist, that’s fantastic but you don’t have to be.

- Decorate the lidThe little saucer with ball is our top and it should fit nicely on the rim of your glass vase. Use paint markers or brush on paint to add any desired designs to your top.

- Spray the terra cotta with sealerOnce your designs have dried, spray the outside (or visible) parts of the terra cotta pieces with matte acrylic sealer. A light coat is fine as this craft will be used inside-don’t spray to heavily. Let dry.

- Attach Glass Ball to BaseWith the clay pot upside down, use clear glue to attach the bottom of the glass base to the terra cotta pot base. This will need to dry for several hours.

- Assemble and EnjoyOnce all the glue has dried. It’s time to fill your glass bowl with your favorite candy and top it off with your saucer lid. Now doesn’t that look great!


