DIY Tin Can Bee Craft

Most everyone has a soft spot in their heart for bees – what about a tin can bee you can make? Various decorations for inside and outside the home showcase our affection for these productive insects. And why not – they are important pollinators and help provide foods that we love. This whimsical tin can bee is a great diy project for your yard or garden.
How to Make a Tin Can Bee
In addition to being a sweet decoration for your garden or patio, the project can also help a few pollinators in your area.
By filling the can with sticks -especially those with hollow stems, you may be providing a home for some bees. It is important to note that honey bees will not move into this tin can garden art.
Honey bees are social insects that live in large colonies. They would need much more space than this structure provides. But, as wonderful as they are – honeybees are not the only bees around.
In fact, most of the bees in the world are solitary insects. One example is the Mason bee. This pollinator is a solitary insect that nests in hollow stems and tubes. Who knows, a solitary bee may choose your tin can bee for a home this Summer.
Materials
- large tin can
- wire
- paint
- googly eyes
- hollow sticks
Choosing a Tin Can for a Bee House
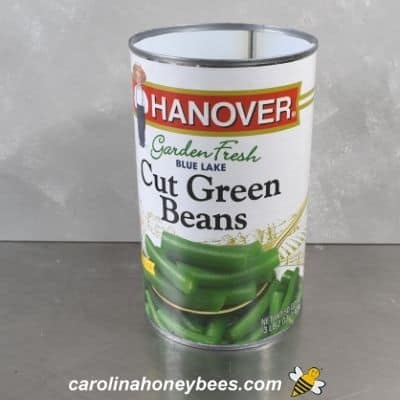
When choosing any type of fun craft project, using recycled materials is always a plus. For this project, we are using a medium sized tin can but of course you can use a can of any size.
My family loves green beans and I find so many uses for these larger cans. This can measures about 8″ tall with a diameter of 5″. If you use smaller cans, be sure to adjust the length of your legs to fit the smaller size body.
Hanging Wire
You will need some type of wire to hang your tin can bee house. Any bendable wire will work, you might even be able to repurpose a wire clothes hanger.
Try to avoid using string unless you intend to replace it each season. Most string does not hold up well in outdoor weather.
Paint
Of course, you need some paint in bee colors. If you want your craft to look like a Bumble bee or honey bee – yellow and black as the most popular choices.
With or without stripes – it is your choice. – though, both bumble bees and honey bees often have stripes. Buy some plastic googly eyes or just paint them on if you wish.
Hollow Sticks
Look around outside and find some dried hollow sticks. These are the perfect homes for solitary bees. If you live in an area without the proper sticks – you can order insect tubes.
Other Bee Themed Crafts
Your garden art bee should last for at least one season and maybe more. Create several and have a large nesting site for many types of solitary bees.
This fun project opens up the opportunity to talk to others about the importance of all pollinators. They make great gifts too.
You might even create a themed garden art pole to hang it from.
Though this project is based on our ideal of a honey bee, you could use any bee as the model. Education is the key to helping everyone understand the importance of all pollinators.
Still in the mood to – think Bee? The paracord used in this project was also used to make this clay pot bee. This is a larger project but you could use smaller pots too.
While you are shopping for clay pots – what about a DIY bee candy jar?
Another great idea for the garden is bee painted rocks – a fun project for all ages. They can be used for decoration, tic tac toe games or as garden markers.
For a delightful inside bee art project, consider making an easy honey bee gnome. Easily made in an hour or less they are very popular.
If you are up to an adventure, this recipe for honey slime is sure to delight the young folks. It is easy to make and offers a fun sensory learning experience.
Have fun with your project. This does not have to be a work of art. It makes a great gift for kids to make for grandparents or other bee lovers too – a great idea for a bee gift basket.
Step by Step Instructions for Tin Can Bee
This post may contain affiliate links. As an Amazon Associate, I earn from qualifying purchases.
Read my Disclosure.Tools
- scissors
- wire cutters
Supplies
- 1 can large tin can – empty
- 1 can spray paint primer – Bullseye 1-2-3
- 1 can yellow base coat- Gloss Sun Yellow – AA
- 1 roll masking tape
- 1 bottle black outdoor acrylic paint
- 1 piece small craft paint brush
- 1 piece paint pen pink
- 1 piece yellow paint pen
- 2 pieces large googly eyes
- 1 roll black paracord (small amt)
- 1 tube super glue or equivalent
- 12 inches wire for hanging
- 1 pkg mason bee tubes
- 10 pieces hollow stems gathered (optional)
- 1 can acrylic spray sealer (optional)
Instructions
- Prepare the tin can by removing the label. You can use something like Goo Be Gone or petroleum jelly or nail polish remover to remove any glue if you wish.Most importantly, make sure there are no jagged edges that might cause cuts on the rim!

- Paint a base coat of primer. Spray the outside and inside of your tin can.You can skip this step. However, it really helps your top layer of paint to adhere to the tin.I like to spray outside when possible. Any good primer will work well. I chose Bullseye 1-2-3 for this project.
- Spray paint base color for bee body. You can choose any color you wish. I went the traditional route and used Gloss Sun Yellow in American Accents.Spray one coat and let it dry for a bit. Then add a second coat – let dry thoroughly.
- Prepare masking tape stripes. Those of you with some artistic ability can skip this part. But for those of us who are unskilled and to help kids stay a bit on track – several rounds of masking tape helps keep the stripes in order.With regular masking tape you will have some bleed through but that’s okay. If you do not want this use something like blue painter's tape.I purposely did not have my stripes all the same width but you can if you prefer.
- Paint on the strips. Use black acrylic paint (designed for outdoor use is best) to paint the area between the masking tape. This gives your bee stripes. It’s okay to be messy.
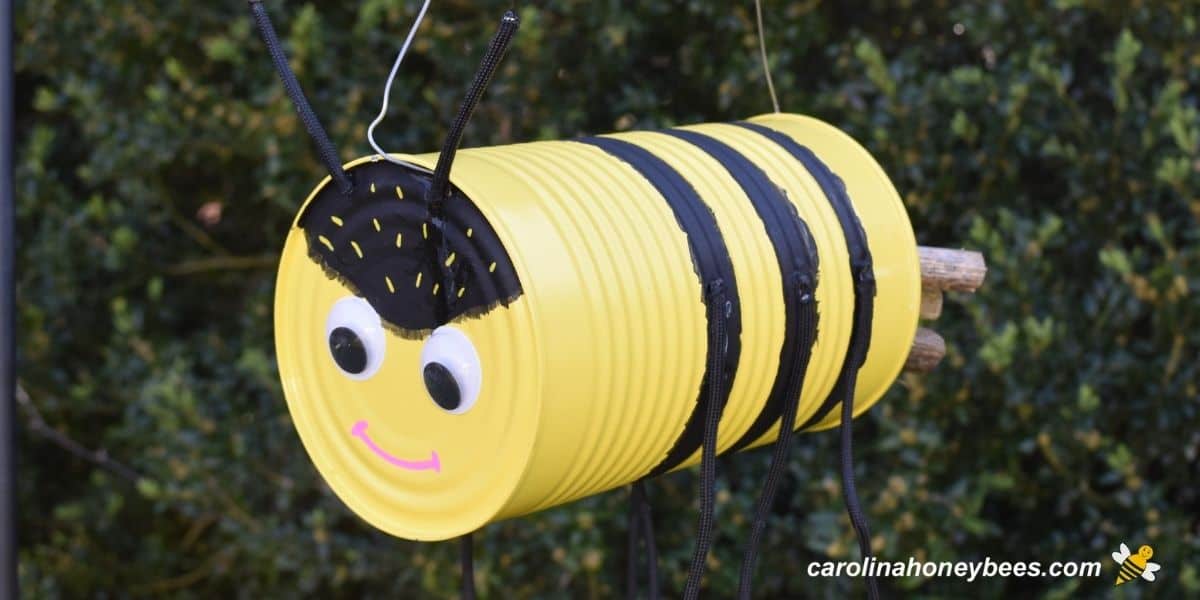
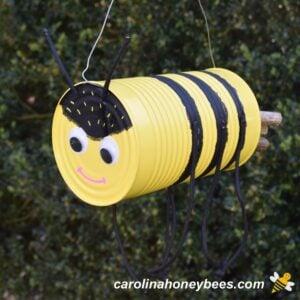
- Making the bee head or face. After the stripes are dry, remove the masking tape. Slowly pulling if off to prevent pulling away your base coat of yellow. If that happens – don’t fret – we can cover it up in a bit.Now, use some of your black paint to give your bee some color on the bottom of the can – this will become the head. A bit of a black forehead is a good idea.
- Glue on the eyes. Give your bee a face with eyes. I choose to use 2 large googly eyes – (even though a honey bee really has 5 eyes). I got these at the Dollar Tree for a buck so you may find cheap ones locally. Use super glue or Elmer’s glue.Then, just because the tin can bee looked sad – I gave her a smile with a pink paint marker.
- Adding bee fuzz. Bees are fuzzy. That is why insect pollination is so helpful. Use your paint brush with just a bit of black paint to blur the lines of your stripes and face.
- Make legs and antennae. Use black cord to make 6 legs and 2 antennae. The legs should be 7″ long and the antenna 3″ long. Tie a small knot in one end of the legs to simulate feet.Because I used paracord, I had to gently melt the ends of the cord to prevent fraying. You may not have to do this depending on the type of cording you choose to use.
- Glue on legs and antenna. Use Super Glue (or any fast drying glue) to attach the legs and antennae to your can. You can glue the legs on the stripes or not – but put 3 on each side with the knotted feet end hanging down.The 2 antennae go at the top of the head.
- Attach the hanger. A small piece of wire can serve as a hanger. This one was cut at about 16 inches. One end glued to the head of the bee and the other to the open end.
- Pollen marks on bee head. Use a yellow paint marker to make a few yellow dashes on the bee’s forehead. This simulates pollen and brightens the face.
- Adding hollow stems for solitary bees. Now you are almost ready to hang your tin can bee craft outside.Find some hollow stems and twigs to place in the can. You can even order hollow tubes for mason bees if you wish.If you hang your craft in the garden where it is exposed to rain, be sure to tip the can so no water will collect.
- Hang Your Tin Can Bee Craft in the GardenYou did it! Now find a great place for your bee. If you want to prolong the life of your creation, spray with an outdoor sealer but this is completely optional.


