Make a Honey Bee Gnome

Gnomes have become a popular part of home decor. So, why not make a honey bee-themed gnome. This fun project combines the whimsical gnome features with one of our most popular pollinators. In this tutorial, I will show you how to create a simple DIY honey bee gnome – even if your sewing skills are not first rate. Even if you have never made one before – don’t feel intimidated -just have fun.
Of course, as I beekeeper I could not miss this opportunity. If you know any bee enthusiasts -this easy bee craft is a “must make”. Folks love these weird little guys.
Create Your Own Buzzing Honey Bee Gnome
Traditionally, gnomes were mythical creatures believed to guard treasures under the Earth. Often made of clay, some believe them to be a symbol of good luck.
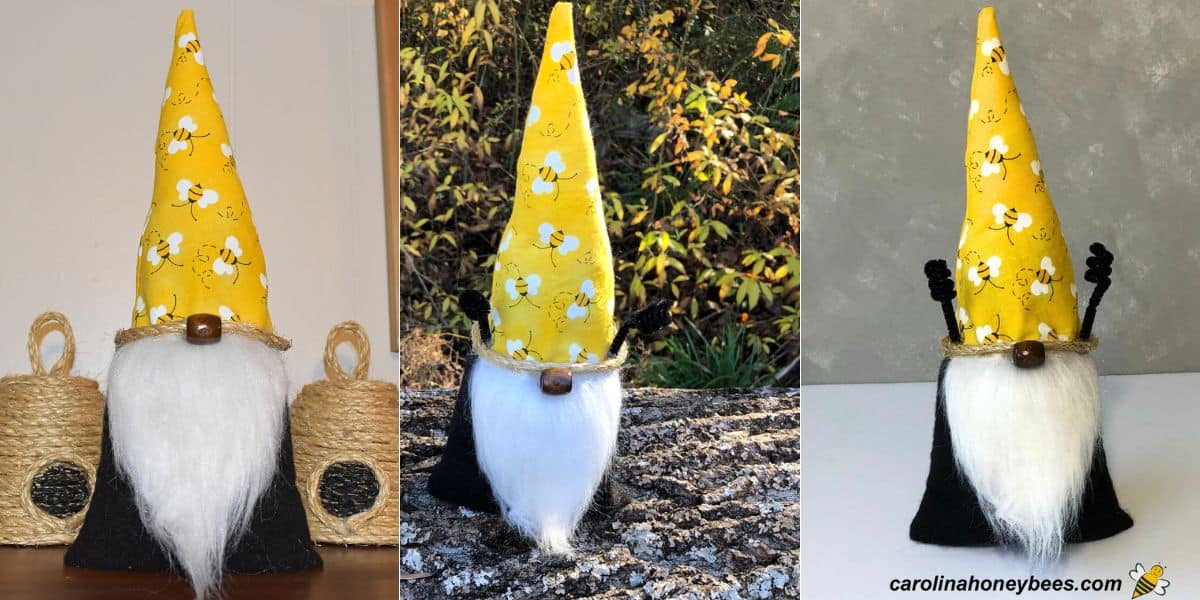
The biggest reason to make a honey bee gnome is because they are cute. (Ok, you can call it a Bumble bee gnome if you want – I won’t tell).
A sweet addition to your home decor, the bright black and yellow design along with beard and antennae add a touch of cheer.
Materials Needed
You don’t need a lot of materials to for the gnome project. The focal points of construction are the hat and beard. It is customary for the body to be simple.
Some patterns show legs and arms – which do add interest to your project. However, most gnomes do not have limbs-this makes the project easier. If this is your first time – keep it simple.
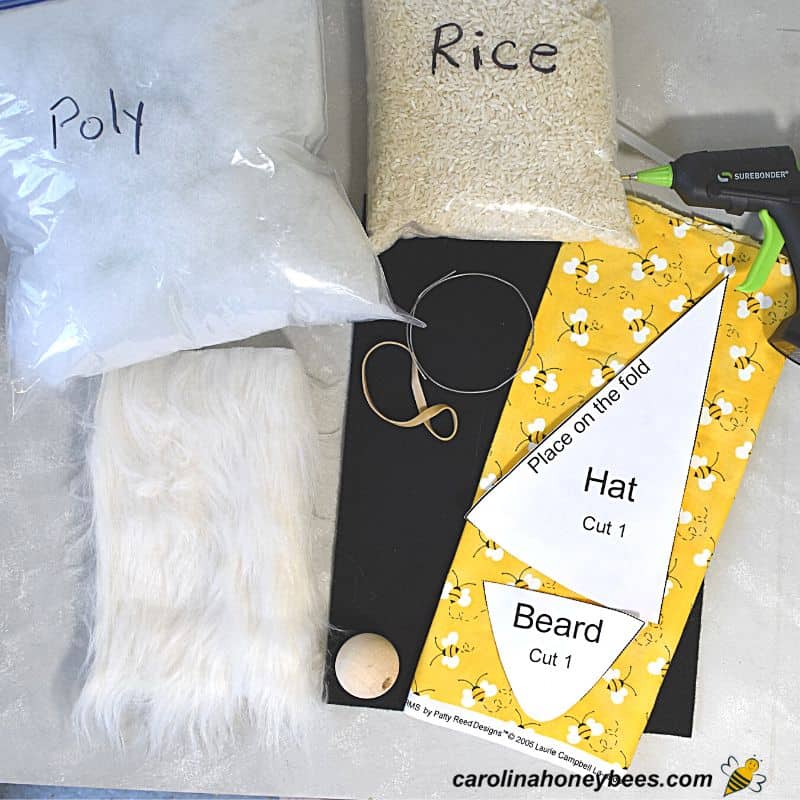
- body material & filler
- hat material & polyfil
- beard (faux fur)
- accessories (pipe cleaners black – wooden bead)
Body Material & Filler
A gnome body can be as simple as a sock. Sock gnomes are popular because they require little to no sewing.
You just need a fabric pocket that can be filled with something. Bright colored cotton, burlap or even felt material are good choices. For the body of my bee gnome, I choose black felt to reinforce the bee motif.
Filler: Once the pocket is created you need filler. Filler materials give the body substance and helps it stand up: popular choices are – rice (uncooked), beads, sand and pea gravel.
Hat Material
Most gnomes have a signature tall hat. This can be constructed from fabric glued to a foam cone. Or, as in this tutorial, you can sew a cone shaped piece of fabric and stuff with polyfil.
I find that cotton fabric makes good material for hats. It is easily sewn – even by hand and you have many colorful options.
I chose to not put a pom pom on top of the hat. However, depending on the style you are going for – you could add one.
Gnome Beard Material
Every gnome needs a long beard (Yes – I know bees don’t have long beards). But, along with the hat – this is one of the key features of the project. White is most common but other colors are fine.
Beards can be made of unraveled yarn, felt and other materials. But for beginners a bit of faux fur or craft fur is easiest. You only need a small piece. It can get costly – look in the remanent boxes.
Embellishments
There are many items you can use to give your gnome character. This is the part of the project that really focuses in on the theme you choose.
I am making a honey bee gnome . One of the most distinguishing feature parts of a bee is a pair of antenna. Therefore I chose pipe cleaners to simulate antennae.
You could add other items such as wooden bee charms, ribbon or small wooden honey dippers. Attached to the body with glue or stitching.
Equipment
In addition to basic supplies: rubber band, thread, pins, scissors – you only need one item.
- hot glue gun
Assembly of Your Gnome Bee
Here are some simple instructions to aid you in assembly. You may make some variations depending on the exact materials you use. Still – I think you can get the general idea of how to make your gnome.
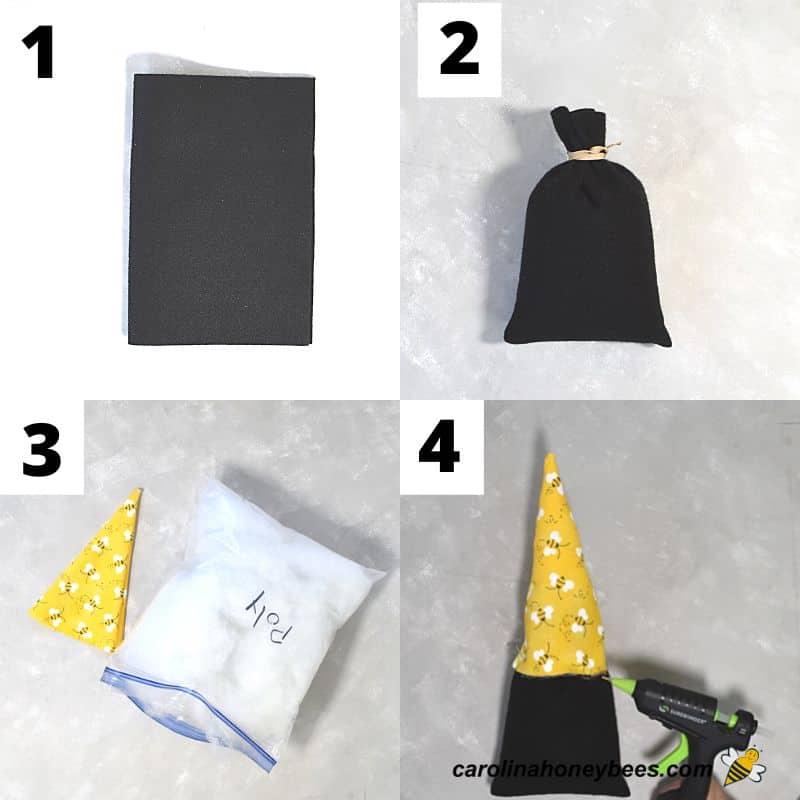
1. Make the Gnome Body
Create the body section first. This is easily done by folding your cloth and seaming up one side. I used one standard piece of black felt folded in half – no cutting required.
After sewing up one long side – turn the felt “inside out” so your stitches are now inside. Hand stitching is fine – just be sure to make the stitches small enough to contain whatever material you put inside. You do not want rice or sand leaking out! I like to use black thread to blend in with the body.
2. Filler
Now it is time to fill the body with your weighted material. Plain white rice is a popular medium for this purpose. The amount used is your decision – I used about 3 cups of uncooked rice.
When it is almost full, gather the top together and close with a zip-tie, wire, etc. Remember – no one is going to see this part.
3. Make the Hat
Fold the hat material with right sides together (assuming you are using colorful material). Now, cut out a large triangle to form your bee gnome hat. (see pattern link for below) This hat should be tall because this is another major gnome feature.
Stitch up one side of the hat and turn the material right sides out to show your beautiful pattern. Then, fill and stuff the interior with polyfil or something similar. We want the hat to stand up.
4. Attach Hat to Body
This is the most difficult part for me (sometimes my hands are not steady). Place the hat on the body section.
It should cover the top of the body that is gathered together (you will not see the rubber band or whatever you used to close the body.
Use a hot glue gun to attach the hat to the gnome body. (Or you could hand stitch it on if you wish). I admit this was the most tedious part of the project for me.
Don’t worry about the raw material edges – we are going to hide those.
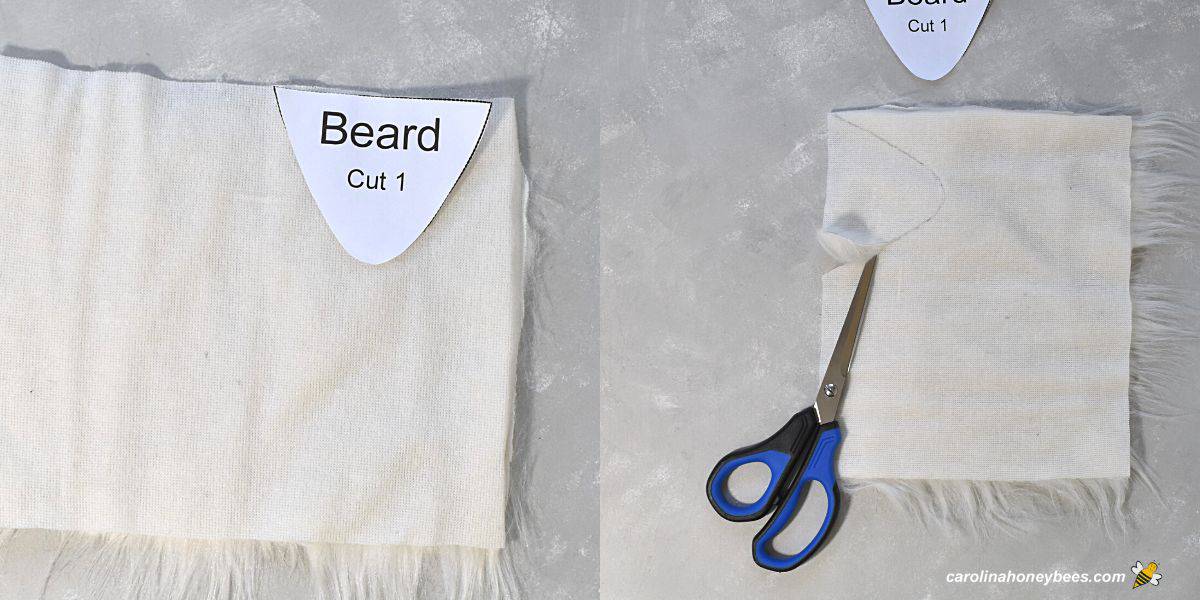
Make a Gnome Beard
A gnome beard pattern for this simple project is really not necessary. However, if you want my outline for the hat and beard – here it is.
Faux fur fabric is one of the easiest ways to make a beard. You only need a small piece and you can save leftovers for other projects.
The most important thing about cutting the fur is to make sure the fabric is laid down correctly. The fur should be going down in the long direction.
Also, be sure to cut only the backing – do not cut the fur underneath – that is what will flow down and cover the edges of the backing. You can do a beard trim later.

Final Stages of Construction
Hot glue the beard to your gnome at the hat line.
Now, I want to cover up that raw seam with cord or ribbon. Ribbon is too difficult for me so I used some of the jute cord from my mini bee skep craft project as a trim for the hat. Worked great.
Every gnome needs a nose- even a honey bee gnome. Along with a tall hat and beard, it is one of their most important features. A cute wooden bead is a good option to create a nose.

We can’t truly have a honey bee gnome without antenna. I used two black pipe cleaners. Cut to a short length and then wrap the ends around a pencil to give them a curve.
Lastly, use your hot glue gun to attach the bee antenna to the hat brim. This is a fairly simple project. Using a few materials (most of which you may already have), your DIY bee gnome can be ready in less than an hour.

Expert Tips
(Optional) Once you are finished, you can use a lint roller to remove the white “beard fuzz” that sticks on your black felt.
If your cutting, gluing etc is not perfect – don’t stress. You are creating a piece of art not a mass produced machine-made item. Feel free to make adjustments and make the project your own-there is no wrong way.
More Ideas
If you love bees like I do, consider trying more bee themed crafts for kids – such as : Painted Bee Rocks – a great idea to try with the older kids.
Decorating your summer garden with a cute Clay Pot Honey Bee. They are sure to please and can be used outdoors or in.
Looking for a quick project suitable for children? Learn how to make a bee using craft sticks and pipe cleaners – good for younger kids.
Older children with more dexterity may enjoy recycling old golf balls craft bees into figures – a good lesson in recycling too.
Final Thoughts
This honey bee gnome tutorial can be used for any style – it does not have to be a bee. You can vary the theme. They make wonderful gifts for beekeepers or friends who just love bees. Though not designed for outdoor use, they are a cute addition to any inside spacer.

DIY Honey Bee Gnome Tutorial
This post may contain affiliate links. As an Amazon Associate, I earn from qualifying purchases.
Read my Disclosure.Tools
- scissors
- sewing machine (Optional)
Supplies
- 1 piece black felt craft sheet
- 1/2 yard bee fabric any bright color
- 1/10 bag polyfill stuffing
- 1 spool thread for sewing – black
- 3 cups rice uncooked
- 1 piece zip tie
- 1 pkg glue sticks for gun
- 12 inches jute cord
- 2 piece black pipe cleaners – chenille stems black
- 1 piece 12 x 12 Faux Fur
Instructions
- Fold the piece of black felt in half. Sew the bottom and open side with a good seam. Turn the piece inside out so the seam is on the inside.You can use a sewing machine or hand sew. We want a good tight seam to hold the rice. This is the body of your bee gnome.

- There are several materials you can use to fill the body. We need some weight there to ensure he will stand up.The most readily available option is dry rice. Use about 3 cups of rice to fill out the body.
- You should have enough room to gather and tie the top of the bag. You can use a couple of good rubber bands or twisted wire.My favorite is a zip tie that is very easy to work with and get a good seal.
- Lay down the fabric chosen for a hat with right sides together. Place pattern piece for gnome hat on the fabric as shown. Cut out hat.
- With the hat piece still right sides together, sew with machine or by hand along the seam line. This forms the cone that will become the hat for your bee gnome.
- Turn the hat right side out. Pack some polyfill (or similar) into the hat. Use your scissors or something slim to reach the tip so your hat will stand up.
- Don't make the mistake that I first did of over-filling the hat. You do not need to fill the cone completely. Leave room for the sides of the hat to fit down over the bag of rice.
- Using one of your hands ( or a coupe of pins), place the hat down over the top 1/3 or so of the gnome body. Use the hot glue gun to attach.Don't be stingy with your glue. People make want to pick your bee gnome up by the hat! Let cool until set.
- It's time to cut the beard. Lay your beard pattern on the backside of the fur fabric. Check to make sure that the direction of the fur is going the way you want.
- When cutting your gnome beard, gently insert your scissors under the backing material only. You do not want to cut the strands of fur just the backing.
- Use the hot glue gun to attach beard to front of bee gnome body. It normally sits right at the hat line.
- Glue jute cord around the seam where the hat meets the body. Then, glue on a wooden bead (or similar) right under the cord to be the gnome nose.
- Use a lint roller (optional) to remove any furry residue from the body.
- To complete our bee theme. Use 2 black pipe cleaners to make antenna. For each, wrap one end 3 times about a pencil (or finger). Cut length to about 5 inches. Then, glue to area between jute cord and hat.


Notes
- Small wire can also be used to secure the top of the body bag. I liked the zip ties better.
- Be careful when cutting the fur fabric for the beard – don’t cut the fur underneath.
- If you do not want to use rice for filling – commercial filling is available.
Thank you for sharing This cute Knome. May I ask what size is the body piece and hat piece? Thanks, Avis
Thank you. The body piece is a 12″ piece of felt that is folded in half. For the pattern for the beard and hat – look in the section that says Make a Gnome beard and you will see the link for the free template.