DIY Golf Ball Craft Bees

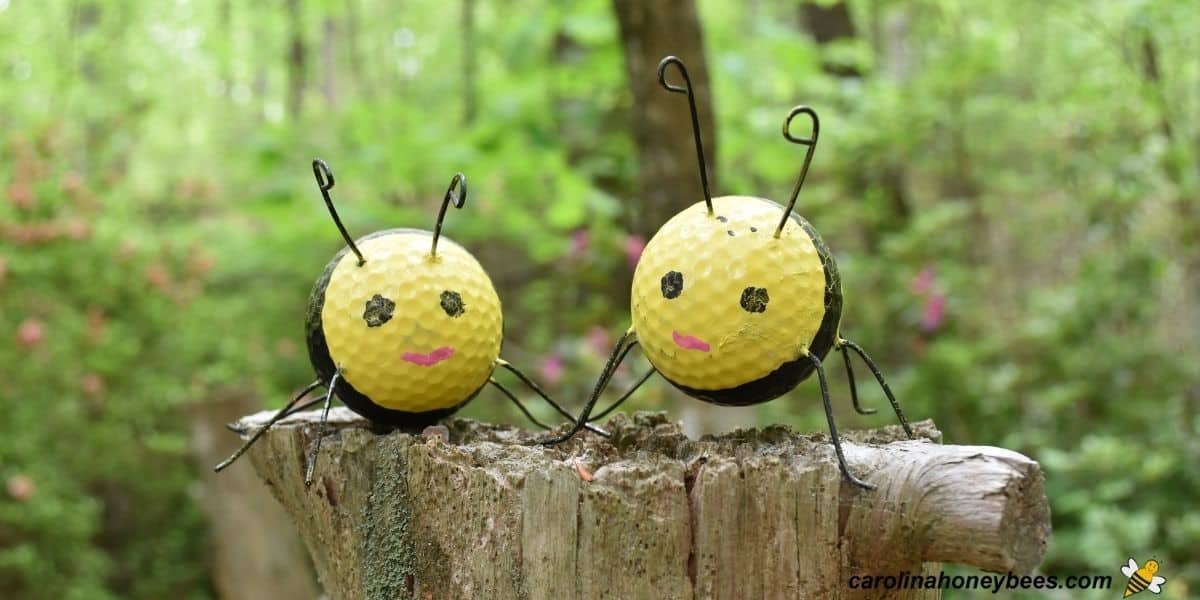
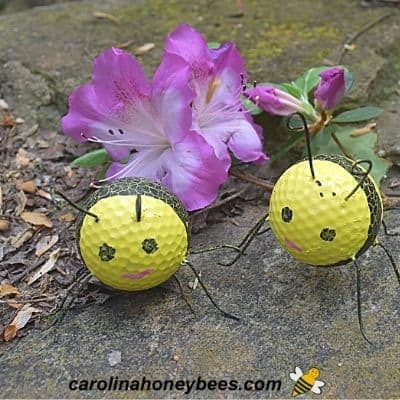
If you like the unusual, these golf ball craft bees may be the perfect inspiration for your creative tendencies. This project uses recycled golf balls to create bee-like figures that can be enjoyed in many ways. They make a really cute decoration for your garden. And, they are great for gift giving! Any bee lover will be delighted with this whimsical recycling idea.
I love bee crafts – but am not blessed with artistic talent. And, my hand is not as steady as it used to be. Projects like this can express my love for honey bees-even if they are not perfectly done. It is okay – it is about education and fun.
Old Golf Balls Make Bee Crafts
Finding bee themed gifts or décor for decorations or gift giving is easy to do. Insects are very popular in crafting and design. Hundreds of items can be purchased in a variety of prices and sizes.
However, when you can take a used item and transform- recycle – it into something useful, that is wonderful. Using recycled golf balls for a project is another way to keep trash out of the landfill.
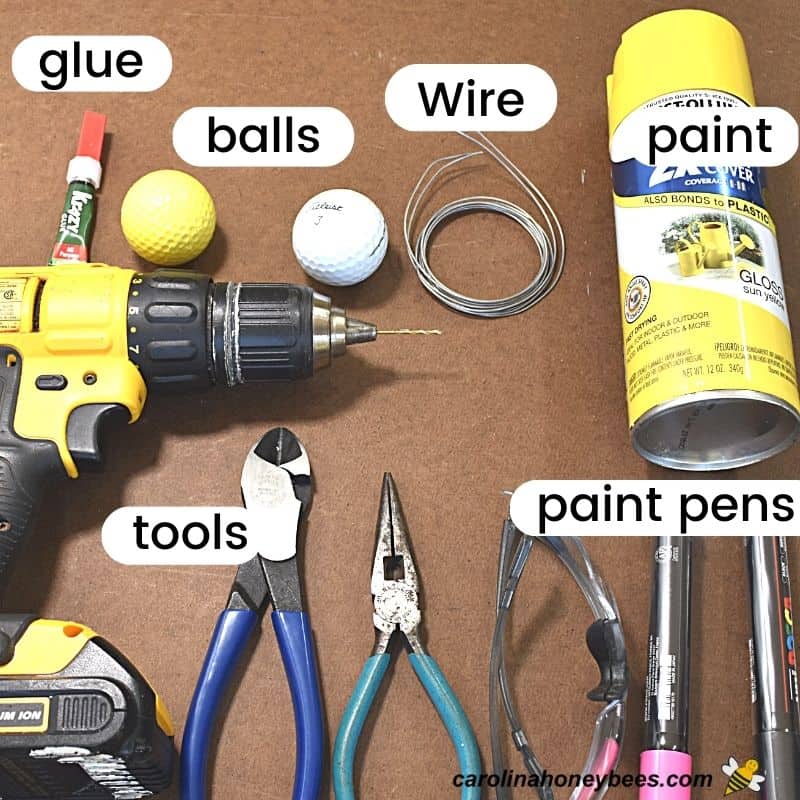
Materials
In addition to a few old golf balls, you will need a few more materials.
- small gauge wire
- glue
- paint – paint pens
- safety googles
Be sure to wear safety goggle when drilling or cutting wire. When choosing the wire, 20 gauge is the best size. The wire should be soft enough to bend easily but stiff enough to hold up the weight of the golf ball.
Glue is needed to attach the wire permanently to the ball. Any fast setting glue it good – those slow to dry are difficult to work with.
The paint and/or paint pens needed depends on how you plan to style your bee. I chose yellow spray paint for the body and used a black paint pen for the stripes, leg painting and details.
I did use a pink paint marker to draw on a bee mouth (not realistic – but cute) – why pink? Because worker bees are females!
Equipment Needed
These tools make creating your golf ball craft bees much easier. You can make some substitutions as long at they get the job done.
- drill – with small bit slightly larger that the wire you are using
- wire cutters – to cut wire to length
- needle nose pilers – used to shape wires

Assembly
Complete – step by step details for assembling your golf ball craft bees is at the bottom of this article. But here are the basics.
1. Use yellow spray paint to paint all the surface of the golf balls. Use two coats if necessary and let dry well before rolling around to paint the other sides.
2. Decide how you want to place the wire bee legs. This is really up to you and does not require a special template. However, keep in mind that once the wires are bent – we want them to support the golf ball.
Use a drill with a bit just slightly larger than your wire. Drill holes for each of the 6 legs – spread them out along the bottom – not too high up on the ball. And drill two holes for the bee antennae.
3. Cut the wires to the desired length and bend them to look like jointed legs. Then, glue the wires (legs and antennae) into the drilled holes and let dry.
(Optional- if you want to give your bee the appearance of a bee stinger – I just glued on a short screw.)
4. Now, use your paint pens to finish with the markings and decorations that make your golf ball bee crafts look more realistic.
Expert Tips
There are many fun bee related things to do with young children but this project is not for the very young. It is suitable for older children – and is also a great project for adults.
Younger bee lovers can enjoy it too but they may need some assistance. Bending and cutting the small wires and drilling holes can be a little challenging.
If your participants struggle with fine motor skills, you could pre-drill the holes. Then, your helpers could paint and assemble.
What to do with Golf Ball Bees
Well, once you create your bees – now what? These are some of the things that I know people have used their recycled golf ball bees for:
- give as a gift to a beekeeper, teacher, friend
- use a plant markers in the garden or yard – to mark bee friendly plants
- décor inside for any room with bee themed items
- party decorations or favors for special “mommy to bee” or “bride to bee” events
*For durable outside use, use and acrylic sealer to spray each one of the bee figures.
More Ideas
Creating hand made projects is a great way to share time with family or just have a little relaxation for yourself. You can get as fancy as you want or keep things plain and simple.
If you want to make a little “home” for your golf ball bees, try this cute DIY bee skep craft – that’s where my bees live.
And, maybe add some painted bee rocks if you plan to put them in the garden.
Of course if you want to create a really big bee – learning how to make a clay pot honey bee is just the project for you.
If you are into garden art, a hand painted garden art pole can be decorated with bee theme designs. These can be as simple or elaborate are you desire and can be made for a fraction of the cost of buying one premade.
Once you have created your golf ball bee crafts, they can be displayed inside or even outside in the garden. Bees provide so much value to our lives. Bring a little sweetness to your life by making your own.
Promote Bee Awareness
While this is an easy fun project to pass a lazy afternoon, it can be a learning experience as well. Appreciation for honey bees and all pollinators grows are we learn more about them.
If you are working with young people, or the young at heart – it’s a great time to discuss some bee basics. Is a Bee an insect or a bug? You may be surprised to learn the answer.
Why do bees sting and how can we prevent being stung? And, what about bee pollination? Is it really that important? All great topics to discuss when thinking bee.
How to Make Golf Ball Craft Bees
This post may contain affiliate links. As an Amazon Associate, I earn from qualifying purchases.
Read my Disclosure.Tools
- electric drill
- 3/64″ drill bit
- safety glasses
- wire cutters
Supplies
- 3 pieces golf balls
- 20 inches 20 gauge galvanized steel wire
- 1 can Yellow Acrylic Spray Paint
- 1 piece paint pen pink
- 1 piece Paint Pen Black
- 1 pkg small craft paint brush
- 1 tube super glue or equivalent
Instructions
- Wash and dry. You need one golf ball for each honey bee figure that you want to create. This is a great way to recycle old golf balls that you find on the range or in a thrift store. Wash each golf ball with soap and water, we want to create a clean surface before painting. Let the cleaned balls dry completely.

- Spray a base coat (yellow) on each golf ball – allowing time to dry. Then rotate the ball to complete spray painting the bottom of each.Not all bees are yellow but yellow and black are icon bee colors so we will stick with that!
- Legs and antenna. Use wire cutters to cut 6 wire legs ( 1 ½” long) for each bee and 2 (2” long) wires for the antenna of each bee. **Always wear safety glasses when cutting wires! Bees have 6 legs because they are insects.Antennae are another important part of the bee body. One of their functions is smell – yes, bees can smell with their antennae!
- Use pliers to shape your wires. Give antennas a nice small curl at the end – this works easier if you do both antennae at the same time.Shape legs in a soft bend and curl the feet sections to avoid sharp edges.
- Use a marker to mark locations for legs and antenna on each golf ball. Legs should go in a line alone each side near the bottom of the ball. A pair of holes for the 2 antennae go near the top of the face. Drill the holes ½“ deep.*If you don’t have a vice to hold the golf ball steady – use something else to steady it.
- Check to make sure the wire fits into the drilled holes. Now add a small dot of glue to the end of the wire and insert each on into the proper hole. Optional : Glue a small screw onto the back of the ball to simulate a bee stinger. – While this is a cute idea for an adult gift – it can be dangerous if someone steps on it – ouch!
- Spray everything with another coat of base paint – yellow and let dry completely. Don’t rush this part. The amount of time needed for the paint to dry will depend on the temperature and humidity in the air.
- Use paint marker to draw strips on the yellow body. Draw 2 eyes beneath the antenna (just for looks – bees have 5 eyes!)Painting the legs black also will allow some of the yellow to show through giving the illusion of stripes.


