DIY Candy Board for Bees: No Cook

One technique that beekeepers use to help their colonies through Winter is making a candy board for bees. For colonies that are low on stored food – this can be a life saver. In this guide, I outline one simple technique to create a candy board for a hive that does not require cooking.

Making sure your hives are ready for Winter is one of the most important tasks for beekeepers. When it comes to stored food, the goal is for each hive to have plenty of their own honey to eat during the cold months. But, that does not always happen.
In most cases, feeding bees in Winter can be a bit tricky. Liquid food is not the best option. With this type of hard sugar, the bees have access to a concentrated energy source.
Role of Candy Boards in Beekeeping
Winter is a difficult time for honey bee colonies. In fact, having bee colonies die in Winter is all to common in beekeeping. It is not always due to lack of food – but that is one thing we can control a bit.
Ideally, good hives store enough honey for survival during the cold months. But, this does not always happen.
There are many reasons bees may not make honey – or enough of it. Using fondant or candy boards on your beehives adds just a bit of insurance.
Advantages
There are several advantages to this feeding method.
- food source located near bee cluster
- less waste
One of the main benefits is using candy boards on beehives is that they are located inside the hive. This means that the bees will be able to access the sugar regardless of the weather outside.
On warmish Winter days, the honey bees can break cluster and feed. As the season wears on, the whole cluster may work it’s way up to be living directly underneath the candy.
Feeding regular sugar is another option for in-hive feeding. However, bees sometimes do not recognize dry sugar as food and throw it out of the hive. Firm sugar is not as likely to be removed by worker bees involved in house cleaning.
Materials
A candy board does not have to be elaborate. Mine are not and yes they are ugly but they work great. This process involves two different parts:
- make a frame to hold the candy
- make a recipe for hardened sugar
1. Create a Hive Shim or Form
When placing a thicker slab of sugar in the hive, you need a form or shim. Bee suppliers have special forms to purchase that can be used as candy boards.
Of course, you can make your own from materials you already have on hand. Some beekeepers even take old hive bodies or shallow beehive boxes to create a shim to hold candy. They are already the correct width and length to fit the dimensions of a Langstroth hive.
They cut the height of the box down to a height of about 2″ and nail wire across the bottom. This is a slightly larger mesh than screen used for screened bottom boards (though you could use that.)
This is a great way to save some money – the costs of beekeeping can get expensive.
With reduced hand strength, my biggest frustration was getting the wire to bend and behave. It does not have to look pretty. But, when added to the hive, all the boxes must fit together allowing the hive to be closed.

2. Hard Sugar Recipe
Some recipes for making sugar or fondant get really involved – that doesn’t have to be. This simple recipe is so easy it really shouldn’t be called a recipe. You only need a few items.
- granular cane sugar
- water
- pollen substitute (optional)
There are several methods of making sugar candy boards to for bees. Recipes for bee fondant, sugar boards or candy boards vary a bit in ingredients and methods of construction.
No Cook Required
Some of them require “cooking” the sugar. Properly cooked sugar may be an acceptable method of feeding your hive-but it requires a lot of care.
Over-heating the sugar can actually create compounds – HMF (hydroxymethylfurfural) that are dangerous for the honey bees. There is also the risk of burns associated with heating and pouring the hot mixture in forms.
I don’t bother with that. I simply place the sugar in a large bowl and add just enough warm water to get the sugar to clump together. This is similar to my emergency sugar cake feeding method I use.
Adding Pollen Substitute to Candy Boards?
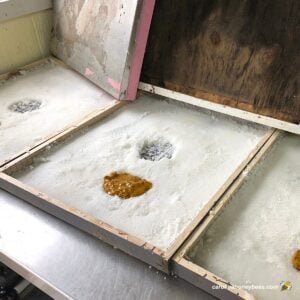
You can add pollen substitute to your candy board recipe. Personally, I prefer to add a small pollen patty mix in one area of the board.
This allows the bees to choose whether they want the protein or not. You do not have to add pollen substitute.
In fact, some years I do not add it. I had rather make pollen patties for use in late Winter/early Spring. You will see some images with and without protein.
Assemble the Homemade Candy Board
In addition to being a “cheap” method, one of the best things is that you can use these year after year. They are only on the hive for the Winter months – mine are still going strong at year 5.
Prepare the Form
This is a very easy and somewhat fun beekeeper task. However, it is messy! Don’t try it in your kitchen if you have any other possibilities.
Even with plastic trash bags under the trays – I feel gritty sugar on the floor of the honey house for a while.

This year, I used strips of those cheap paint drop cloths under each board. This serves a couple of purposes:
- less mess
- helps hold the damp sugar in the form while it dries
- it makes it easier to move them to the bee yard

Adding Sugar Mixture
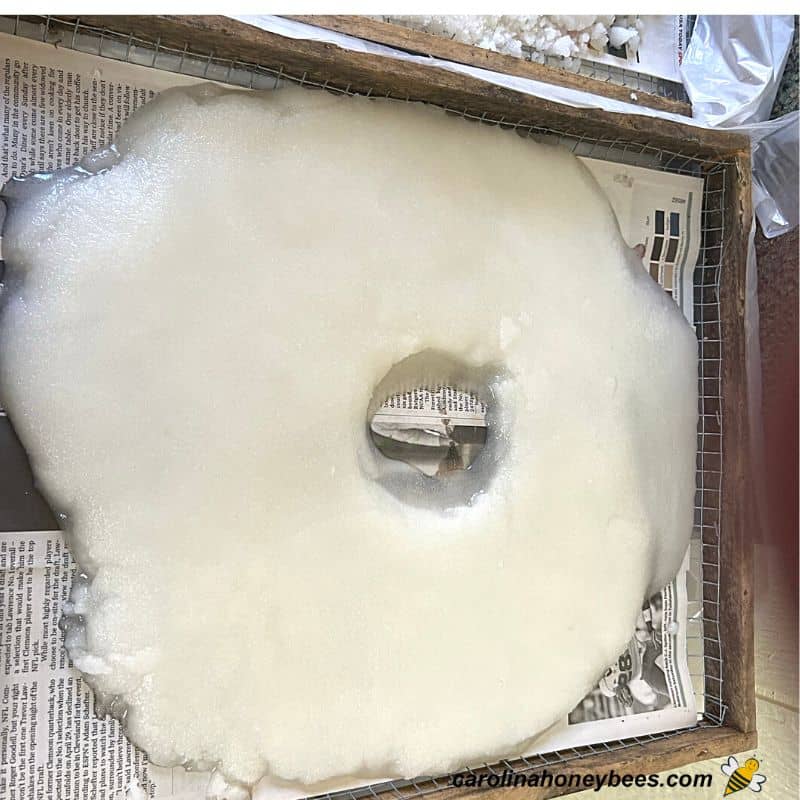
You do not have to place a layer of newspaper in the form before adding sugar but I often do. It just makes things easier.
Also, you don’t have to fill up every inch of the board (though it is great to do so – especially if you know your climate requires a lot of food.)
I often use a cup or funnel to create a useful center hole in my candy board. This aids in air flow (it will be removed of course once the sugar has been added.)
It works well to use something to press the sugar down in the board, this helps it hold together. Use your hands or sometimes, I use a spatula.
It is not necessary to fill the entire depth (thickness) of the form with sugar-unless you live in a region with long bitter Winters and know you need thick candy. Spreading the sugar mixture out over the frame is best as it allows more access for the bees.
Let Dry
Once your DIY candy board frame is filled with sugar, it needs to sit and dry for a few days. If the weather is damp, I might run my dehumidifier to help that process along.
After 24 hours, you might prop the bottom of the forms up off the plastic sheeting just a bit to encourage the bottom to dry faster.
This does not form a rock hard sheet of candy but rather a firm candy board that should allow you to get it to the hive in one piece if handled correctly.

Get the Buzz on Beekeeping & Life with Bees..
Subscribe to my weekly newsletter. Practical beekeeping guidance, along with honey uses, beeswax projects, and bee-friendly gardening ideas.
How to Use Your Candy Board on the Hive
The style of candy board you choose to make will determine whether or not you also need to leave an inner cover in place. In most cases, the candy board will sit directly on top of the upper most box of the hive.
So, if you have a hive with 1 deep and a medium (or shallow) – the candy board goes next. I normally add the inner cover on top of the candy board and then close the hive with the telescoping top.
With this setup, the sugar is directly over the bees and the inner cover on top still provides some insulation and ventilation for the hive. My boards are often empty by Spring.

Expert Tips
Here are some useful tips I have found out from years of experience in the bee yard:
- it is important to spread the sugar over a wide area across the form – we don’t know exactly where the cluster will be
- make sure there are no large gaps between any of the boxes. The colony will close small cracks with bee propolis to keep out drafts. But, large gaps will be detrimental to the overall condition of the colony
- don’t worry if the sugar is a bit wet when first placed in the form – it will dry over a few days
- Be sure to remove the candy board once warm weather arrives and natural nectar is available. The bees will move up into the area and build burr comb – you have been warned 🙂
FAQs
Placed inside the hive, a candy board not only provides accessible food for the colony – it also absorbs excess moisture to help protect the bees from chilling.
Place the candy board directly on the top most bee box. This makes it most accessible to the bees inside the hive. An inner cover and outer top can them be placed on top of the candy board shim.
Both fondant and candy boards provide carbohydrates to hungry colonies. Fondant is more flexible in ways it can be used but it is not necessarily better as a food source.
Final Thoughts
Is this something that every beekeeper must do? Of course not. Many of colonies get through Winter just fine. However, for beekeepers who want to take the time, this extra insurance is useful for some hives. Thankfully, this is a once a year chore that may be the difference between a live colony or a dead hive to clean up come Spring.
No Cook Candy Board for Bees Tutorial
This post may contain affiliate links. As an Amazon Associate, I earn from qualifying purchases.
Read my Disclosure.Tools
- hand saw
- framing square
- Hammer
- small nails
- staple gun
Supplies
- 1 piece 1/2" welded wire piece – 22" x 19" (or equivalent)
- 1 bag granular cane sugar
- 1 cup water
- 1/2 cup pollen substitute (optional)
- 1 piece newspaper
Instructions
- Build a frame for the candy board: Unless you buy one already made – you need to assemble a simple wooden frame that fits on your hive.The first step is to build a wooden rim – also called a “shim” for the hive. This wooden rectangle will fit exactly on top of a wooden bee box.The outside dimensions of your wooden frame should be 19 7/8” by 16 ½”. This is the standard length and width of 10 frame langstroth boxes. The exact length you will cut each piece depends on the thickness of the boards used to make your frame. Just make sure your overall outside dimensions are correct.

- Assemble the wooden frame: Assemble the wooden frame with small nails and some type of wood glue. Glue is optional but it will make the finished product much sturdier.It is a good idea to use a carpenter's square to ensure the board frame will fit your hive boxes.
- Add wire to bottom of frame:Some type of wire or support is needed to hold the sugar in the frame. It is a good idea to use wire that is large enough for bees to squeeze through.If you can-attach the wire just inside the bottom of the wooden shim – you will not have any wire in the way to create a gap between the candy board and top hive box.A good choice is ½” welded wire. This mesh size is large enough to allow bees to move through the wire and still gives some support.
- Mix up candy board sugar recipe:In a bucket or large bowl, mix the dry sugar and a small amount of water. How much exactly will you need? It depends. It is easy to add more sugar or a bit more water. The amounts listed in the ingredients section is just a recommendation.Stir with your hand or large spoon. We want all the sugar to be moist but not soggy. We want it to clump together like a good snowball.
- Filling the frame with candy:Placing a small cup on the wire keeps a hole open in the candy. This allows moisture to escape from the hive. It also allows bees in the hive easy access to the food. (Add a second cup if you want to save space for a bit of pollen patty.)A single layer of newspaper can be placed inside to help hold the sugar in place until it dries a bit.Place handfuls of the sugar mixture around the cup and across the surface of the wire. Spread to a uniform thickness and press down firmly.(Optional) Add a small pollen patty if desired.
- Drying your bee candy board: Let the filled candy boards sit for 1 or 2 days in a warm dry location. As the water evaporates, the sugar should become hardened in the frame. Still handle them carefully as you move them to the bee yard to place on the hives.


every little bit of info helps THANKS
Thank you. So many ways to do things.
What happens to the newspaper under the sugar.
Thanks
The bees chew it up and you might find bits of it in front of the hive eventually – but I’ve never seen a lot.
Can p-nut butter be used as a protein source?
I don’t think so. I would be afraid of causing digestion problems at the worse time of year.
I have one hive that has been in trouble with SHB for a few months now. I have implemented many steps to control this but my biggest worry is that the candy board will attract them. Any ideas?
Hi Sheryl, Those hive beetles can be a problem but the candy board will not attract them as long as you do not put pollen in the recipe.