Apply Beeswax to Plastic Foundation
Adding beeswax to plastic foundation is a common practice among beekeepers. While durable plastic foundation is an appealing option for your hive, bees may resist it and fail to draw out wax properly. Manufacturers usually apply a thin coat of wax to plastic. But, this may not be enough. In this guide, you’ll learn how to enhance your plastic foundation by applying additional beeswax, helping your bees get to work more efficiently.

As a beekeeper, in the debate of beehive foundation – I prefer wax. But, many beekeepers love their plastic foundation and are very successful using it in their hives.
Why Add Beeswax to Plastic Foundation?
Plastic hive foundation offers many benefits to beekeepers. It is durable and easy to install and clean off. However, bees don’t always embrace plastic readily.
Once the comb is drawn out, they will use the frames of plastic as well as any in the hive. But, honey bees sometimes hesitate to build on the synthetic plastic surface and create weird shaped comb – cross comb and burr comb instead.
This delay can affect the overall productivity of the colony -causing slow buildup to a strong hive.
How it Helps
Adding a thin layer of beeswax to plastic foundation encourages bees to use these surfaces. They recognize the waxy feel and smell and accelerate their efforts.
Faster comb building means there will be more room for honey and pollen storage. Also, more cells to be used for rearing bee brood. The colony must have spaces to live and work.
Choosing the Right Beeswax for the Job
You should always use good beeswax when coating your plastic foundation. That does not necessarily mean expensive, pristine white wax.
Natural beeswax comes in a range of colors. Darker colored wax is fine to use to coat plastic. But, you do not want to use beeswax that may have any contaminants.
Cappings wax resulting from extracting honey can be a good choice. But, cappings wax is also great for making beeswax candles or using in recipes for lip balm etc.
Use the lesser premium wax for coating plastic. It is a good idea to at least clean beeswax in some manner before using it for any project as this removes bits of wood, etc.
Preparing Your Plastic Foundation
If you have new foundation, it is clean and ready to go. In my opinion, all plastic foundation should have an additional coat of beeswax – even if the manufacturer claims it has been done.
Or, perhaps the foundation has been used in a hive and had some old comb on it. You can simply use a hive tool to scrape off the old comb.
This is an advantage of plastic as it makes the job of rotating out old comb frames quicker and easier. A process that promotes good quality health.
Used plastic will retain some wax, stains and bee propolis in the impressions. This is no reason for concern. After scraping off the old wax, wash the foundation well with water.
Some beekeepers go a few steps farther and attempt to sanitize the frames further. But, if they came from your hives – this is not really necessary.
Do keep in mind that used beekeeping equipment can be a cost saving but always carries risks.
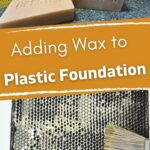
How to Apply Beeswax to Plastic Foundation
There are several methods for wax application. To a degree, the method used depends on how many pieces you need to do.
- using a sprayer
- dipping plastic foundation in melted wax
- brushing melted wax on with a paint brush
For someone getting started in beekeeping and those with only a few hives, the paint brush method is best. So, that is the one I will share with you.

Equipment & Materials
Prepare a place to work and protect surfaces from wax drips. You will need a heat source and method for melting your wax.
- melted wax
- brush or roller
1. Begin by melting some beeswax in a safe manner. The double boiler method is best. You can use a pot of water with a special wax melting pot or even a tin can to create your double boiler.

2. Once the wax is liquid. Use a small brush or roller to “paint” the wax onto your plastic foundation.
While some sources recommend applying a thick coat of wax, I don’t see the need. If you put wax somewhere the bees don’t want it to be – they have to move it.

I prefer to apply a thin coat of wax and let them build comb as they naturally would. But, the choice of how much to apply is yours. Strive for a uniform layer of wax across the foundation surface.
3. If you only place a light coat, the application will look a little “humpy-bumpy” due to the cells impressions on the plastic. That’s okay.
Safety Precautions
Anytime you are working with hot wax, care should be taken to avoid fires or burns. Beeswax is flammable if heated to a high temperature – and you don’t need it that hot anyway.
A plastic sheet to protect your working space is a good idea – you will have drips. And, while you can remove beeswax from most surfaces, avoid that task where possible.
FAQs
You typically only need to apply beeswax once, but if the wax wears off after multiple uses, you may need to reapply it before reusing the foundations.
While you can use colored beeswax, natural or lightly filtered beeswax is best because it closely resembles the wax bees produce and is less likely to deter them.
Yes, applying an even, thin coat of beeswax is ideal. Too much wax can create clumps and make it harder for bees to work the foundation, while too little wax may not be effective.
No, synthetic waxes are not recommended because they do not provide the natural appeal or scent that bees recognize and prefer for comb building.
Final Thoughts
Adding beeswax to plastic foundation is a straightforward technique that can make beehive management much easier. It is not a requirement – some beekeepers have great success with premium plastic as it comes. But, it only takes a few minutes to perform this task and it is an investment in your colony’s success.
Resources: Betterbee Foundation
Another way to add wax is to make a wax block, warm it up in the sun just until it’s a little soft and rub it over the foundation.
Yes, I agree that can work if the temperatures are warm.