How to Mark a Queen Honey Bee
Learning how to mark a queen bee often intimidates new beekeepers. Yet, it is an important skill to know. Having a marked queen honey bee has numerous benefits and will help you monitor the health of the colony. In this guide, I share with you my process for marking my own queens. However, there are several methods used by beekeepers- you can choose the one you like best.
As a new beekeeper, I too struggled with being able to find the queen bee in my hives. It is still hard to do when the colony is large. But, keeping marked queens makes that job much easier and helps you complete faster hive inspections.
What You Need to Know Before Marking a Queen
Any task performed by a beekeeper has some inherit risks. Can you harm your queen during the marking process? Yes – you can and sometimes we do. Be gentle.
This is especially complicated due to the role of the queen bee in the colony. As the only reproductive egg laying female, she is the sole source of worker brood – the next generation of colony workers.
However, marking queens provides valuable information about her health and productivity. Issues that directly impact the overall well-being and success of the hive

Tools Required
You do not need a lot of tools to get your new queen bee marked. Beekeepers have been doing it for years with little equipment. But, there are lots of gadgets that make the job easier.
- Queen Marking Tube – Or Your Fingers
- Non-Toxic Paint
If you choose to hold her, you won’t need a marking tube but they do make the job easier.
This post may contain affiliate links. Carolina Honeybees earns a tiny commission when you shop from our links. See our privacy policy for terms.
Queen Marking Paint
There are several different paints beekeepers use for queen marking. For years, many used the regular model tester paints – I’m not sure if that is a good or bad idea but it did work.
Today, most of us opt to use a paint pen. The paint pens by UNI-POSCA are most commonly used (Honestly, they are the best and what I always use).
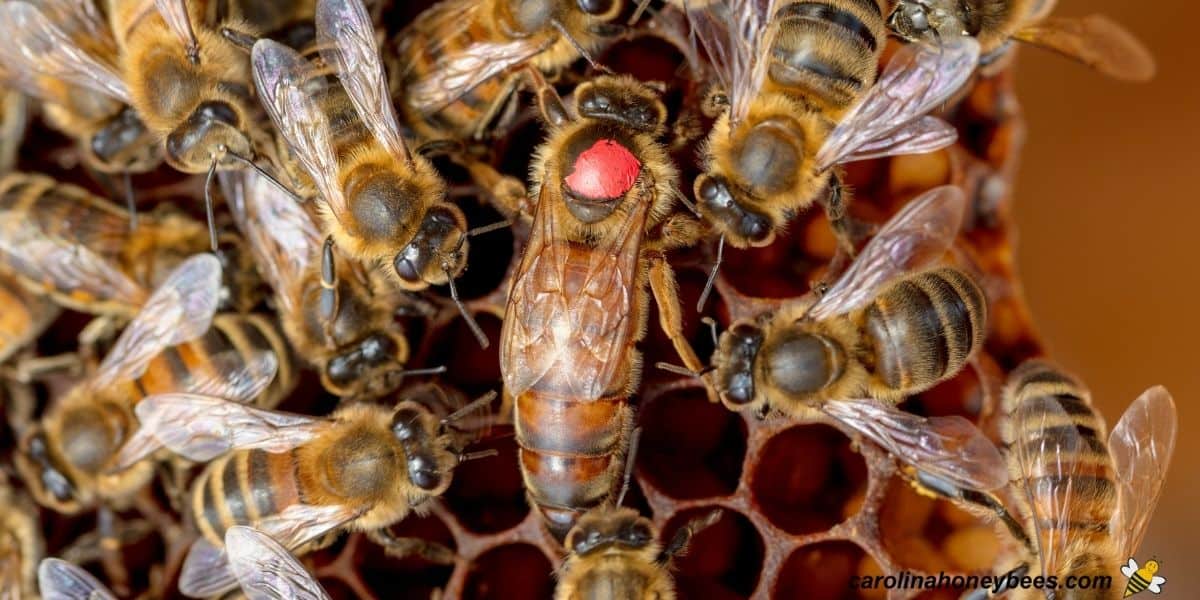
Always do a test blob on a nearby piece of wood first. Sometimes, the first bit of paint that comes out of the pen is too much. Do not get paint on her wings, antenna or legs. We only want a small dot of color on her back.
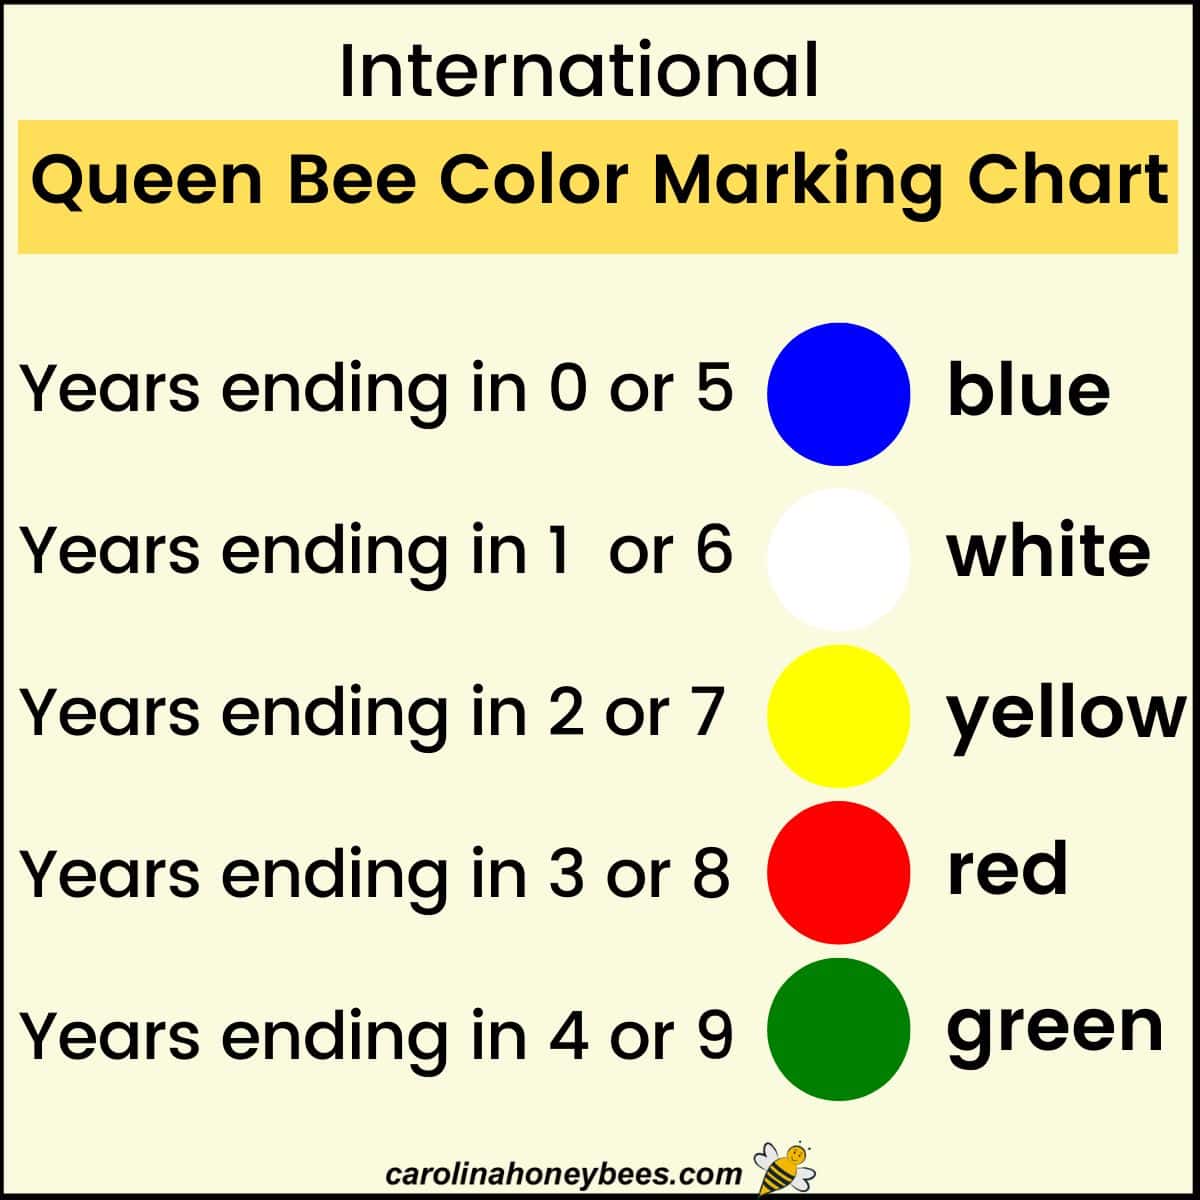
International Queen Bee Color Chart
You can mark your queens with any color you like – perhaps your favorite? It just needs to be bright enough to show up when you are looking for her.
However, it is common practice in the beekeeping world to use the International Queen Bee Color Chart.
You do not have to rely on your memory to know which color was used for which year. Use the color pen that corresponds with the last digit of the year.
White 1,6 Yellow 2,7 Red 3,8 Green 4,9 Blue 5,0. So, a queen raised in 2020 would be marked with a blue dot, 2021 – a white dot, 2022 – yellow dot, 2023 – red dot, etc..
Step by Step Instructions
Here are the basic steps used to mark queen honey bees. The process may vary a bit depending on the tools you use – but the basic process stays the same.
- First locate the queen bee
- Contain her – in your fingers or a marking tube, etc
- Gently apply a dot of paint & let dry a few seconds
- Return her to the hive

Locate the Queen Honey Bee on a Frame
Easy right? Not always. The queen could be anywhere but is mostly likely in the area of the hive with bee brood.
Look carefully for her in and on the frames in the brood nest area. You may have to look at a frame more than once – be careful as you lift and replace frames.
Catch & Hold The Queen
I think one of the most intimidating things about marking queens is holding them. Some beekeepers seem to have no problem with this.
But, I always have a bit of angst and fear that I will accidentally crush her, drop her or have other types of bad luck.
When developing a strategy to catch and hold your queen, do what feels comfortable for you. We need to restrain her for a few seconds without harming her.
Two Common Methods of Containment
- catch and hold the her with your fingers
- use a queen marking tube or cage
Holding a Queen Bee With Your Fingers
If you have a steady hand and calm nerves (I do not), you can take the direct approach to catching your queen. Restraining her in this manner takes some skill.
Gently grasp her and hold her body between your thumb and 1st finger of your non-dominate hand. The second finger provides a place for her feet to sit.
Move your fingers to expose the top of her thorax this is where you will put a small dot of paint. If the idea of picking up your queen in this manner makes your blood pressure rise – never fear, there are other options.

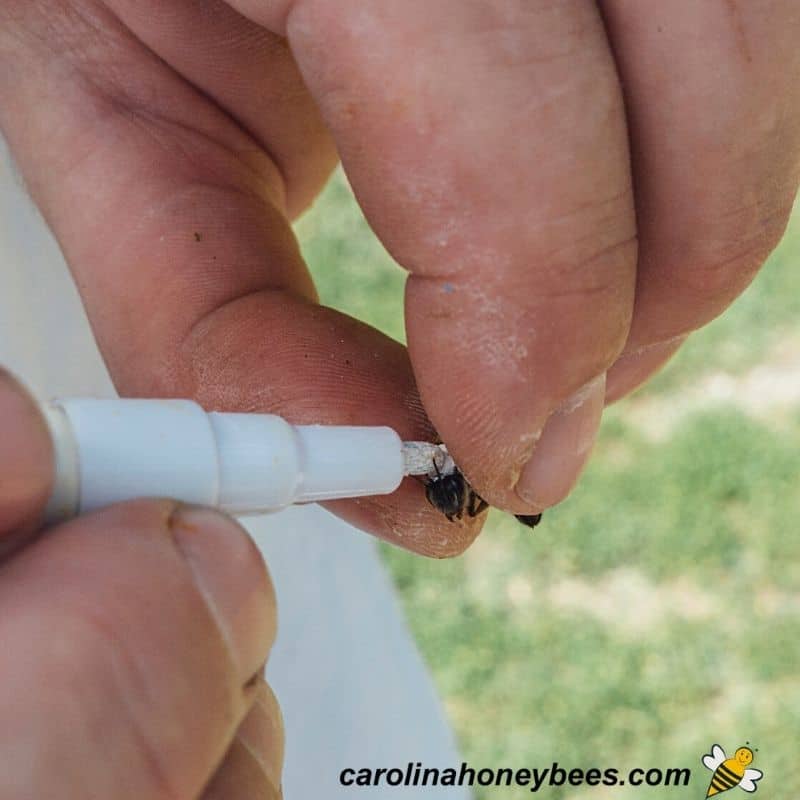
Using a Queen Marking Kit with Tube
Using a queen marking tube (available alone or in a kit) is the easiest method to safely mark your queens. You do not have to hold her but care must still be taken to avoid applying too much pressure.
Locate the frame with the queen and gently lay the frame down with that side facing up. Remove the foam-covered plunger from the tube and “corral the queen into the tube”.
Replace the foam plunger and gently push her to the end with a mesh covering. The sponge surface will protect her if you are careful.
Continue to slowly nudge her until her back (this is the part of the bee called a thorax) is against the mesh.
Do not use too much force – be gentle. Sometimes, gently blowing on her will help to get her to turn over if needed. There is also a one-handed queen marking tube on the market to consider. I have not tried them.

Round Push in Cage
Another option less common technique uses a small round cage. This push in cage has a mesh top. The beauty of this tool is being able to mark your queen without having to pick her up.
However, it can be difficult to get her in the cage without a lot of other bees. The push in cage works well but you must be careful. Avoid pushing down too hard and damaging your queen.
Mark the Queen
Now, mark her with your queen pen marker or paint. Test the marker on something else first – you don’t want a big glob to come out.
Allow the paint to dry for a minute or 2. If you did get a bit too much paint on her – it is usually best to just leave things alone and hope for the best.
Trying to clean it off may only damage her further. Check back in a few weeks to make sure the bees did not kill the queen and replace her. They do sometimes if they think something is wrong with her.
Return Marked Queen to Hive
Release the queen back into the hive. I generally put all the frames back in the box and release her near the open space between two frames. She will likely crawl down into the dark area to hide.
Why do Beekeepers Mark Queens?
You will find that beekeeper opinions on queen marking vary from one person to another. But, most hobby or small-scale beekeepers enjoy the benefits of having a marked queen. It enables you to:
- track her age
- easier to locate in the hive
- faster hive inspections
- know she has been replaced
By using the color chart, you can tell how old she is. If you have an older queen, you know the chances of her failing are greater. Knowing her age allows the you to plan – would you expect to need a new queen this season?
You can also conduct hive inspections faster. Once you know where the she is – her frame can be kept in a safe place. She is less likely to be crushed during a hive inspection if you know her location.
If you see an unmarked queen in a hive that you know had a marked one, the colony has most likely replaced her. Maybe the bees swarmed? If so, this is good information to know.
Best Time to Mark Your Queen Bees
If you bought a bee package with an unmarked queen, the best time to mark her is within the first month.
You can mark her during installation of the bee package – and I have done this before. However, it is best to wait a couple of weeks. Let the colony bees get to know her – without a big dot on her back.
It is fine to let the small colony adjust for a few weeks. You don’t need to do this during the first hive inspection after installing bees – just before the population grows too large to find her.
Once she is accepted and laying eggs-she can be marked while the colony is still small. When I am requeening a hive, I like to give the bees a few weeks to accept her before marking.
Safety Tips
- minimize handling time – don’t hold the queen any longer than necessary – get her back in the hive
- some beekeepers use a queen catcher or clip (doesn’t work well for me but you should try it)
- use the right paint – non-toxic
- you only need a small dot of color
- let the paint dry a minute before carefully placing the queen bee back in the hive
FAQs
Yes, it is possible for worker bees to clean the paint right off the queen – but this is not the norm. No paint usually means you have a new queen in the hive.
If this happens, don’t panic – stand still. The queen usually returns to the hive in a few minutes.
It costs bee suppliers and investment in labor to mark queens. But, the upcharge is usually minimal.
In most cases, virgin queens are not marked. There is no need to have a colorful target on their back as they fly out to conduct mating flights.
For new beekeepers, it is definitely better to have marked queens in the hive.
In most cases, this is not a problem. But, it does depend on the colony in question and it does sometimes happen.
Final Thoughts
Having marked queens helps new beekeepers develop the skill of being able to find one when needed. It helps to “train your eyes” to look for her special shape and movement patterns.
Every beekeeper should learn how to mark a queen bee. Where you are breeding bees for certain honey bee characteristics or just managing your apiary.