Installing a Nuc

A common way to start a new hive, nuc installation is a bit different than working with package bees. Getting the bees from the transportation box to a permanent hive can seem rather daunting. However, installing a nucleus colony is really no more difficult than conducting a regular hive inspection. With the proper preparation, careful handling and respect for the bees you should be able to get the job completed quickly.

As a Master Beekeeper, I love using bee nuc colonies in my apiary. They are a great way to fix a queenless hive that is having problems but they are most commonly used to start new hives – especially in the Spring.
Bee Nuc Installation
New beekeepers have a lot to do beyond getting all the necessary tools and equipment together. You may also need to buy honey bees .
While buying honey bee packages is the most common way to start a hive – there is an alternative. Some beekeepers prefer to purchase a nucleus colony (pronounced as “nuke”).
What a Nuc Contains
Though they are available in different sizes, the 5-frame nuc is most common size. Also, most nucs come with deep frames – though you might find some for sale with medium frames. Be sure to ask when you order.
Inside the plastic or wire and wood box should be the “heart of a hive”. A laying queen already acquainted with the colony, frames of comb, food and worker bees to maintain the hive.

Evaluation the Condition of the Nuc
Before the begin the journey of installing your nuc into the hive, it is important to assess the condition of what you just purchased.
You should receive 5 full frames of bees with drawn comb with honey, pollen and brood. Good quality nucs will have at least 3 frames of brood or baby bees.
Take note of your queen (if you can find the queen) – if you can not find her, at least verify that you have fresh eggs or bee larvae in the comb. Larvae should be pearly white with not sign of disease. If you are concerned about anything – take a picture if possible and speak to your supplier.
Preparation
A good quality nuc should be almost bursting at the seams with bees. Before you begin this process, make sure your nuc bees are ready to move to a full hive. They should be but there are several factors to condsider.
Let’s assume you have obtained a nuc with 5 deep frames – to go into a 10 frame standard dimension Langstroth Hive.
Have your empty hive set up and ready for the bee nuc to be installed. Since your nuc has 5 frames, you will need 5 more to fill the 10-frame space.
How to Install a Nuc into a Full Size Hive
The hive to receive the nuc frames should be open. The nuc box ideally is sitting beside the new hive with the entrance facing in the same direction.
1. Prepare yourself by putting on your beekeeper’s hat/veil or other beekeeper clothing. A nuc colony may be more defensive than a package. They have young to protect and frames of food.
(Some experts recommend waiting until after you light your bee smoker to put on your veil. I’ve never had a problem with flames but if you are concerned – that’s an extra step for safety.)
2. Light your smoker and produce a little smoke. (Unlike the more docile package, smoke is helpful in a nuc installation).
Puff a little cool white smoke near the nuc’s current entrance. This does not harm the bees – a little smoke calms bees and reduces the alarm response.
3. Open the empty hive that will receive the nuc frames. (Assuming you are using a standard Langstroth hive-you will need 5 more frames to go with 5 in the nuc.)
Put 4 of empty frames in the large hive – 2 on each side. This leaves a large opening in the middle.
4. Carefully transfer the nuc frames with bees into the center of the new hive. Once you have all the frames (including the one with the queen) in the new hive – place the last empty frame in the hive to complete your 10 frame setup.
When installing a nuc colony, you do not have to worry about the queen being released from a cage. Nuc queens are known to the workers and loose in the box. However, you do need to be very careful because you don’t know where she is.
5. Some bees will still be in the nuc box and some will be flying around your head! Shake any bees remaining in the transport container into the new hive.
If a few stragglers insist on staying inside, you can set the box nearby. They will soon join the queen – if the temperatures are warm enough (don’t do this too late in the day if the weather is cold).
6. Many beekeepers will see the importance of feeding bees in a new hive. With all the frames inside – you are ready to close up the hive and put your favorite type of bee feeder in place.
Not a “must do” – providing sugar water for bees can help them get a good start on finishing those new frames you added.
7. While your colony is ready to grow, they are still a small family. Help them protect their hive by installing an entrance reducer.
A 2-3 inch opening should be fine for now. We want the entrance to be a bit small until the population builds up in a couple of weeks.

Expert Tips
Your nuc will be delivered or available for pickup in mid-late Spring. They are traditionally available a little later than package bees.
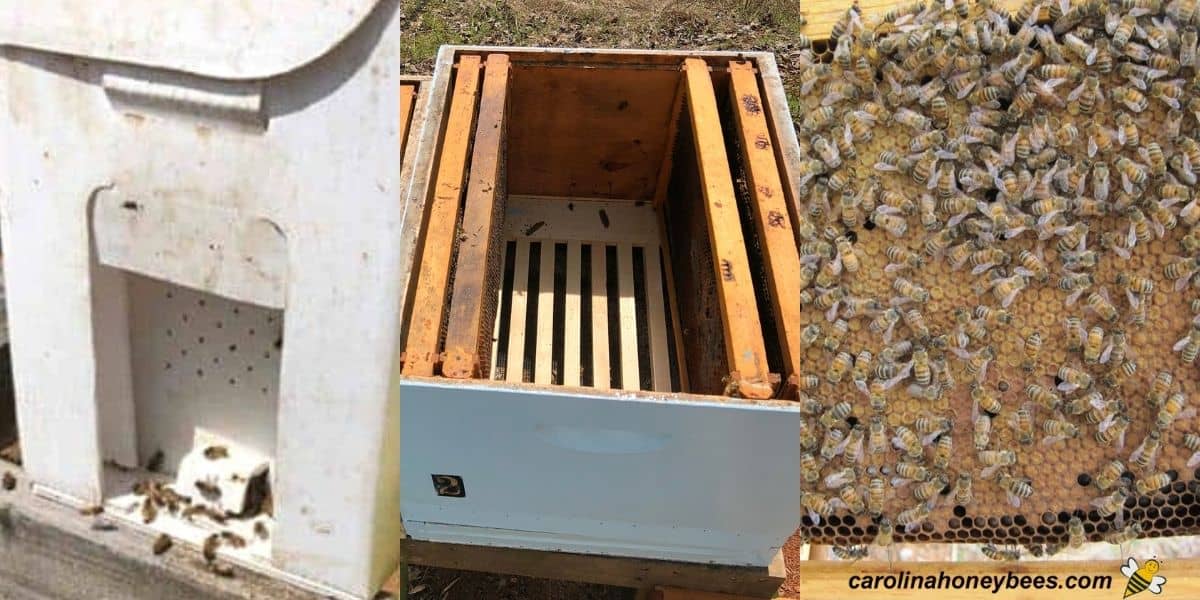
Today, it is common to receive a nuc of bees in a white waxed container or plastic box with ventilation holes. Don’t throw them away – they can be reused for swarms.
Plan to pick up your nuc very early in the day. In general, the sooner you get the bees home and into a regular hive- the better.
Protect it from temperature extremes. The colony is not able to moderate temperatures inside this box as they would in a regular hive.
Normally, NO bees will escape from the box during transport. However, if one does – is not a reason to freak out. If this concerns you, take some type of large mesh bag to put your nuc inside.

Delaying Nuc Installation
What if the weather or your schedule prevents immediate installation? No problem, your bees can live in the nuc box for a day or so if necessary. But, we do want them to be able to fly.
If you need to delay installing the nuc bees in a hive, place the container right beside your permanent hive. Open the little access door on the front so the bees can come and go.
As long as the bees can come and go, you are not in a rush to make the transfer. A few days is okay.
However, a good nuc box is full of bees – almost to the point of overcrowding. We don’t want them to cast a bee swarm!
Post Install Hive Inspection
A good practice is to do a thorough new hive inspection a week after putting the bees in the box. The bees will begin foraging right away – even the same day! Incoming nectar or feeding will encourage the bees to build comb.
Eventually, the growing colony will need more space. Whether adding another brood box (deep, medium or small according to your preference) don’t get in too big of a hurry. This also applies to the timing of adding a second honey super to a production hive.
When 7 or 8 of the 10 frames are drawn out (full of honeycomb) -you will be ready to add another box. But, don’t give them too much space too soon or Small Hive Beetles – even wax moths may cause trouble.
FAQs
There is debate about the best time of day for installing a nuc. A late day install is favored by some beekeepers. But, I think any time of day is fine if the weather is warm (60° F).
The bees will be eager to get out and experience their new home. However, we are going to be opening the box and transferring frames of brood – you don’t want to chill the bees.
While a late day nuc install is favored by some beekeepers, do not attempt installing the bees in the dark. It is better to wait until the next morning.
In good weather with a nectar flow going on, feeding the bees may not be necessary. But, otherwise – a short time of feeding will help them get off to a robust start.
It is best to delay nuc installation during rain. However, if you must install bees in rainy or cool weather – be prepared to complete the process as effectively and quickly as possible.
Final Thoughts
Installing bee nucs can seem a daunting task but it is really not that difficult. They have advantages and disadvantages as a way to get bees. But, it is a great way to grow your apiary. Continue to monitor colony growth and condition throughout the rest of the season.
I run double deeps for my colonies. Do you install nucs into the upper or lower deep super ?
Thanks,
I start all colonies with 1 deep, then I would add the second when the bees need the room. In my hives, bees like to work up more than down.
Hi from Vermont. I have a comment concerning adding more boxes to a nuc. You mention adding a “second Super” ! Did you mean a medium Super or a second deep brood box ? Many beekeepers use the terms “super” incorrectly. Super means superior or superimposed, “on the top”, not the deep brood boxes. Maybe I am missing something. Still very cold in Vermont….think Spring !!!! Peter
Hi Peter, You are correct many of us use the term super in different ways. Thats a good question and I try to always say brood box or honey super but I don’t always do it. In that paragraph, the idea applies to either size box. If you want to run two deeps or a deep an medium or a deep and shallow, you want to wait until the bottom box is well in use. The timing applies to “honey supers” too when adding boxes for collection. Thanks, I need to make that a bit more clear. Spring is full on here – so much pollen I can breath LOL
👍 🐝
Thanks Charlotte – Transferring my 1st Nuc to its Hive today (I’m in NZ) great article, very helpful in settling some of my nerves. Maybe I’ll give myself a few puffs of the smoker and see if that calms me as well as the bees 🙂
That’s awesome. I am sure you will do well! I love nuc sized colonies.
Very helpful instructions. Thank you.
You are welcome – good luck