Installing a Package of Bees

For those of you who ordered bees for a hive, now you are faced with the task of installing a package of bees for the first time. Perhaps you have a few concerns? It can be rather scary for beginners -but it is easier than you may think. I will show you that with care and patience you can get those thousands of bees into the hive and grow them into a nice strong colony.
Among the different ways of getting or buying bees, the package option is the most common. A complete bee family arrives contained in a wood and wire (or plastic) transportation cage. Everything you need to start the colony.
Putting A Package of Bees in a Hive
Your bees have taken quite a journey from the warm confines of their recent home. It is your task as beekeeper to get them into new living conditions as soon as possible.
Let’s look at the big 3 areas involved in starting a hive with package bees:
- package arrival
- preparation
- putting bees in the new hive
Bee Package Arrival and Care
When you are buying bee packages, there are several different sizes to consider. But, three pound packages containing roughly 10,000 bees is most common. You might have a choice of which breed of bee you want-but most will be a mix of genetics.
Beginner beekeepers use two methods of acquiring bees in a package.
- have them shipped through the mail
- pick up bee packages at suppliers
Bees Shipped in the Mail
Each year thousands of honey bee packages ship thru the US mail or with another mail carrier. If they come through USPS, you may be required to pick them up from the post office.
A package with thousands of stinging insects tends to make some mail handlers nervous – can you imagine that? LOL. Pick them up your promptly. Keep them in a cool dark place until you are ready to install your bee package.
Picking Up Your Bee Package
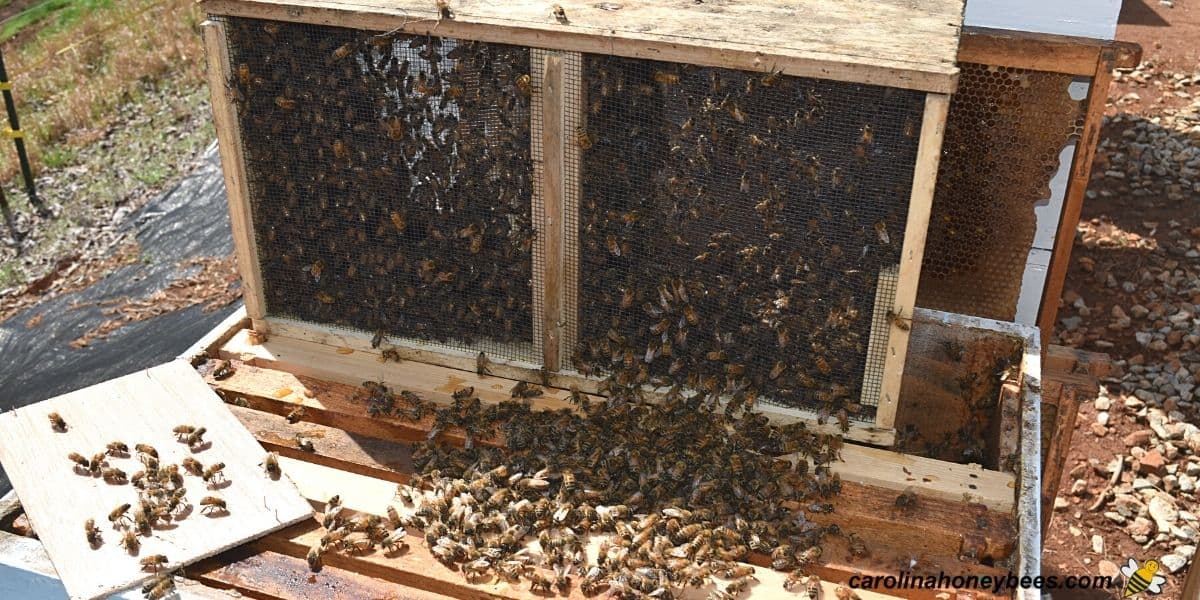
If you have a bee supply nearby, you can drive to pick up your honey bees. Plan to arrive early. Your bees are contained in a wooden and wire (or plastic) travel cage.
There is little danger of bees escaping from their traveling box – but it is not impossible. It is very common to have a few loose ones on the outside of the package.
These loose bees rode from the original bee yard and will likely ride home with you. They are lost and confused and rarely sting unless provoked. After riding home on the outside of the package, these “hitch-hikers” will join the colony.
Going to pick up bees can be a fun outing for the whole family. However, think it through- before going to pick up a package with Grandma, Grandpa, all the kids and the family dog along.
People can and do get stung at pickup sites. I prefer to let the bee package ride home in the back seat. This is hard to do if everyone in the car is scared to death.
Keep Your Bees Cool
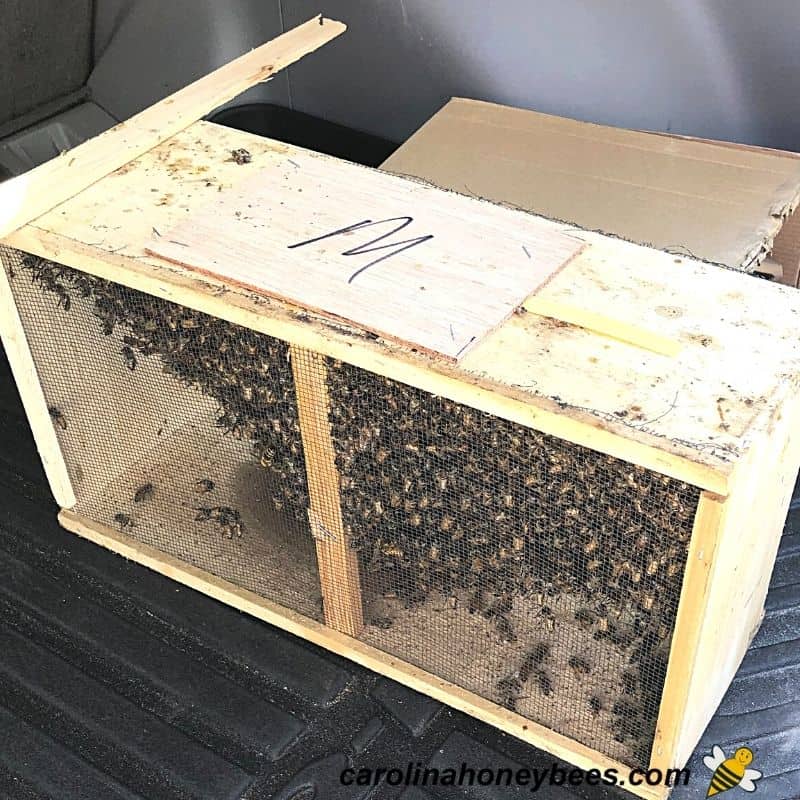
If temperatures are in the 50’s° F, there is little danger of the bee package being chilled. They can be placed in the bed of a pickup (out of any drafts).
You can put them in the trunk of your car, if you don’t have a long way to drive home. However,a package of bees can certainly become over-heated.
Make sure there is ventilation space around the package sides. Do not try to keep your them warm (unless the outside temps are very low).
Once home, place them in a garage, basement or other cool place while you get ready to install your package.
Equipment and Beekeeper Preparation
The well prepared beekeeper has a much smoother experience putting bees in the new hive. Prepare yourself and your equipment before taking the top off the package.
- wear your protective gear
- have hive tool, smoker and fuel with you
- equipment should be assembled, painted and ready to go before bees arrive
Wear your beekeeper’s veil or other protective beekeeping clothing. Package bees are rarely aggressive, they are confused and lost. But, confused bees can sting – protect your face.
Smoke is not used when installing a package unless problems arise. However, it is always a good idea to have your bee smoker with you.
Instead of using the smoker, a spray bottle with a little sugar water (1:1) comes in handy for me. You also need to have your hive tool on hand and a knife or pair of scissors in your tool box is a good idea.
Beehive Set Up
For a Langstroth hive, begin with only 1 deep box. (Bottom board, deep box (enough frames to fill) inner cover, telescoping top).
Do not add more supers or boxes until the population inside the hive begins to grow in a month or so.
The population in your new hive will slowly drop while the queen begins to lay eggs. Over time bee larvae transform into new adults. After about 3-4 weeks the population will grow quickly.
If you are using a screened bottom board, you might leave the grid board in the bottom for the first few weeks. This helps the colony feel safe.
Steps for Bee Package Installation
Basic installation of bee packages into a new hive consists of 2 major steps.
- install the package queen bee
- install the remaining bees from the package

1. Install the Package Queen Bee
Assuming you have a wooden package (most common), use your hive tool to remove the wooden flap on top of the box. Never fear, a few bees may come out (if the opening is larger) but the syrup can fills most of the opening.
The queen cage hangs near the can with a plastic strap. But, we need to remove the can to get the queen – how unfortunate.
Lightly mist the screen sides with a spray of sugar water, then gently but firmly tap the bottom of the package on the ground.
Most of the bees will fall to the bottom. Quickly pick up the cage and tilt it enough be able to grab the syrup can.
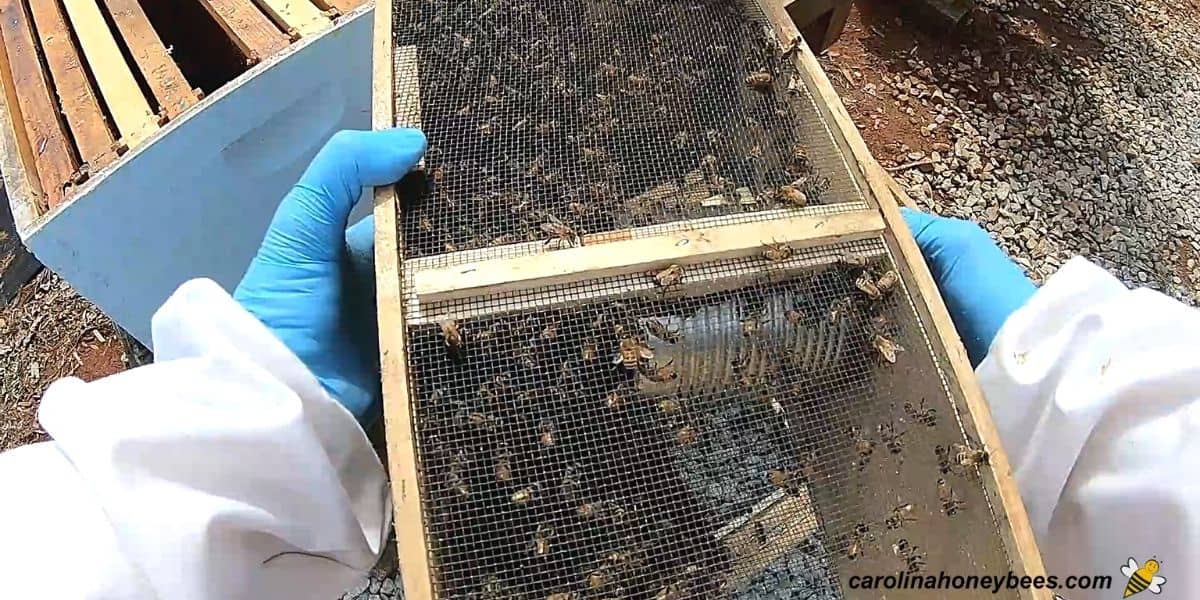
Remove the syrup can from the package – now you can grab the strap with the queen cage and pull the queen cage out.
Set the syrup can aside and temporarily lay the wooden flap back on the package to contain most of the bees. Don’t panic if a few come out – they aren’t going anywhere.
Hanging Queen Cage Inside the Hive
Check to make sure your queen bee is alive. Do not be alarmed if one of the worker attendants is dead. Honey bees do not live long some die every day.
If the queen looks well, it is time to hang her cage in the hive. Fitting a wooden cage into a new hive can be tricky because there is no comb to help hold the cage in place.
It is a good practice to have a small piece of wire or string to help hang the queen cage.
A wooden queen cage will have a cork in both ends. Remove the cork from the candy end only! It is not usually necessary to poke a hole in the candy plug.
If the candy is almost gone and you want to delay release – you can make our own queen candy to fill the hole.

Place the queen cage between 2 frames near the middle of the bee box. The candy end should point up to prevent any dead bees blocking the exit.
Twist the cage so that the screen is open to workers, they will communicate with the new bees and even feed them.

During the few days it takes for them to eat the candy plug, the colony is getting used to the queen’s pheromones.
It is important to be sure that the exit hole is open – so your queen can leave the cage when she is freed. ** Your queen may arrive in a plastic cage. If so, the same rules apply regarding placement **
2. To Shake or Not to Shake
Beekeepers use various methods of installing the remaining package bees into the hive. The most common way involves simply shaking the bees into the hive box – after the queen cage is in place.
Some beekeepers prefer to take approach the task in a more gentle method. However, each method has advantages and either one works equally well-in my opinion.
Shaking a Bee Package
- hang queen cage inside the hive
- remove some frames (with foundation) to make room
- pick up the package and pour (yes pour) a small mound of bees directly on top of the frames holding the queen cage
- pour the remainder of bees in the open space of the box
- carefully replace the frames that were removed
- close up your hive
- set the mostly empty cage near the hive entrance
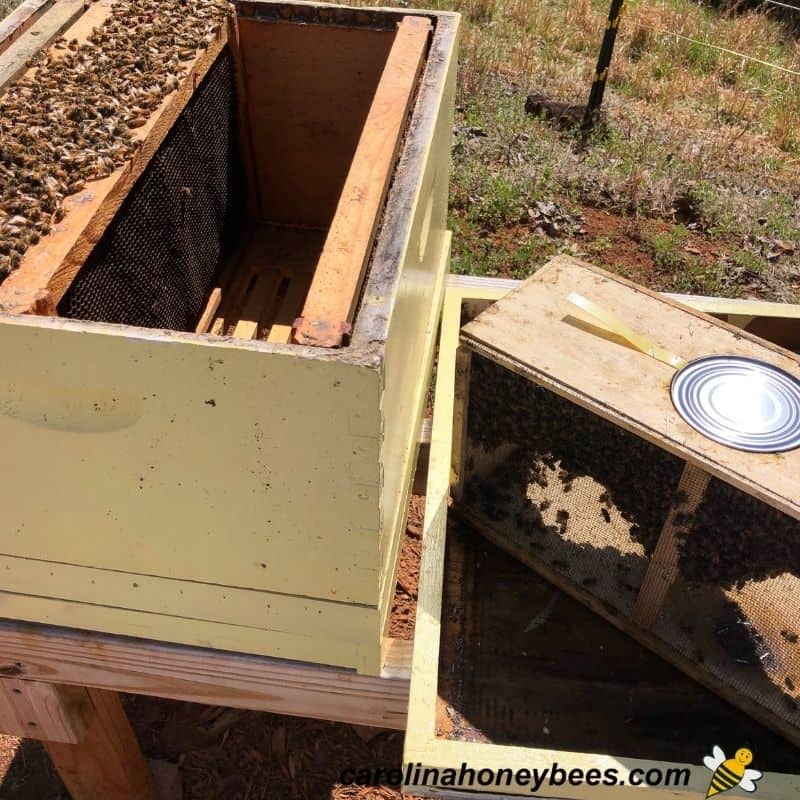
Once your queen cage is placed inside the new hive. Remove half the frames – or just 3 or 4. In a 10 frame hive, this leaves an open space several frames wide.
After pouring a small amount of bees near the queen cage, the rest are shook in the opening left by the removed frames.
It is an amazing sight, no matter how many times you do it. If you have a lot of bees taking flight, you can gently mist the bees in the hive with the sugar water sprayer.
Do not bang the package on the ground. You do not have to shake it wildly like a mad-man. Just gently shake it enough to dislodge most of the bees into the hive.
Carefully, replace the frames that were removed. The bees in the bottom of the hive will begin to climb up on them.
There will be a few individuals left in the package. Sit it in front of the hive, most of them will soon join the rest of the colony. Close up the hive.

Non-Shaking Method of Package Installation
Some beekeepers dislike the shaking method – feeling it is too disruptive to the already stressed bees. So, yes you can install your package without shaking if that is your wish.
Repeat the above steps for hanging your queen cage and removing half the frames. Now, we have a large open space inside the hive.
Set your open package inside the hive ( the opening where the syrup can was is open). The bees in the package will smell the queen and come out of the package to join her-usually…
By the next day, you should be able to open the hive and remove the empty package. Then, replace all the missing frames.
This method of installing a package is fine and will work well in most instances. However, I would not try it in cold weather. Sometimes, the workers don’t leave the package and the queen dies in the cold.
Care After Installation
Once the bees are nestled safely in their new home, you job is not done. There are tasks to complete to ensure they have the best chance of succeeding in establishing the colony.
Feeding Packages
Once you have finished installing your package bees in the hive, it is time to prepare a feeder for your bees. There are many ways to provide sugar water for bees – all with some pros and cons.
A simple internal jar feeder is one of the best options if you have an extra box to enclose the them. Foraging bees will begin to gather nectar and pollen right away but some sugar syrup can be very helpful.
Your package arrives with a small can of food to sustain them until they are installed in the hive. Even if they are not hungry, they certainly are not well fed.
Worker bees need full stomachs to encourage wax production. Feeding your new colony well helps those wax glands start producing wax. This gives the colony a boost and helps encourages the bees to build more comb.

Inspections
Once your bees are installed and fed, they should settle down and begin to grow. Don’t open the hive every day. New bee packages can leave the hive if the beekeeper is too intrusive.
Your first hive inspection or opening of the new hive is done in about 5-7 days. This should be brief. It is not the time to look at every bee in the colony.
After a few weeks (or couple of months), learn how to perform a full hive inspection to ensure that all is well with your colony.
FAQs
The most common sized 3 pound package comes with about 10,000 bees: workers, drones and of course a queen.
There will be times when you may need to delay installing your package for a few hours or a day. They can survive inside the traveling cage for a couple of days. It is a good idea to lightly mist the screen sides with sugar water a couple of times a day.
For European honey bees, it takes between 3000 to 4000 bees to make a pound.
I do not recommend “walking the queen in” or directly releasing her. I have seen this system fail more times than it succeeded. And what it would be the point? To get the queen out a couple of days sooner? Meh..
Late afternoon is a great time to install bees in a new hive. It gives the bees a short time to orientate to the new hive before settling down for the night. Each beekeeper has their own opinion though.
It is best to have an air temperature of 60-65°F to install bee packages. Warmer is better.
You can add a package of bees to an existing colony (without the queen of course) but there may be a good deal of fighting. Rather than just pouring them in – I would consider a newspaper beehive combine method.
After removing one of the queens, you could put two packages of bees in one hive but there is normally no reason to do so.
Final Thoughts
Installing your first bee package into a hive – or your 100th is a thrilling time. With proper care and a little luck, they should grow into a productive colony. Congratulations. You did it! Don’t you feel like a beekeeper super star!
Very good and thorough information.
Someone should proofread though. Several issues with missing words, wrong words etc. otherwise good presentation.
Thank you and and thats fair. Unfortunately, I write like I talk. LOL I will try to do better.
Thank you for a great review Ms Charlotte, used the shake method last year, going to try the gentle insert-package-into-the-hive method this year for practice. Love the idea of moving capped brood and nursery bees over from a strong hive to new package hive. (Really hoping Queenie is not making the trip).
I enjoy your weekly emails and videos plus I use your diary for beekeeping notes, this will be year two for us with both Flow Hives and Apimaye’s,
Lastly, I also used your suggestion to add a little salt to my bee watering stations and honeybees love it! Way better than a neighbor’s pool, they whispered it to me, really! : -)
Sincerely grateful for your bee updates,
Jim
Hives For Hero’s
Pee Dee Beekeepers
Thank you and best wishes for sweet season!